Versatile DIY Paper Basket For Gifts & More

Use reversible Wrappily to make these inexpensive, yet exceedingly cute paper basket table centerpieces for a summer outdoor party or picnic. After, they can be given away as parting favors—who wouldn't want to go home one of these sweet mini succulent gardens?
- - -
A-tisket, a-tasket, a green and yellow basket...
 In her latest installment for Wrappily, Shiho Masuda of Paper Guru teaches us how to whip up this clever little basket using a sheet of our reversible paper. In addition to a lovely gift-giving vessel for flowers or odd-shaped items, we can think of so many ways to put these little baskets to use: snack bowls, party favors, table centerpieces. Oh, the possibilities...!
Versatile Paper Basket For Flowers, Gifts & So Much More
Thanks to some clever folding in the beginning, the basket makes the most of Wrappily's reversible patterns by showing a different one on each side. The dimensions used in the video tutorial yield a 5x10" inch basket. We whipped one up and promptly used it to gussy-up a bundle of Wrappily goods prepped for charity auction donation. The presentation was much improved!
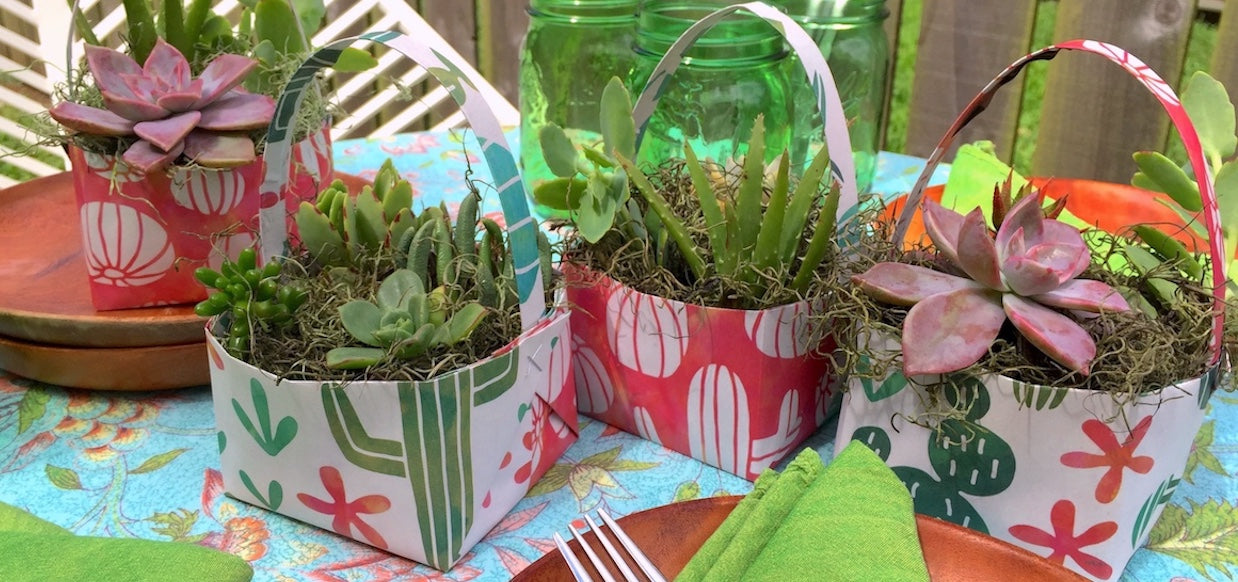
Using Shiho's same folding principles, we began playing with different dimensions to yield different sized baskets. Our third (possibly fourth) try resulted in this smaller 3.5" square basket. Suddenly, an idea struck: mini-succulent garden table centerpieces! This. Was. Happening.

These sweet succulent baskets are guaranteed to brighten up the scene at your next summer soirée. Use them for decor down the center of a dining or picnic table, scattered along a buffet line, or at potluck serving table. After the party, send them home with guests as parting gifts. I mean, who wouldn't want to keep one of these sweet succulent gardens?
And the best part: they're inexpensive and so easy to make. Choose a Wrappily pattern to match your party theme/decor, one sheet makes four baskets (size as shown.) Splurge on cactus mix potting soil and a bag of Spanish moss (optional, but it does result in a more polished look), then raid your succulent plants (or a willing friend's) for new-growth clippings. All told, they'll come out to no more than a couple of bucks each. Sweet!

After the party, the Wrappily baskets will hold up after watering for two weeks or so—plenty of time to get repotted in their new homes. Wrappily is also fully compostable, so let your guests know they can literally plant the whole thing, basket and all! (We can never resist a chance to brag about that!)
**NOTE: To keep the paper looking crisp and fresh, do not water before you plan to display them.**
To achieve this 3.5" square basket, use Paper Guru's DIY Flower Basket video tutorial as a guideline, but with the following adjustments to the cut/ fold dimensions: cut paper to a starting size of 8.5" x 17"; measure a 2.5" square at each corner to form the rise; cut handle width at a half inch.
Helpful hints:
Reinforcement
To help hold the shape and prevent buckling, reinforce the bottom of the basket with a piece of chip board cut to size (an empty cereal or cracker box works fantastic.) Depending on the weight of your contents, this may not be necessary. If extra reinforcement is needed, run the handle completely around the basket, including across the bottom, and secure at one side.
 Get a grip
Play with the width and length of the handle according to personal preference and specifications of your project. Visually we wanted the succulent gardens to steal the show, so we used a slim half inch handle. We also went with a taller handle to allow for height in our arrangements. With a rectangular basket, you have the option to run the handle across either the length or width of the basket.
Finishing touches
Depending on how the basket will be displayed, consider completely wrapping the handle with your decorative paper as we did. For a bit more fanciness, adorn your baskets by adding a bow or decorating the handle.
Paper Guru tutorial: watch, learn, and get crafting!
Materials needed:- Wrappily paper
- scissors
- stapler
- paper or binder clips
- doubled-sided tape or glue stick
- ruler
- cutting mat (optional)
- chipboard/ card stock (optional)
- ribbon for adornment (optional)
What do you think of this project? We'd love to hear your thoughts and see your results. Please share in the comments section below.
Happy Crafting!
BECOME A GIFT WRAP GURU:
From gift wrap basics to professional-level detail, Paper Guru Gift Wrapping Courses offer training at every level. Masterfully choreographed, the lessons build on skills, introducing greater and more creative techniques and artistry as you learn along with Shiho's gentle step-by-step processes. Paper Guru courses are perfect for anyone interested in building their own gift wrap business or simply seeking the personal satisfaction of elevating their gifting with family and friends.
ABOUT WRAPPILY:
Eco-friendly and adorably chic, Wrappily uses neighborhood newspaper presses to print great patterns on 100% recyclable and compostable newsprint—an answer to the millions of tons of trash attributed to wrapping paper every year. This smart, new take on wrapping paper is an idea who's time has come. Our founder set out on her mission to green-up giving in 2013, a journey filled with marvelously talented people who are creating amazing patterns for our wrapping paper. After all, we believe in beautifully wrapped gifts, but not at the expense of the environment.
Leave a comment
Comments will be approved before showing up.