Christmas Character Paper Hats

Holiday Kids Craft - Christmas Characters Paper Hats
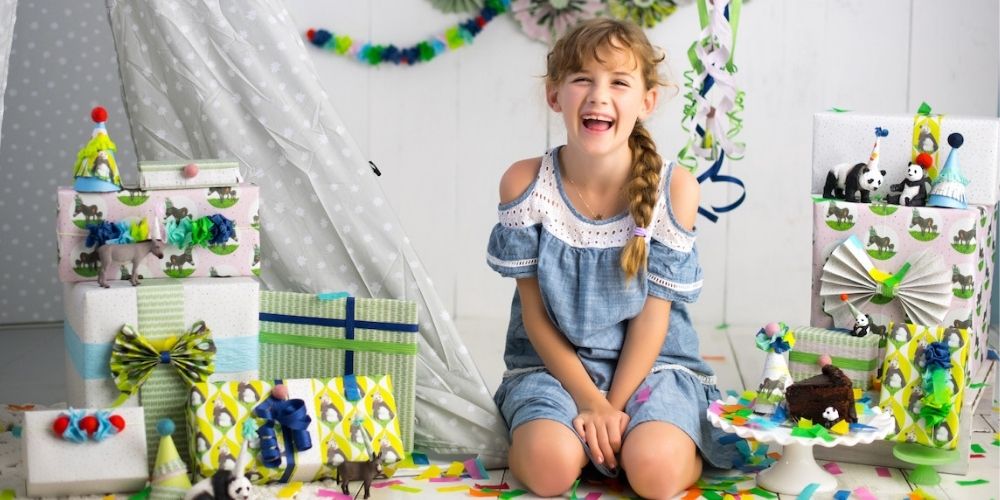
With kids off school for winter break, this fun holiday craft will come in handy: gather some friends for a hat making party! With a few supplies and the tutorials below, the kids will have a blast creating their own character hat—elves, reindeer, or more likely, something with a lot of creative license. The result is quite a cast of characters! These hats are so cute and festive, a little neighborhood caroling may be in order.
We tested this at a local school. Our group ranged in age from 3 to 6 years old. They were all very helpful and excited to be involved in the process. Needless to say, being able to assemble their own custom creation was a big hit. (And we love that these hats can easily be recycled when they've been been worn to shreds and it's time to say goodbye.)

Holiday Kids Craft - Christmas Characters Paper Hats. It started with a reindeer and elf and got pretty creative from there.
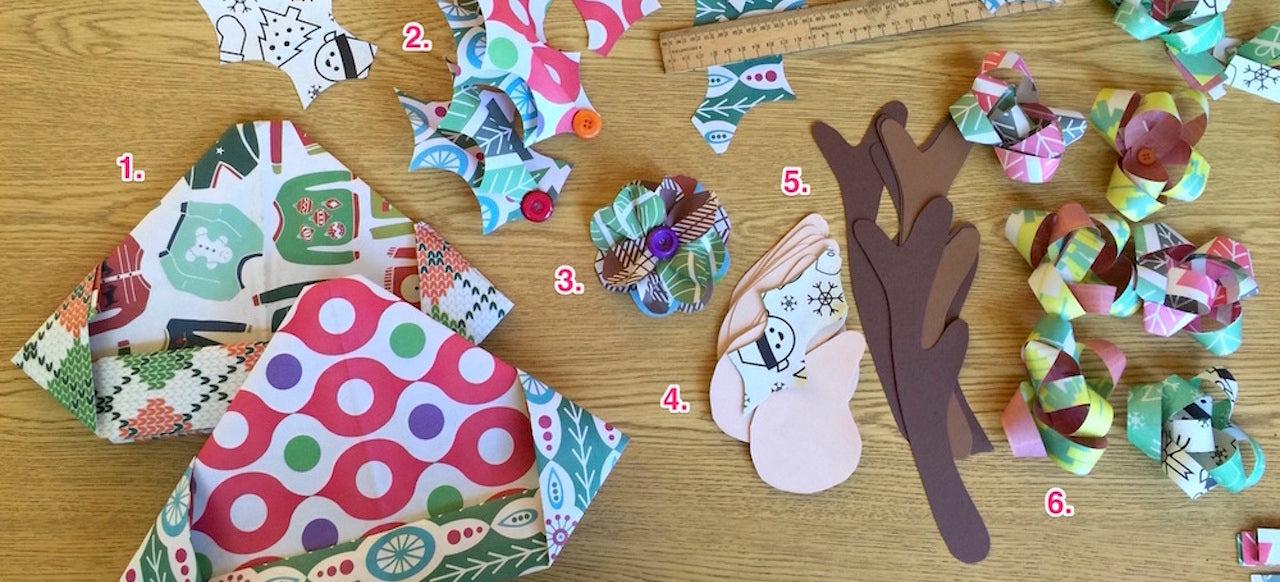
Holiday Paper Hat Making Set-up
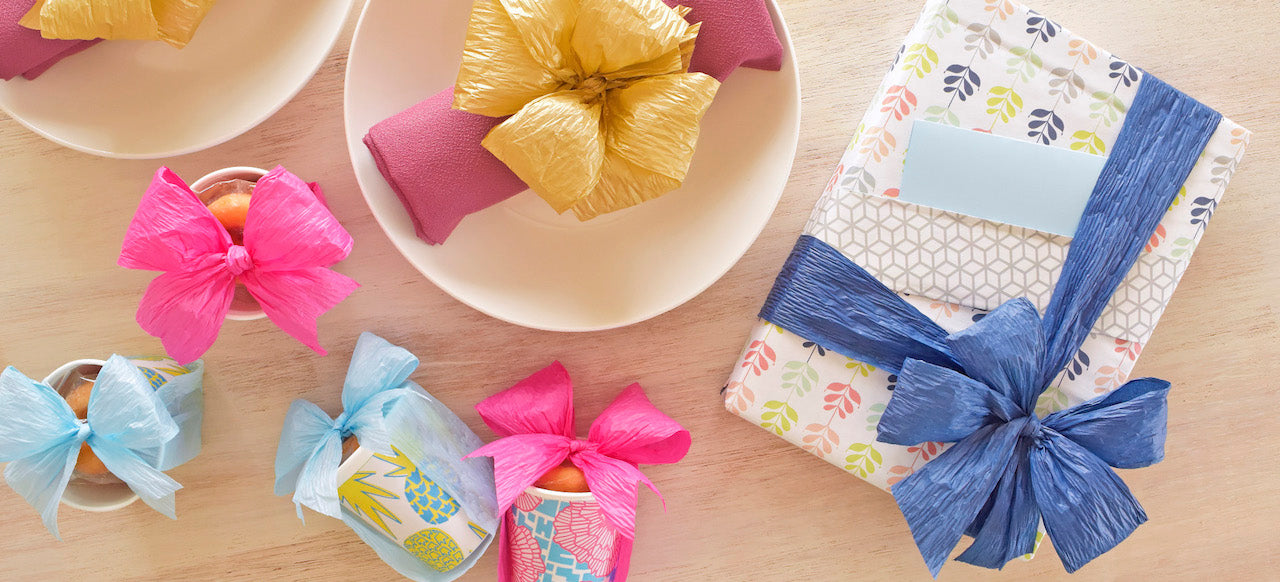
Below is what we supplied, but use this list as a guideline. Feel free to simplify or add in your own ideas. Use what you have on hand, and try to reuse/ repurpose scrap materials to keep it eco-friendly. We like to craft "fancy" adornments out of scrap pieces of paper, like the holly, flowers, and bows you see below. Depending on the age of your kids, you can involve them in prepping the adornments and folding the hats, or do it ahead of time.

- Paper hats folded using tutorial below
- Paper holly adornments with buttons or pom-poms for berries
- Paper flower adornments
- Elf ears cut out of colored construction paper (download stencil here)
- Reindeer antlers cut out of colored construction paper (download stencil here)
- Paper bows
- Yarn or ribbon ties
- Tools needed: scissors, stapler, hole punch, and double-stick tape (glue dots or a glue stick work, too)
Once the kids are done decorating their hats, use the hole punch to weave yarn or ribbon ties to either side of the hat. Tie under the child's chin, and off they go!
You've seen some of our cast of characters, can't wait to see yours. If you give this idea a go, share your craftiness by tagging @wrappily in your social media photos.
Happy Crafting! And Happy Holidays!
How To Fold A Wrappily Paper Hat
1. Cut your Wrappily sheet in half as shown. You'll get two hats out of one full sheet.

2. Start with your paper laid out horizontally.

3. Using the paper's natural crease as a midline, fold each edge in diagonally, ensuring they are even on both sides.

4. Fold bottom up to make brim. Flip over and repeat on the back. See why our reversible prints work well here?

5. Fold up bottom to create an ear flap. Flip over and repeat on the opposite side.

6. Fold over top edge of brim to create a neat edge. Flip over and repeat on the back.

7. Open hat again, bringing it back to its original front and back.

8. Open and flip hat on its side to fold along front crease (shape will switch from a triangle to a diamond.)

And there you have it! A sweet little hat ready to be decorated.

Featured Products


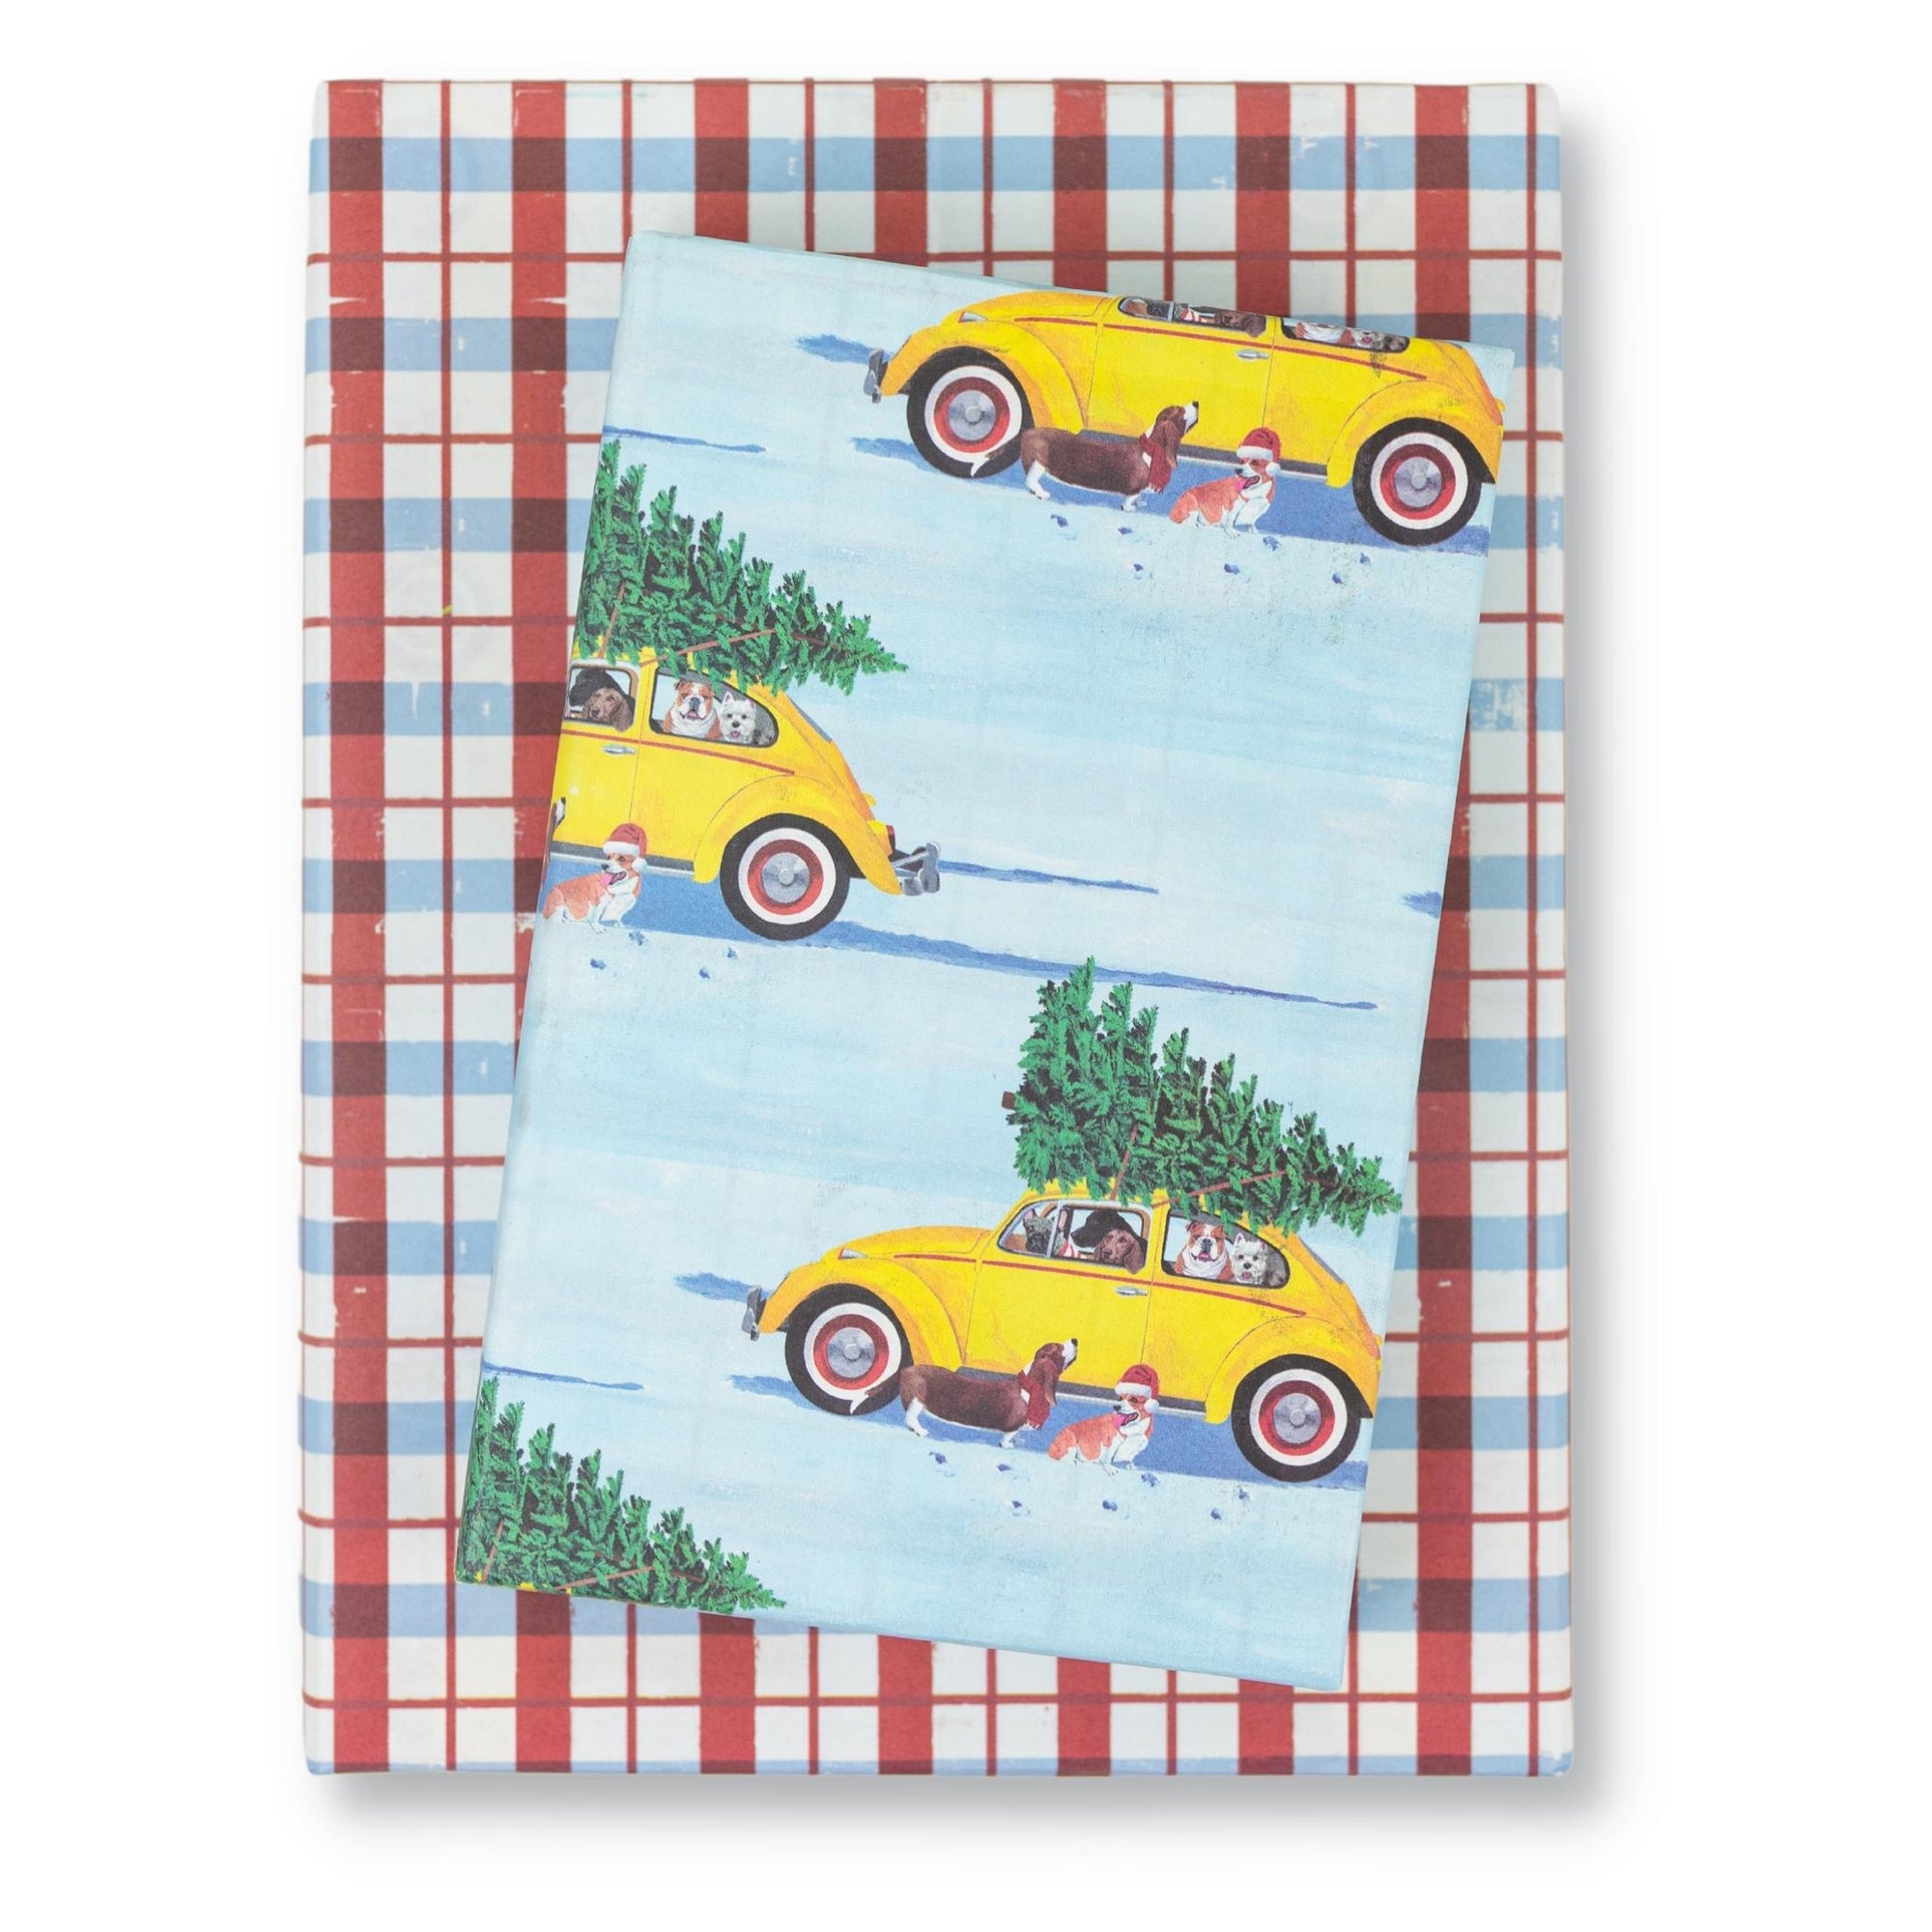


Christmas VW Snow Dogs/ Portland Plaid -Double-sided Eco Wrapping Paper for Holidays
$10.80
Wrap beautiful gifts this winter holiday season with this eco-friendly, double-sided wrapping paper of your dreams. Punch Buggy yellow! Presenting a cheerful holiday scene featuring friendly dogs out getting a Christmas tree in an iconic yellow VW Beetle, a new Wrappily exclusive by illustrator Scott Church for Allport Editions.
Celebrate sustainably with our recycled and recyclable wrapping paper. Reversible patterns make holiday gift wrapping fun! Double-sided patterns works great for crafting, too.
Package includes three double-sided wrapping paper sheets + adhesive gift tags
• Sheet size 21.5" x 34"
• Premium newsprint + soy-based inks = eco-friendly wrapping paper
• Plastic-free PLA packaging
• Flat, folded sheet for easy storage
• No unnecessary cardboard tube
• 100% recyclable and compostable
• Milled, printed and packaged in Washington State
JOIN the mission to green-up gifting!
#wrapriprecycle #wraphappy #gifthappily


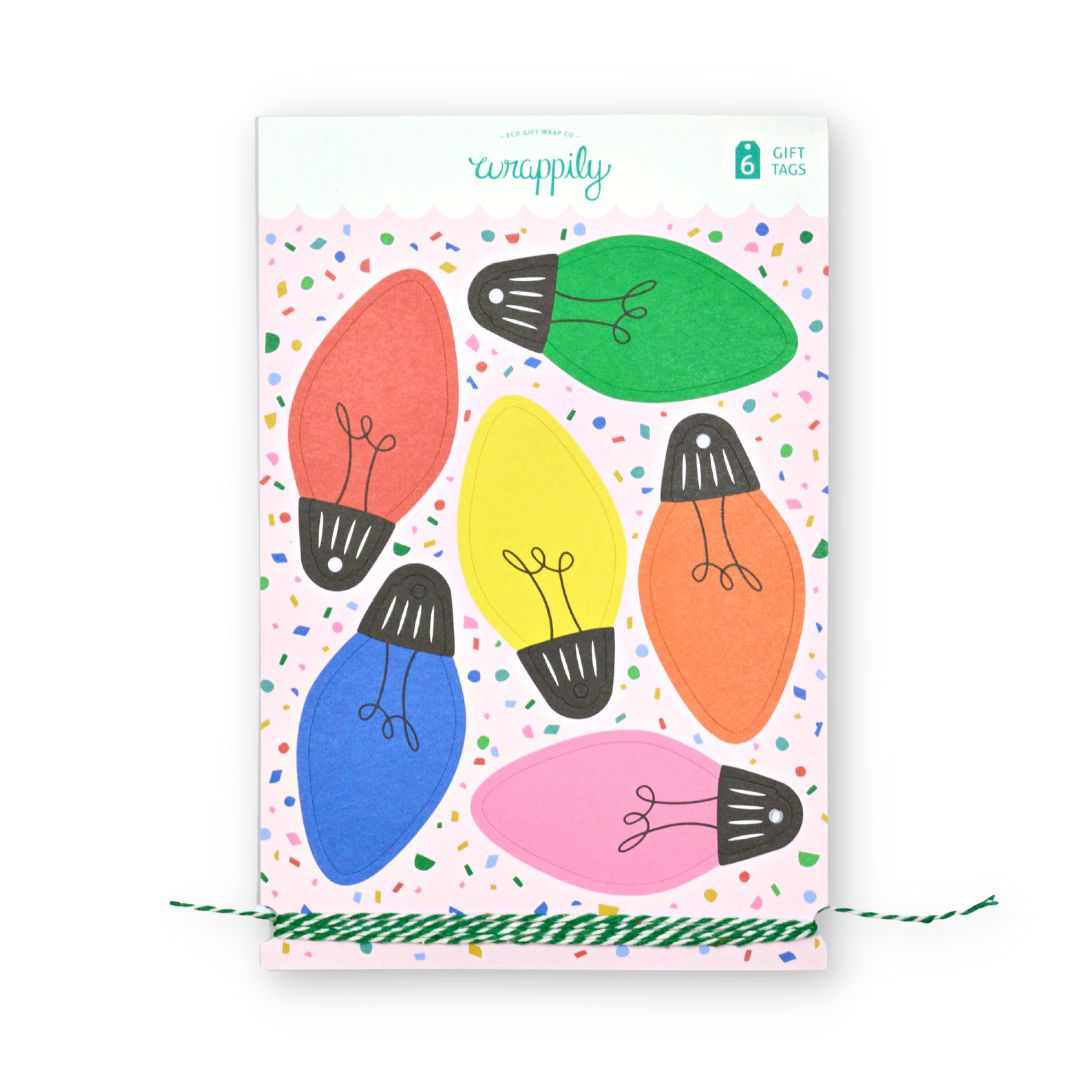
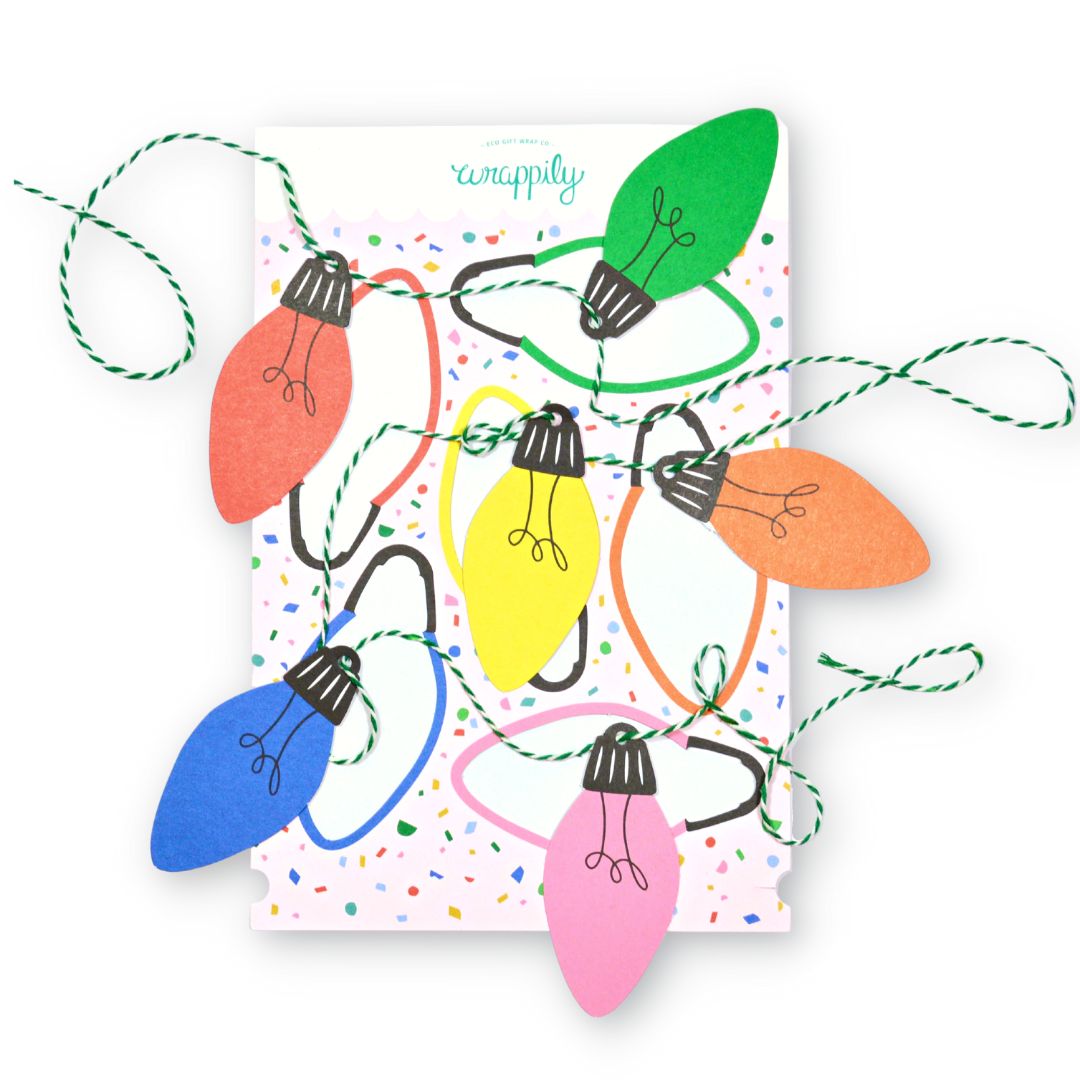


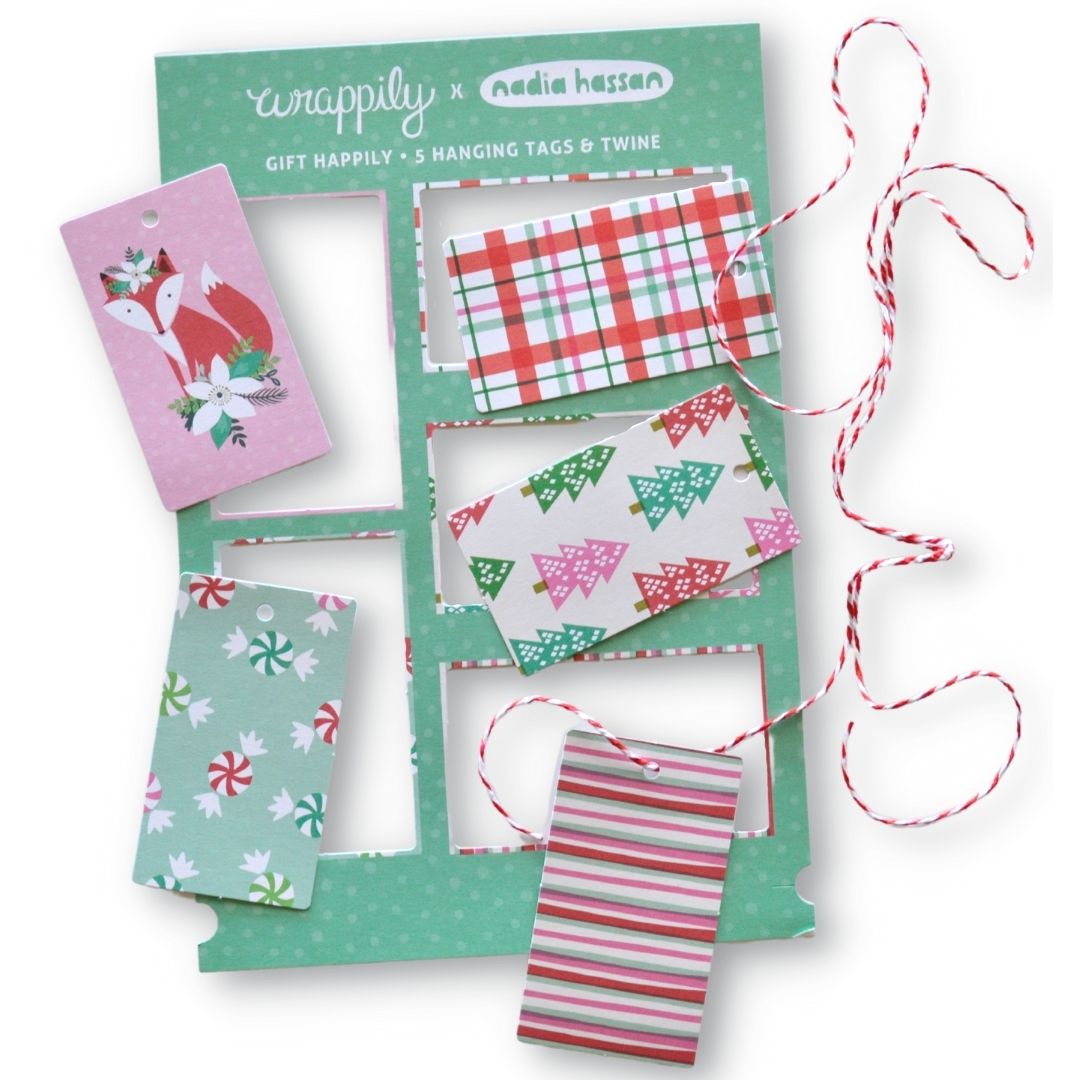
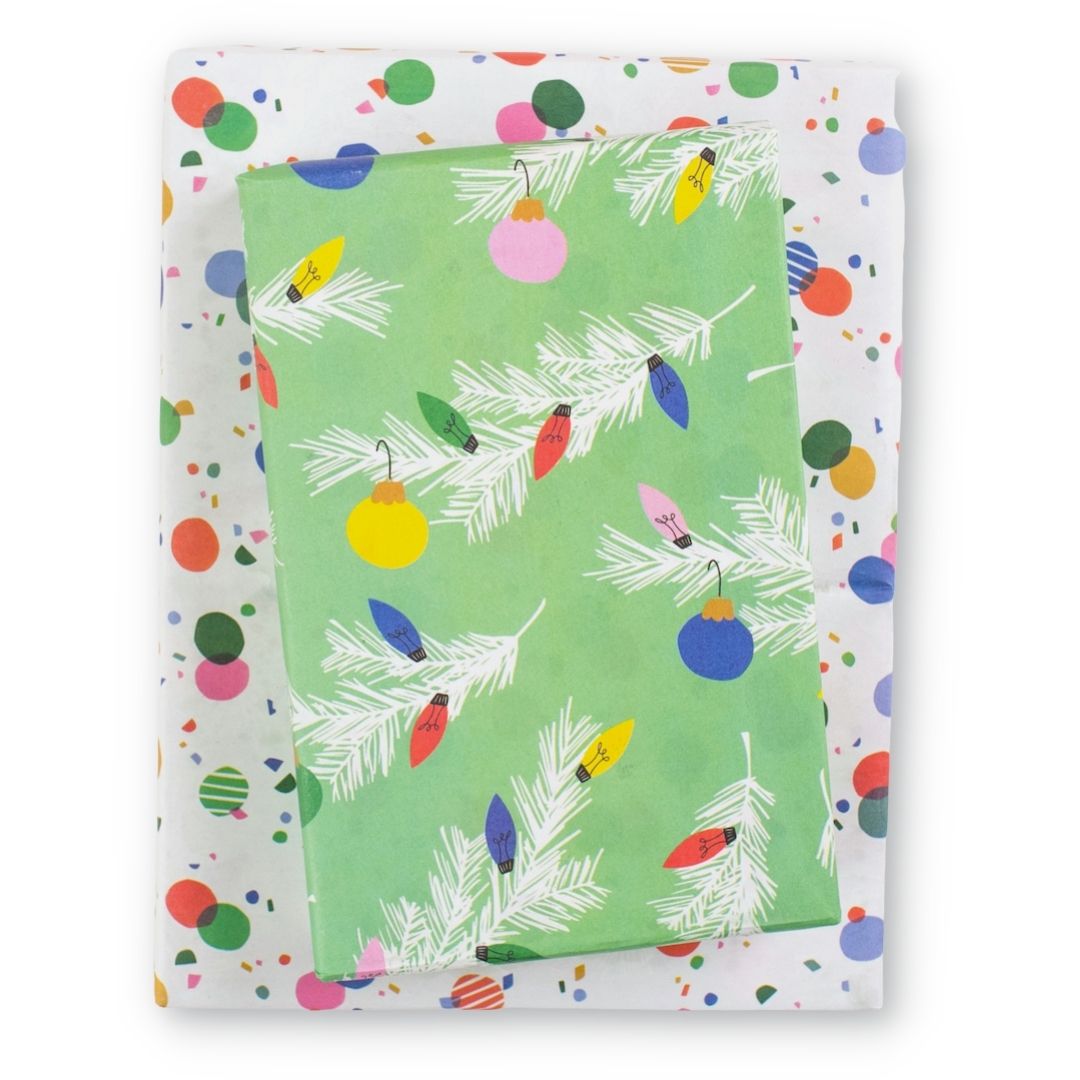
Christmas Lights Pop-Out Gift Tags & Twine, set of 6
$8.00
Add a festive touch to special gifts with these double-sided hanging gift tags in the shape of vintage Christmas light bulbs. Printed with the highest standard of sustainability, these gift tags are cute and credentialed: FSC-certified 100% recycled paper, plant-based inks, and carbon-offset printed.
Set of six pop-out tags with coordinating natural fiber twine.


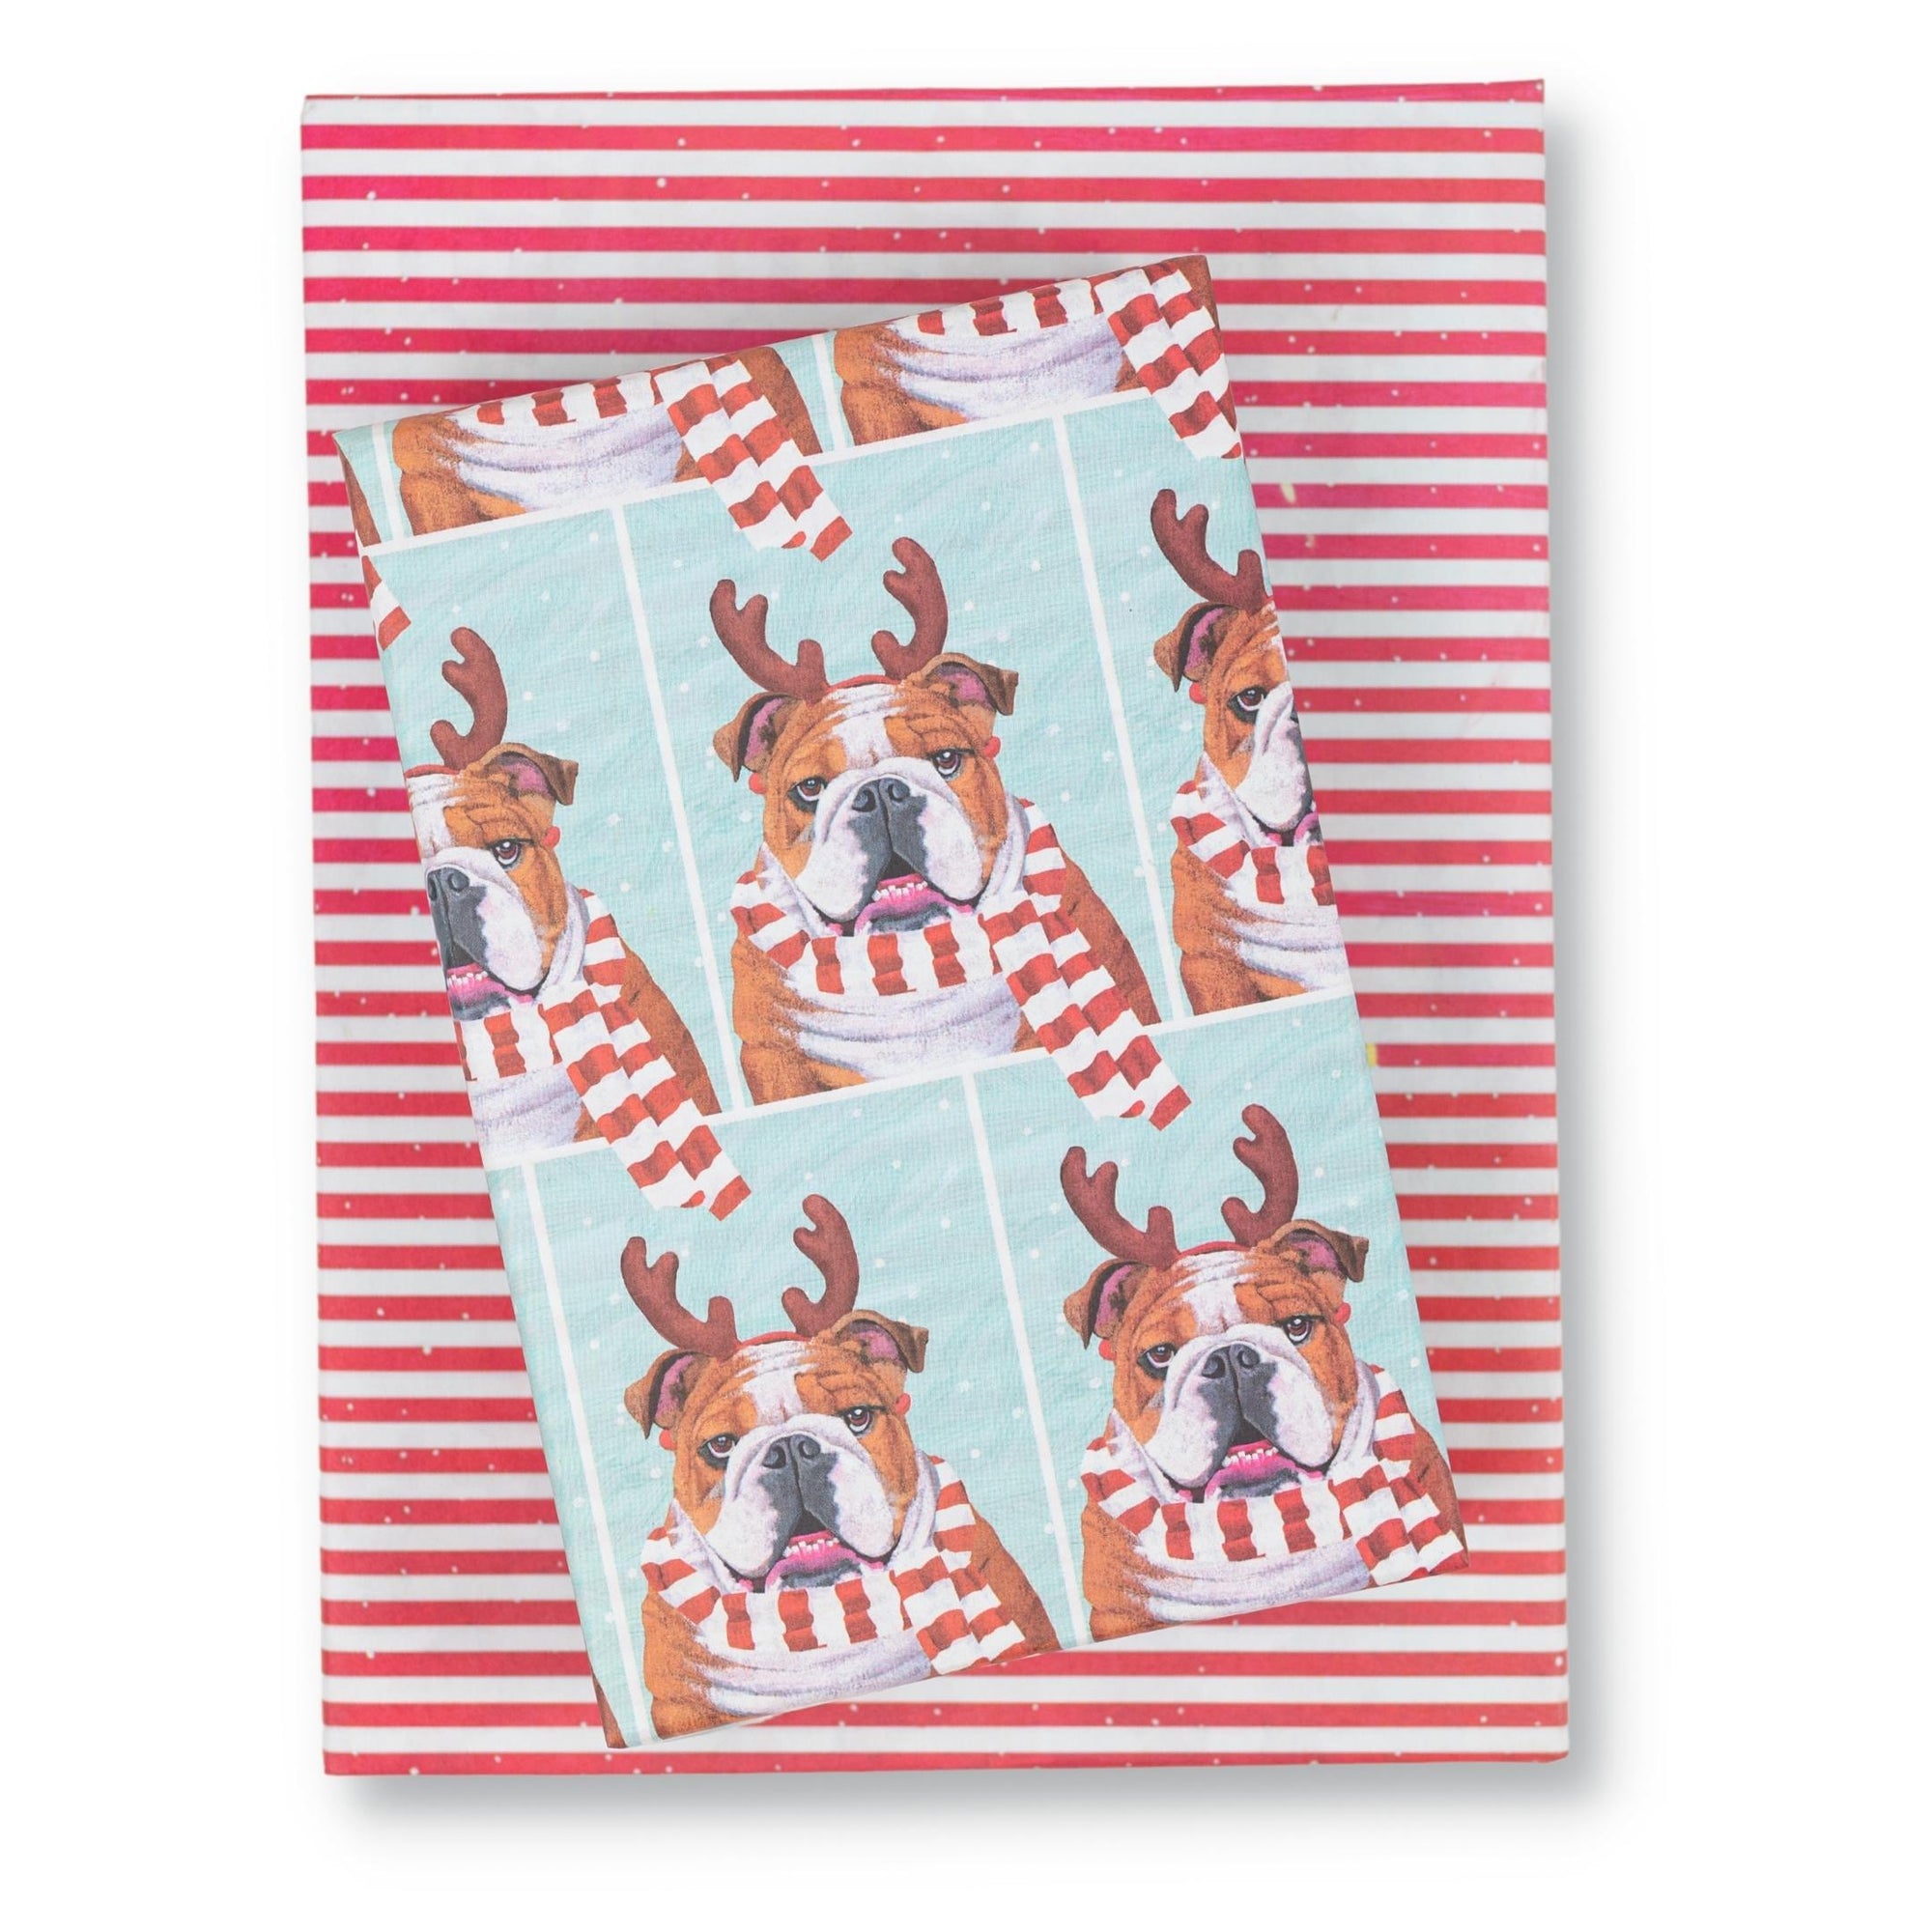
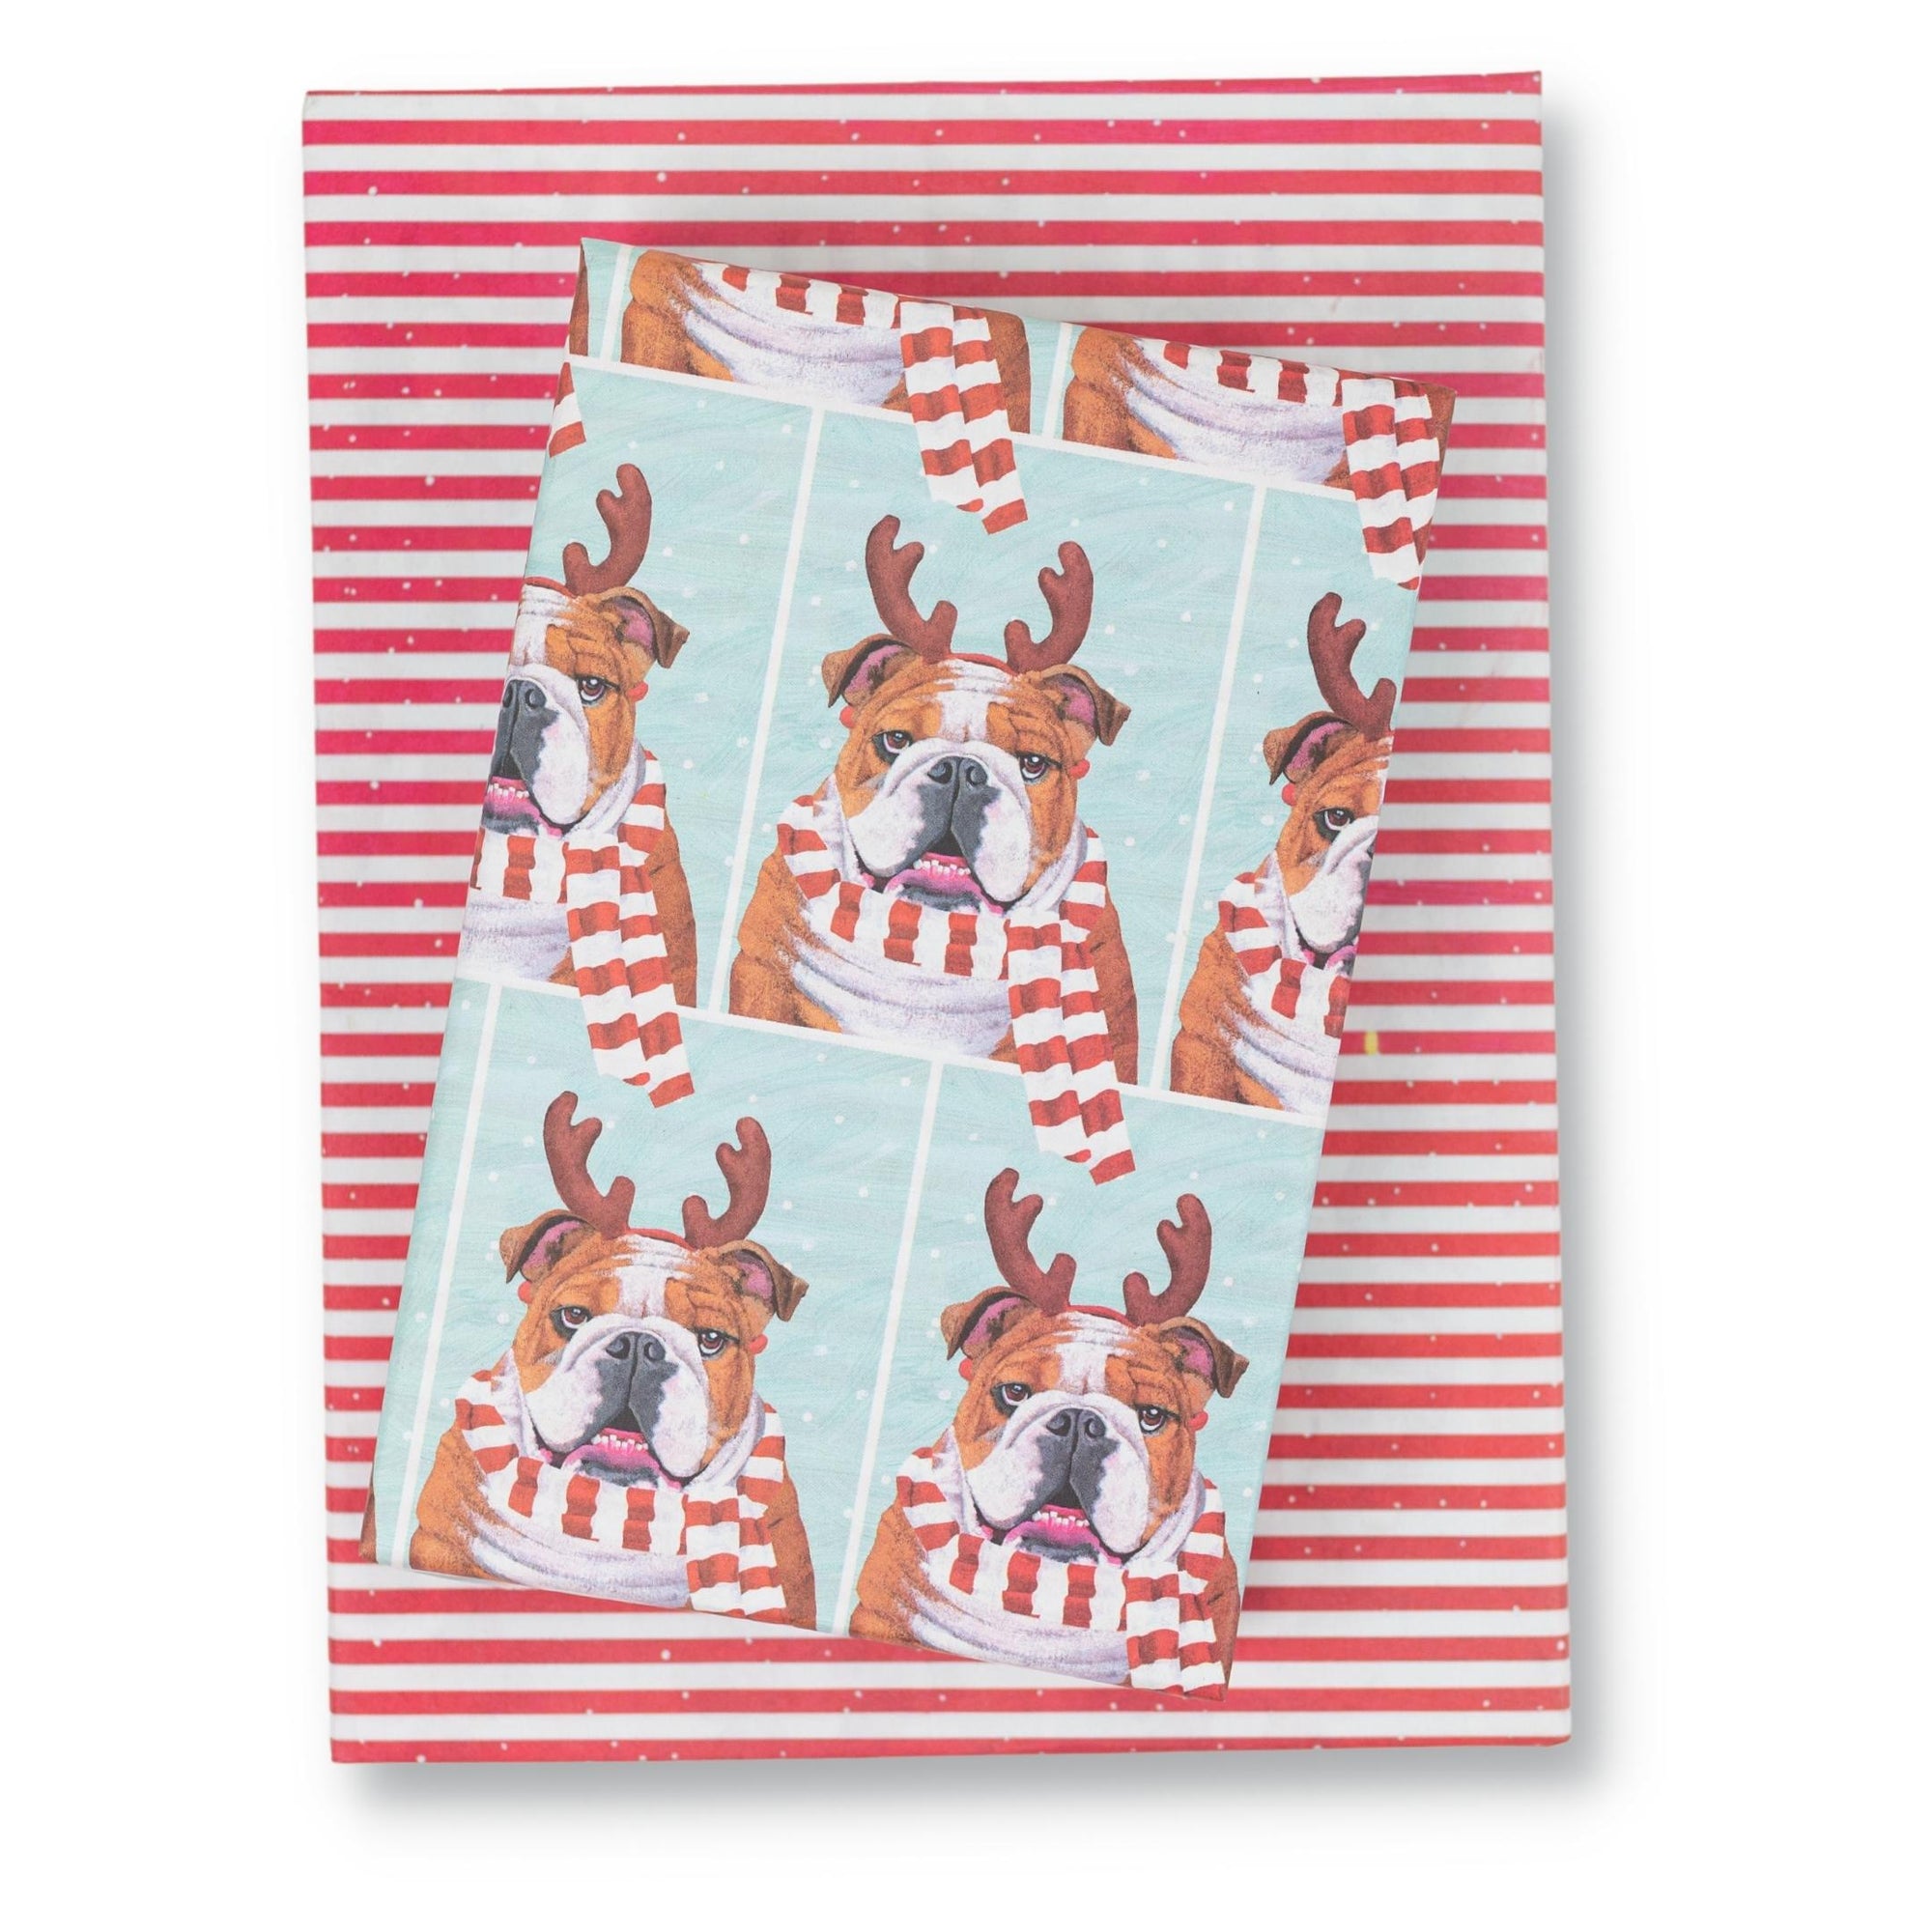


Bulldog in Antlers/ Red Stripe Double-sided Eco Wrapping Paper for Holiday Gifting
$10.80
Wrap beautiful gifts this winter holiday season with eco-friendly, double-sided Wrappily wrapping paper. Dog lovers will love this handsome holiday bulldog festooned for seasonal festivities in his striped red scarf and antlers, a new Wrappily exclusive by illustrator Scott Church for Allport Editions.
Celebrate sustainably with our recycled and recyclable wrapping paper. Reversible patterns make holiday gift wrapping fun! Paper works great for crafting, too.
Package includes three double-sided wrapping paper sheets + adhesive gift tags
• Sheet size 21.5" x 34"
• Premium newsprint + soy-based inks = eco-friendly wrapping paper
• Plastic-free PLA packaging
• Flat, folded sheet for easy storage
• No unnecessary cardboard tube
• 100% recyclable and compostable
• Milled, printed and packaged in Washington State
JOIN the mission to green-up gifting!
#wrapriprecycle #wraphappy #gifthappily


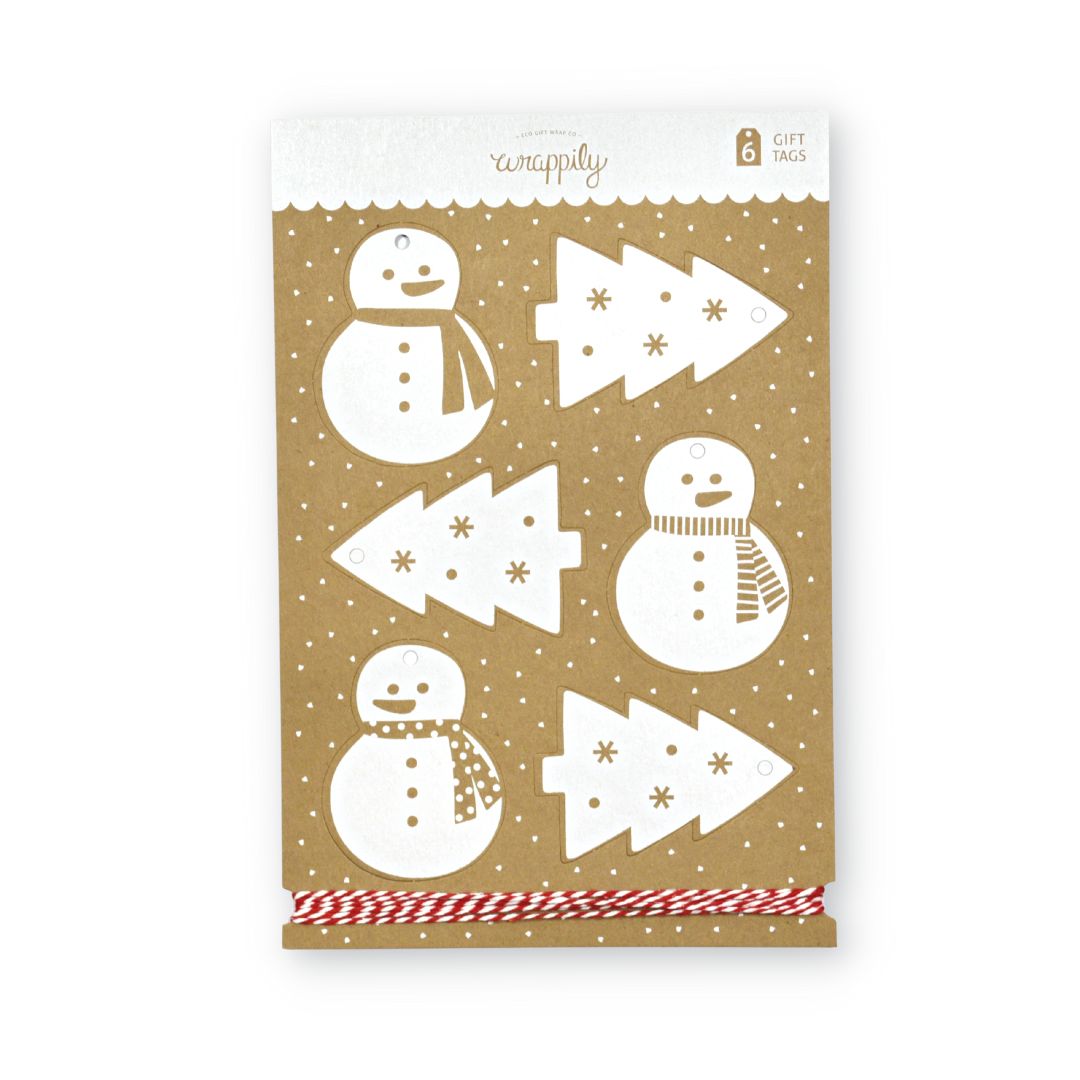
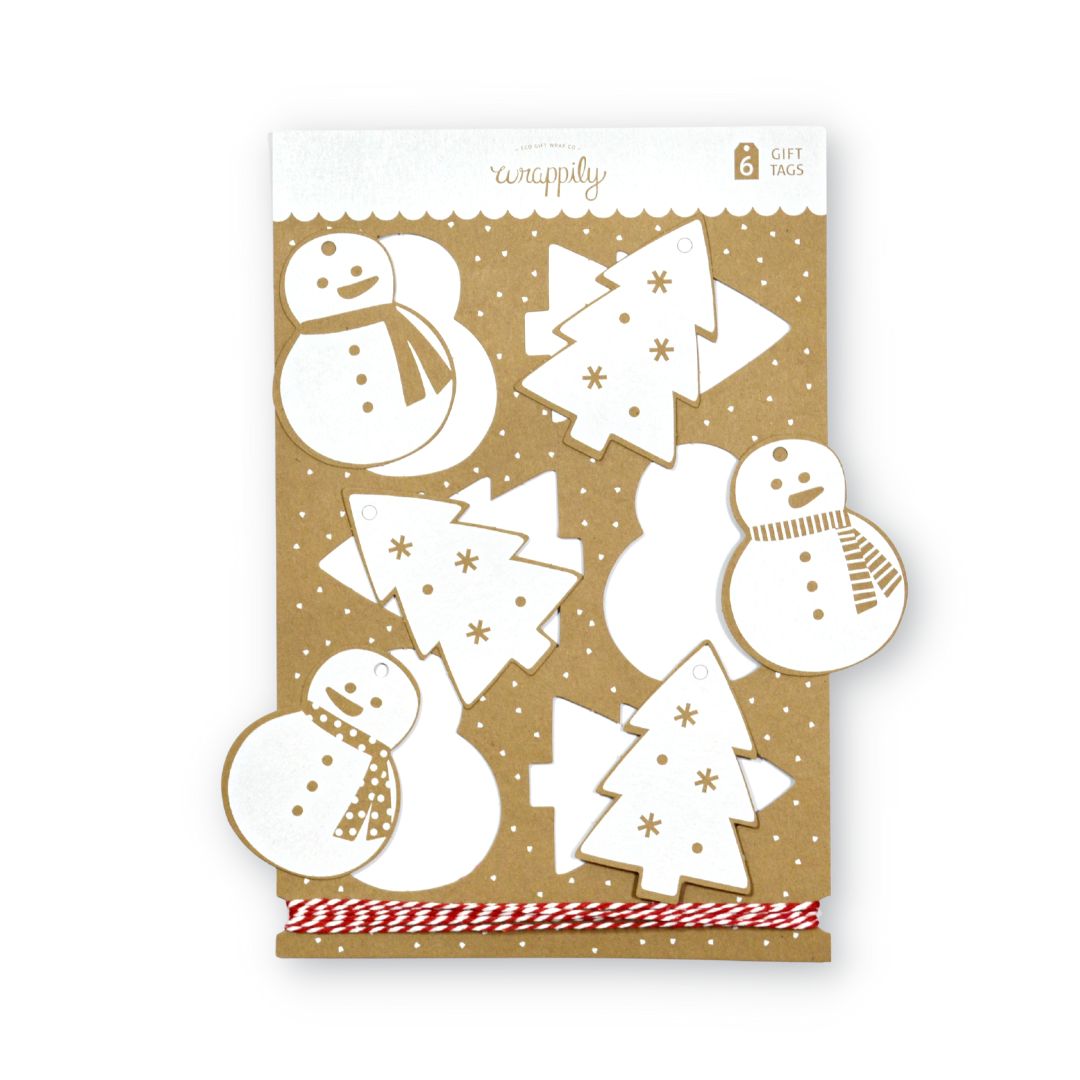


Snow Scenes Pop-Out Kraft Gift Tags & Twine
$8.00
Add an elegant touch to special holiday gifts with these double-sided hanging gift tags in the shapes of snowmen and pine trees. Printed with the highest standard of sustainability, these tags are cute and credentialed. The thick recycled kraft paper is FSC-certified and carbon-offset printed. Set of six pop-out tags with natural fiber twine.


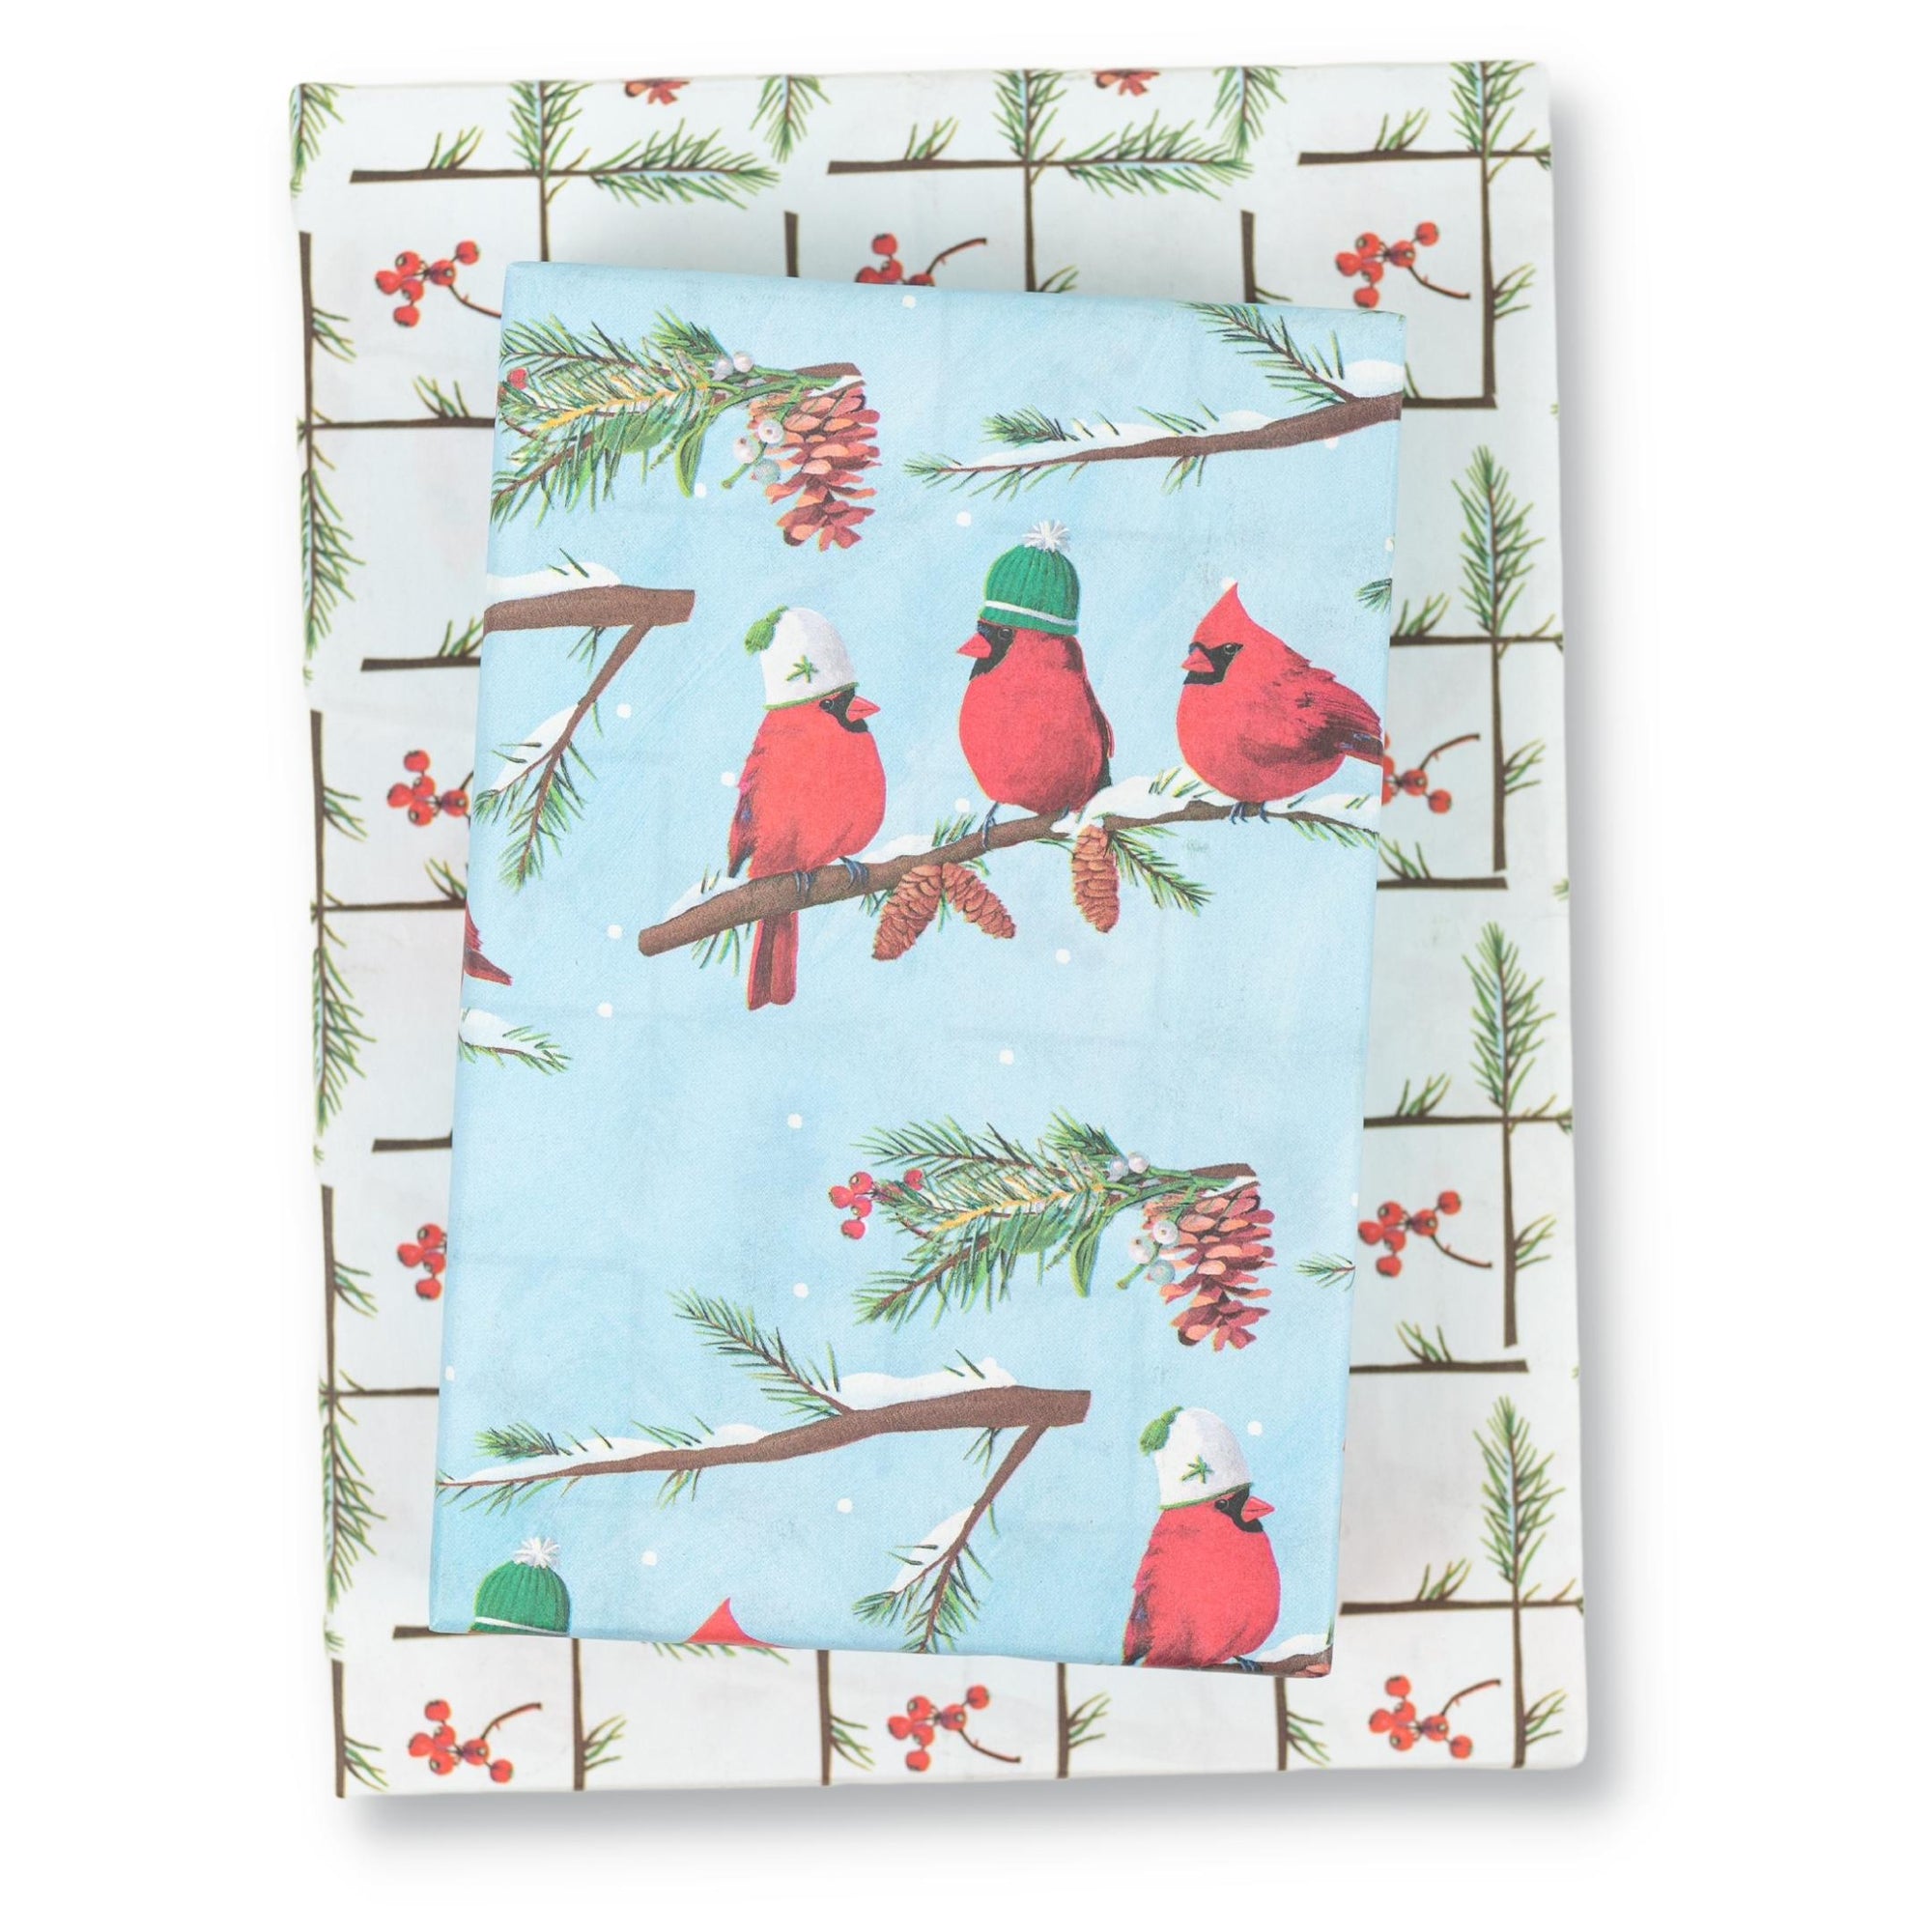


Winter Cardinals Double-sided Eco Wrapping Paper for Holiday
$10.80
Wrap beautiful gifts this holiday season with eco-friendly, double-sided Wrappily wrapping paper. Bird lovers will get a kick out of this humorous winter scene featuring a few cardinal fellows catching up on a pine branch, a new Wrappily exclusive by illustrator Scott Church for Allport Editions.
Celebrate sustainably with our recycled and recyclable wrapping paper. Reversible patterns make holiday gift wrapping fun! Paper works great for crafting, too.
Package includes three double-sided wrapping paper sheets + adhesive gift tags
• Sheet size 21.5" x 34"
• Premium newsprint + soy-based inks = eco-friendly wrapping paper
• Plastic-free PLA packaging
• Flat, folded sheet for easy storage
• No unnecessary cardboard tube
• 100% recyclable and compostable
• Milled, printed and packaged in Washington State
JOIN the mission to green-up gifting!
#wrapriprecycle #wraphappy #gifthappily


Festive Holiday Pop-Out Gift Tags
$7.49 $8.00
Printed with the highest standard of sustainability, these tags are cute and credentialed. The doubly thick 100% recycled paper is FSC-certified and carbon-offset printed. Set includes five pop-out tags with coordinating twine.


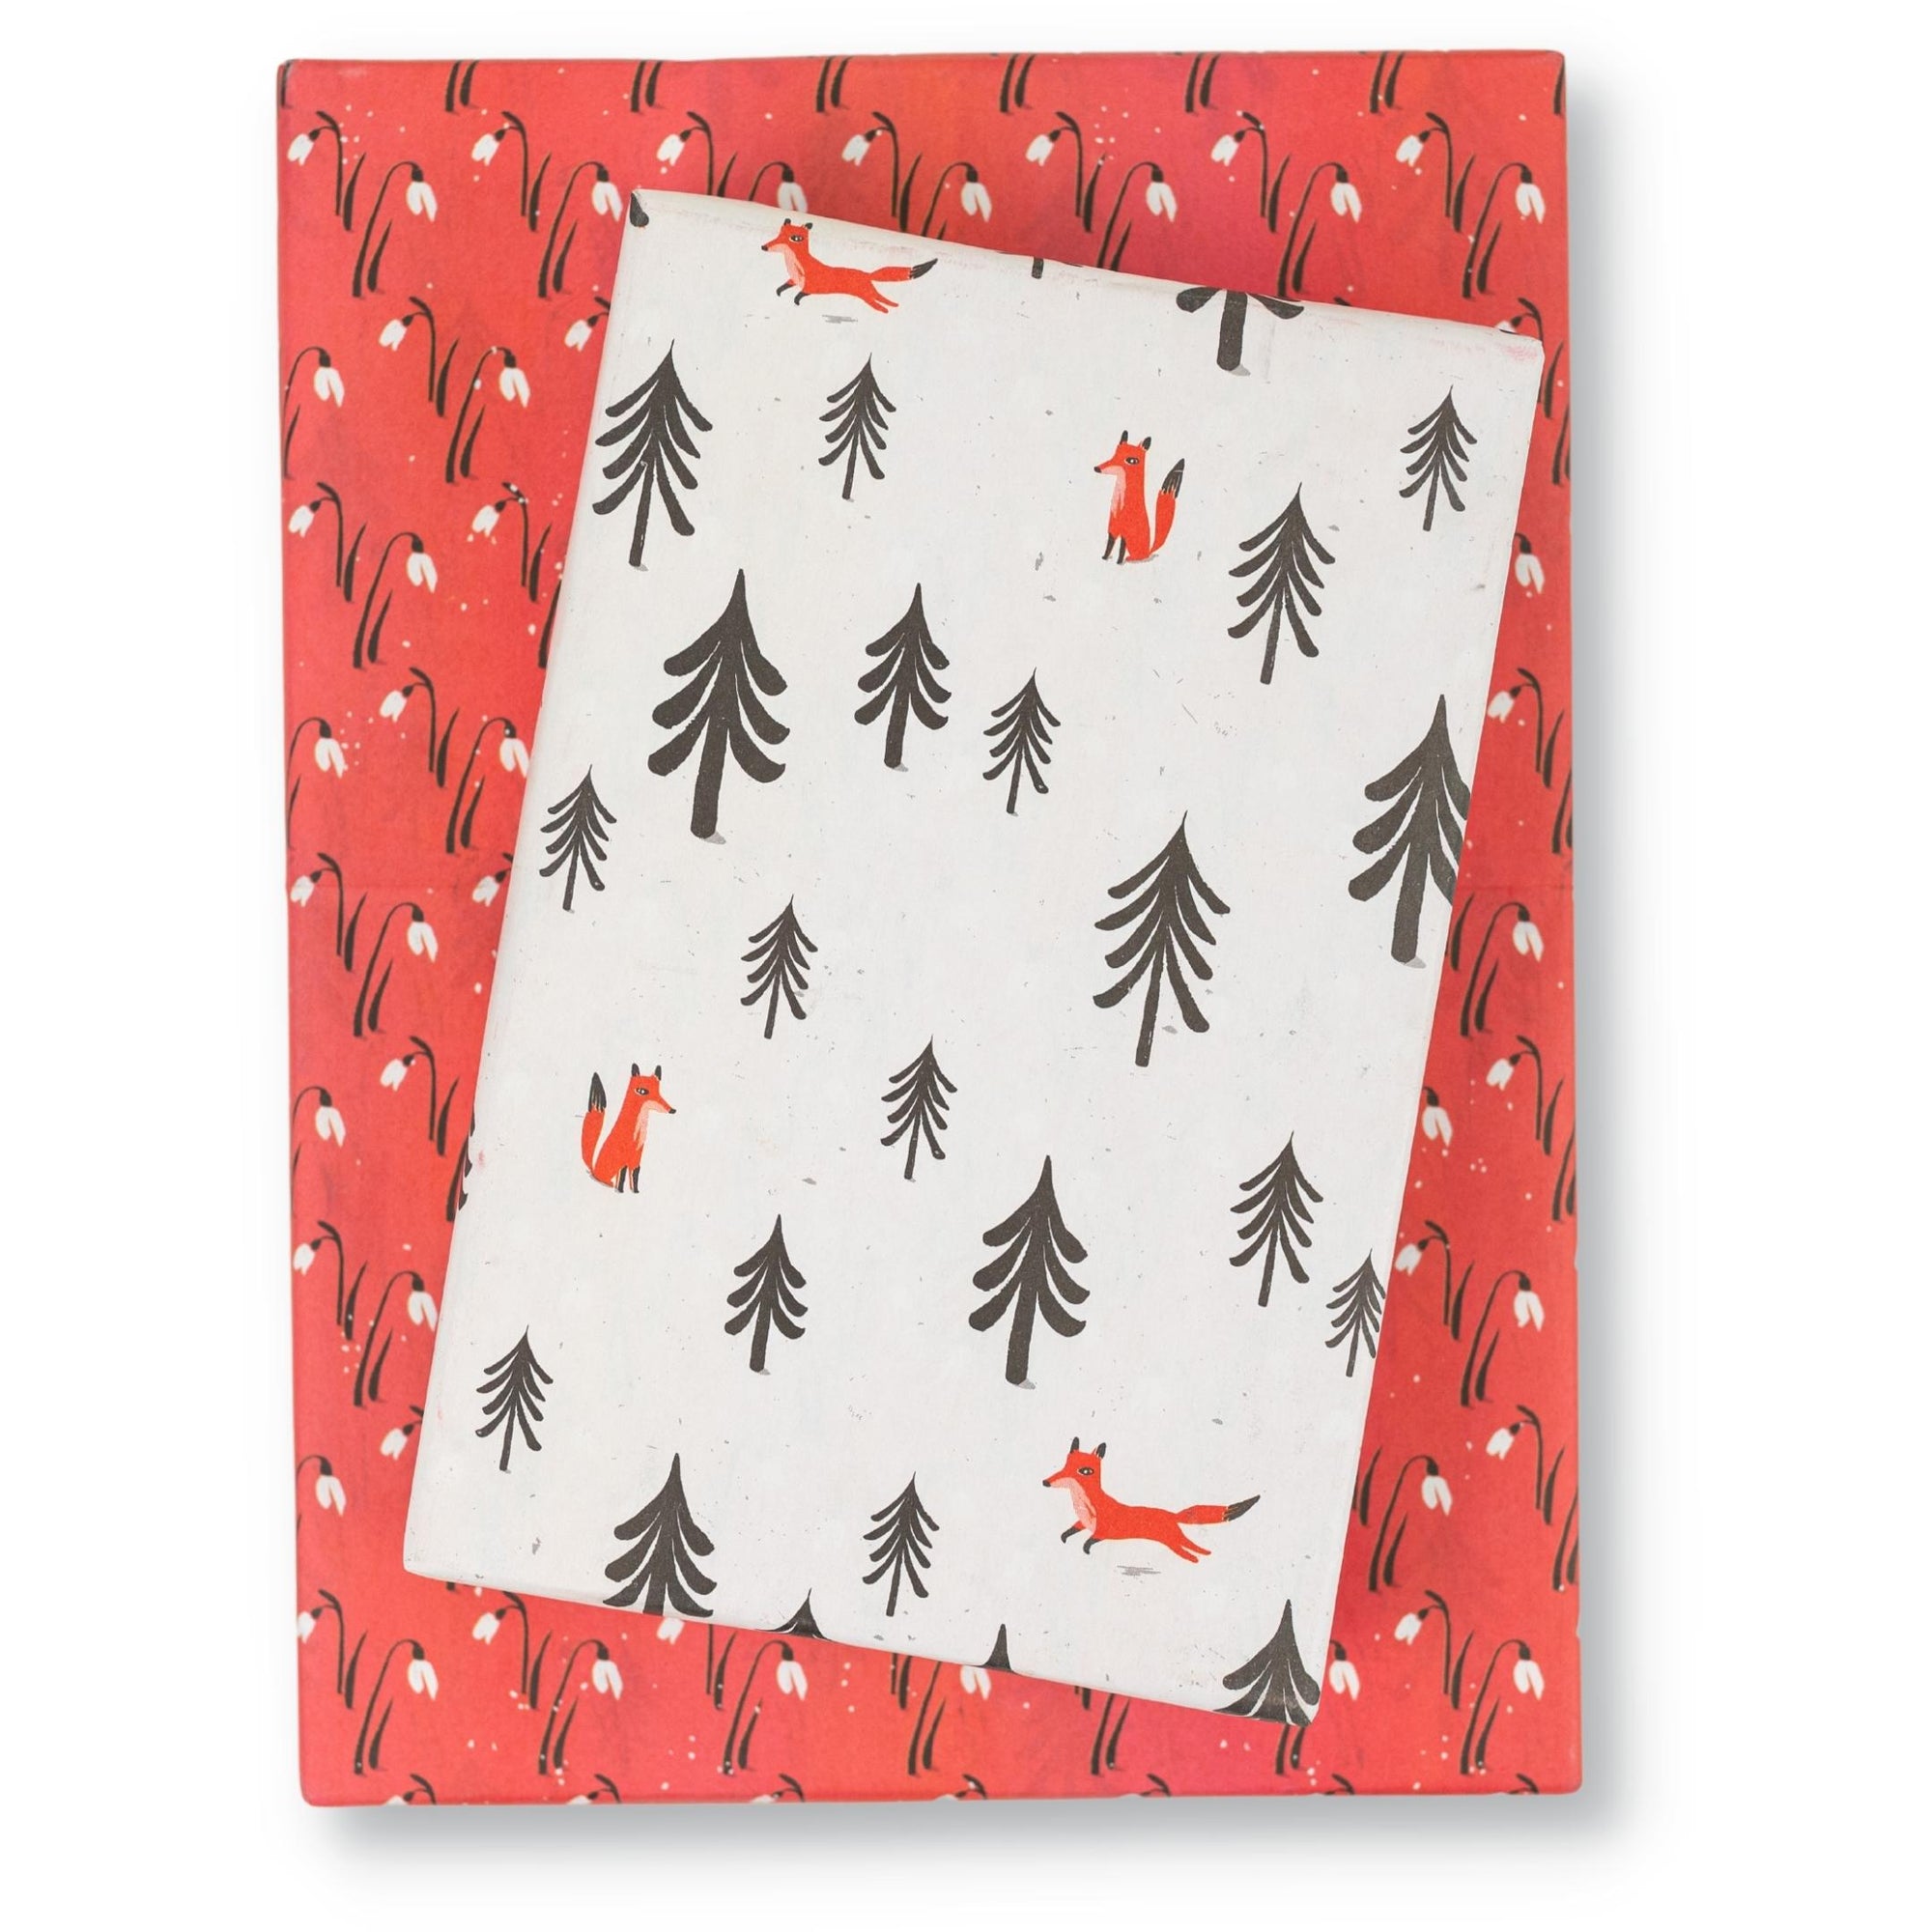
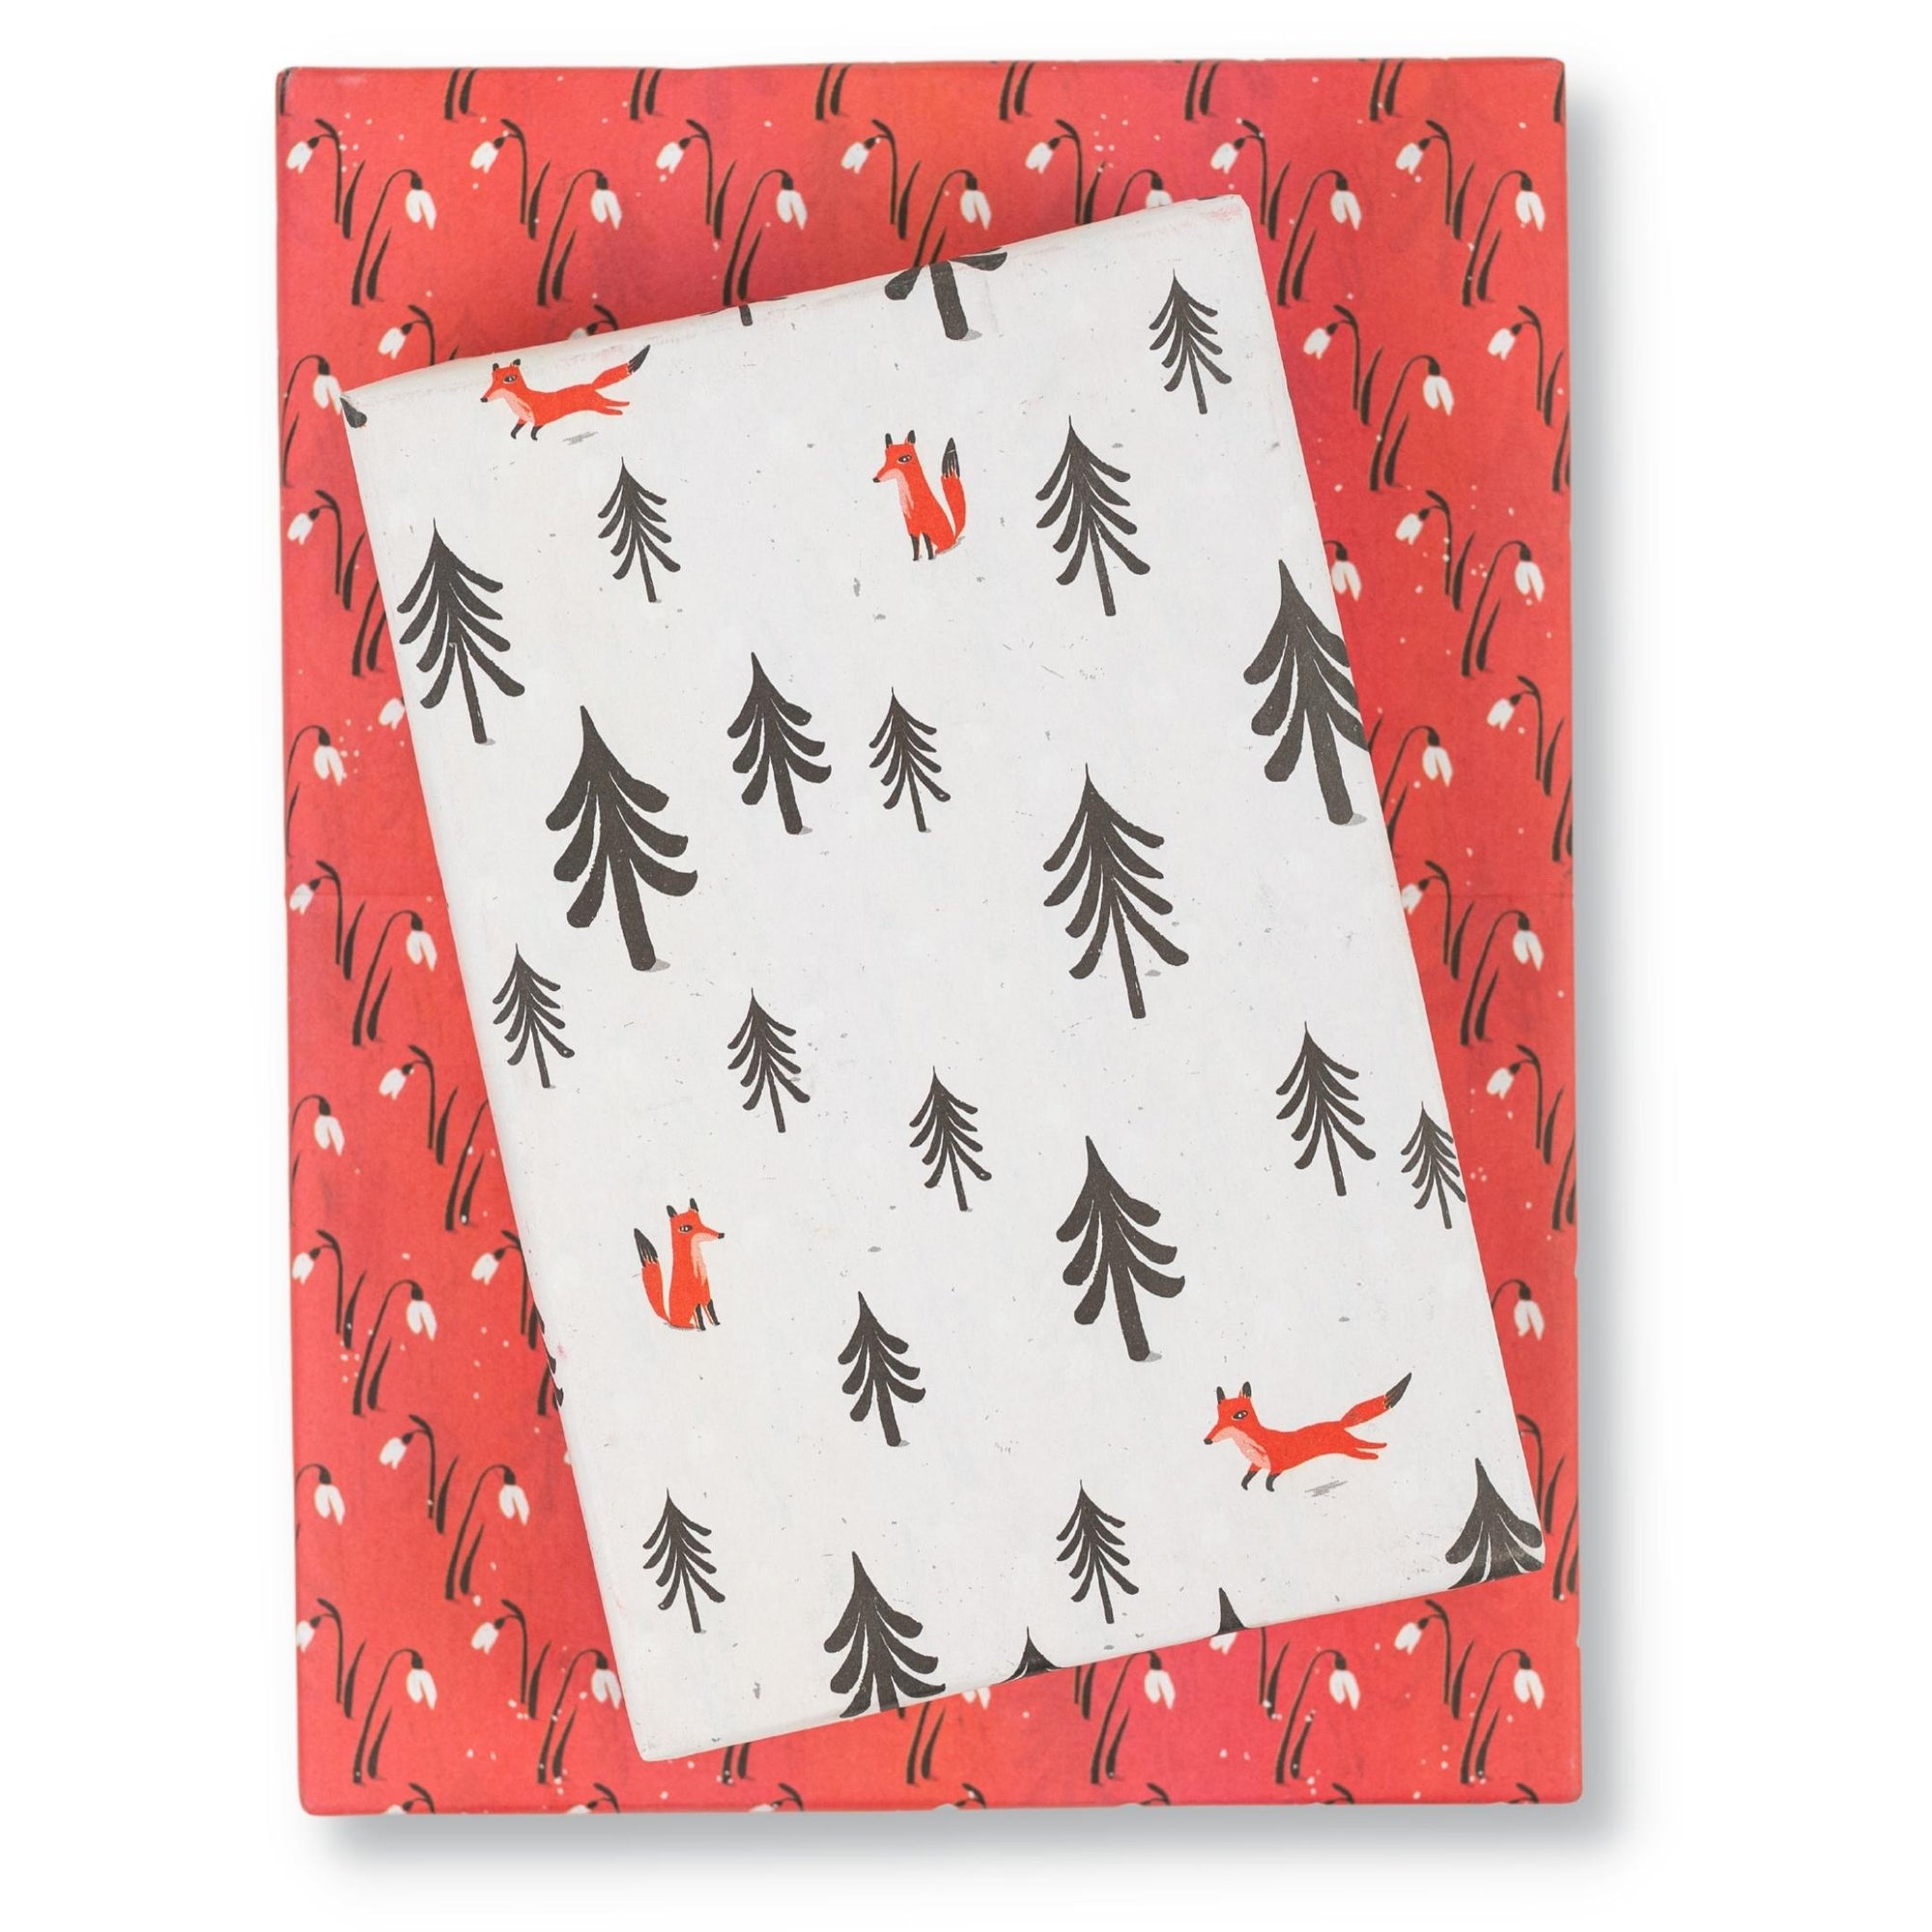


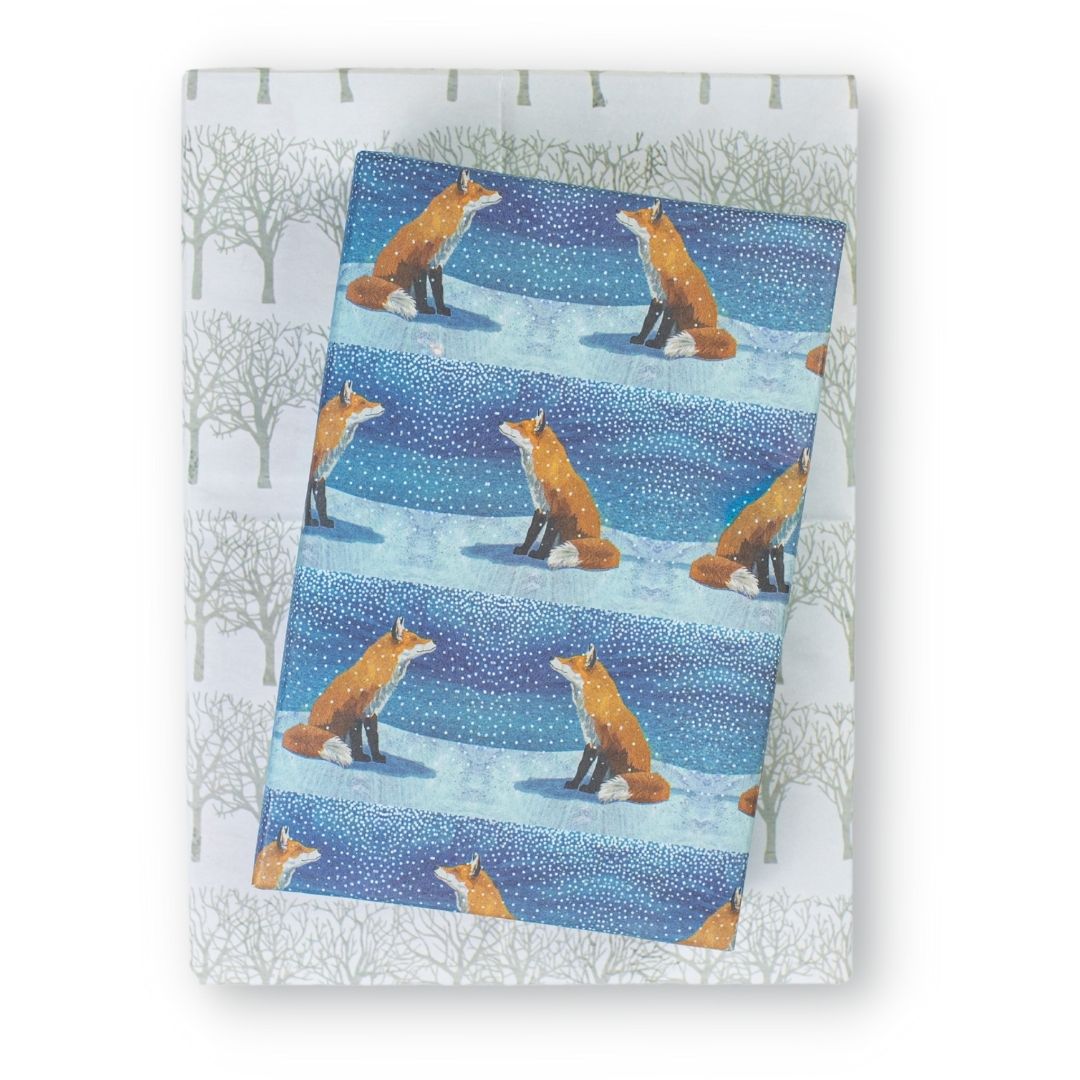
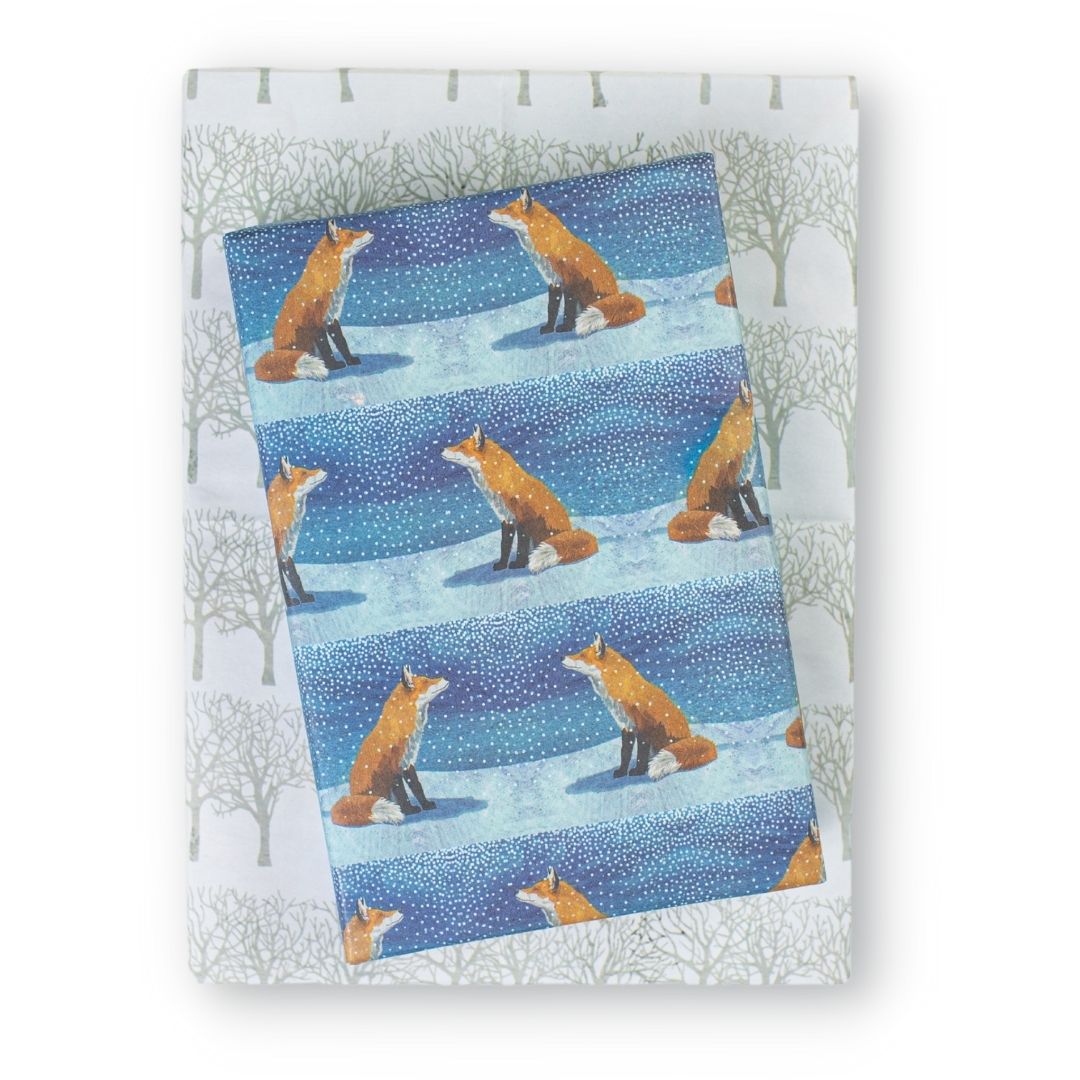
Fox Forest/ Snow Drops
$10.80
Your holiday gifts will look stunning in these playfully sophisticated patterns by Seattle designer Misha Zadeh. Celebrate sustainably with our recycled and recyclable wrapping paper. Reversible patterns make holiday gift wrapping fun! Paper works great for crafting, too.
Package includes three double-sided wrapping paper sheets + adhesive gift tags
• Sheet size 21.5" x 34"
• Premium newsprint + soy-based inks = eco-friendly wrapping paper
• Plastic-free PLA packaging
• Flat, folded sheet for easy storage
• No unnecessary cardboard tube
• 100% recyclable and compostable
• Milled, printed and packaged in Washington State
JOIN the mission to green-up gifting!
#wrapriprecycle #wraphappy #gifthappily


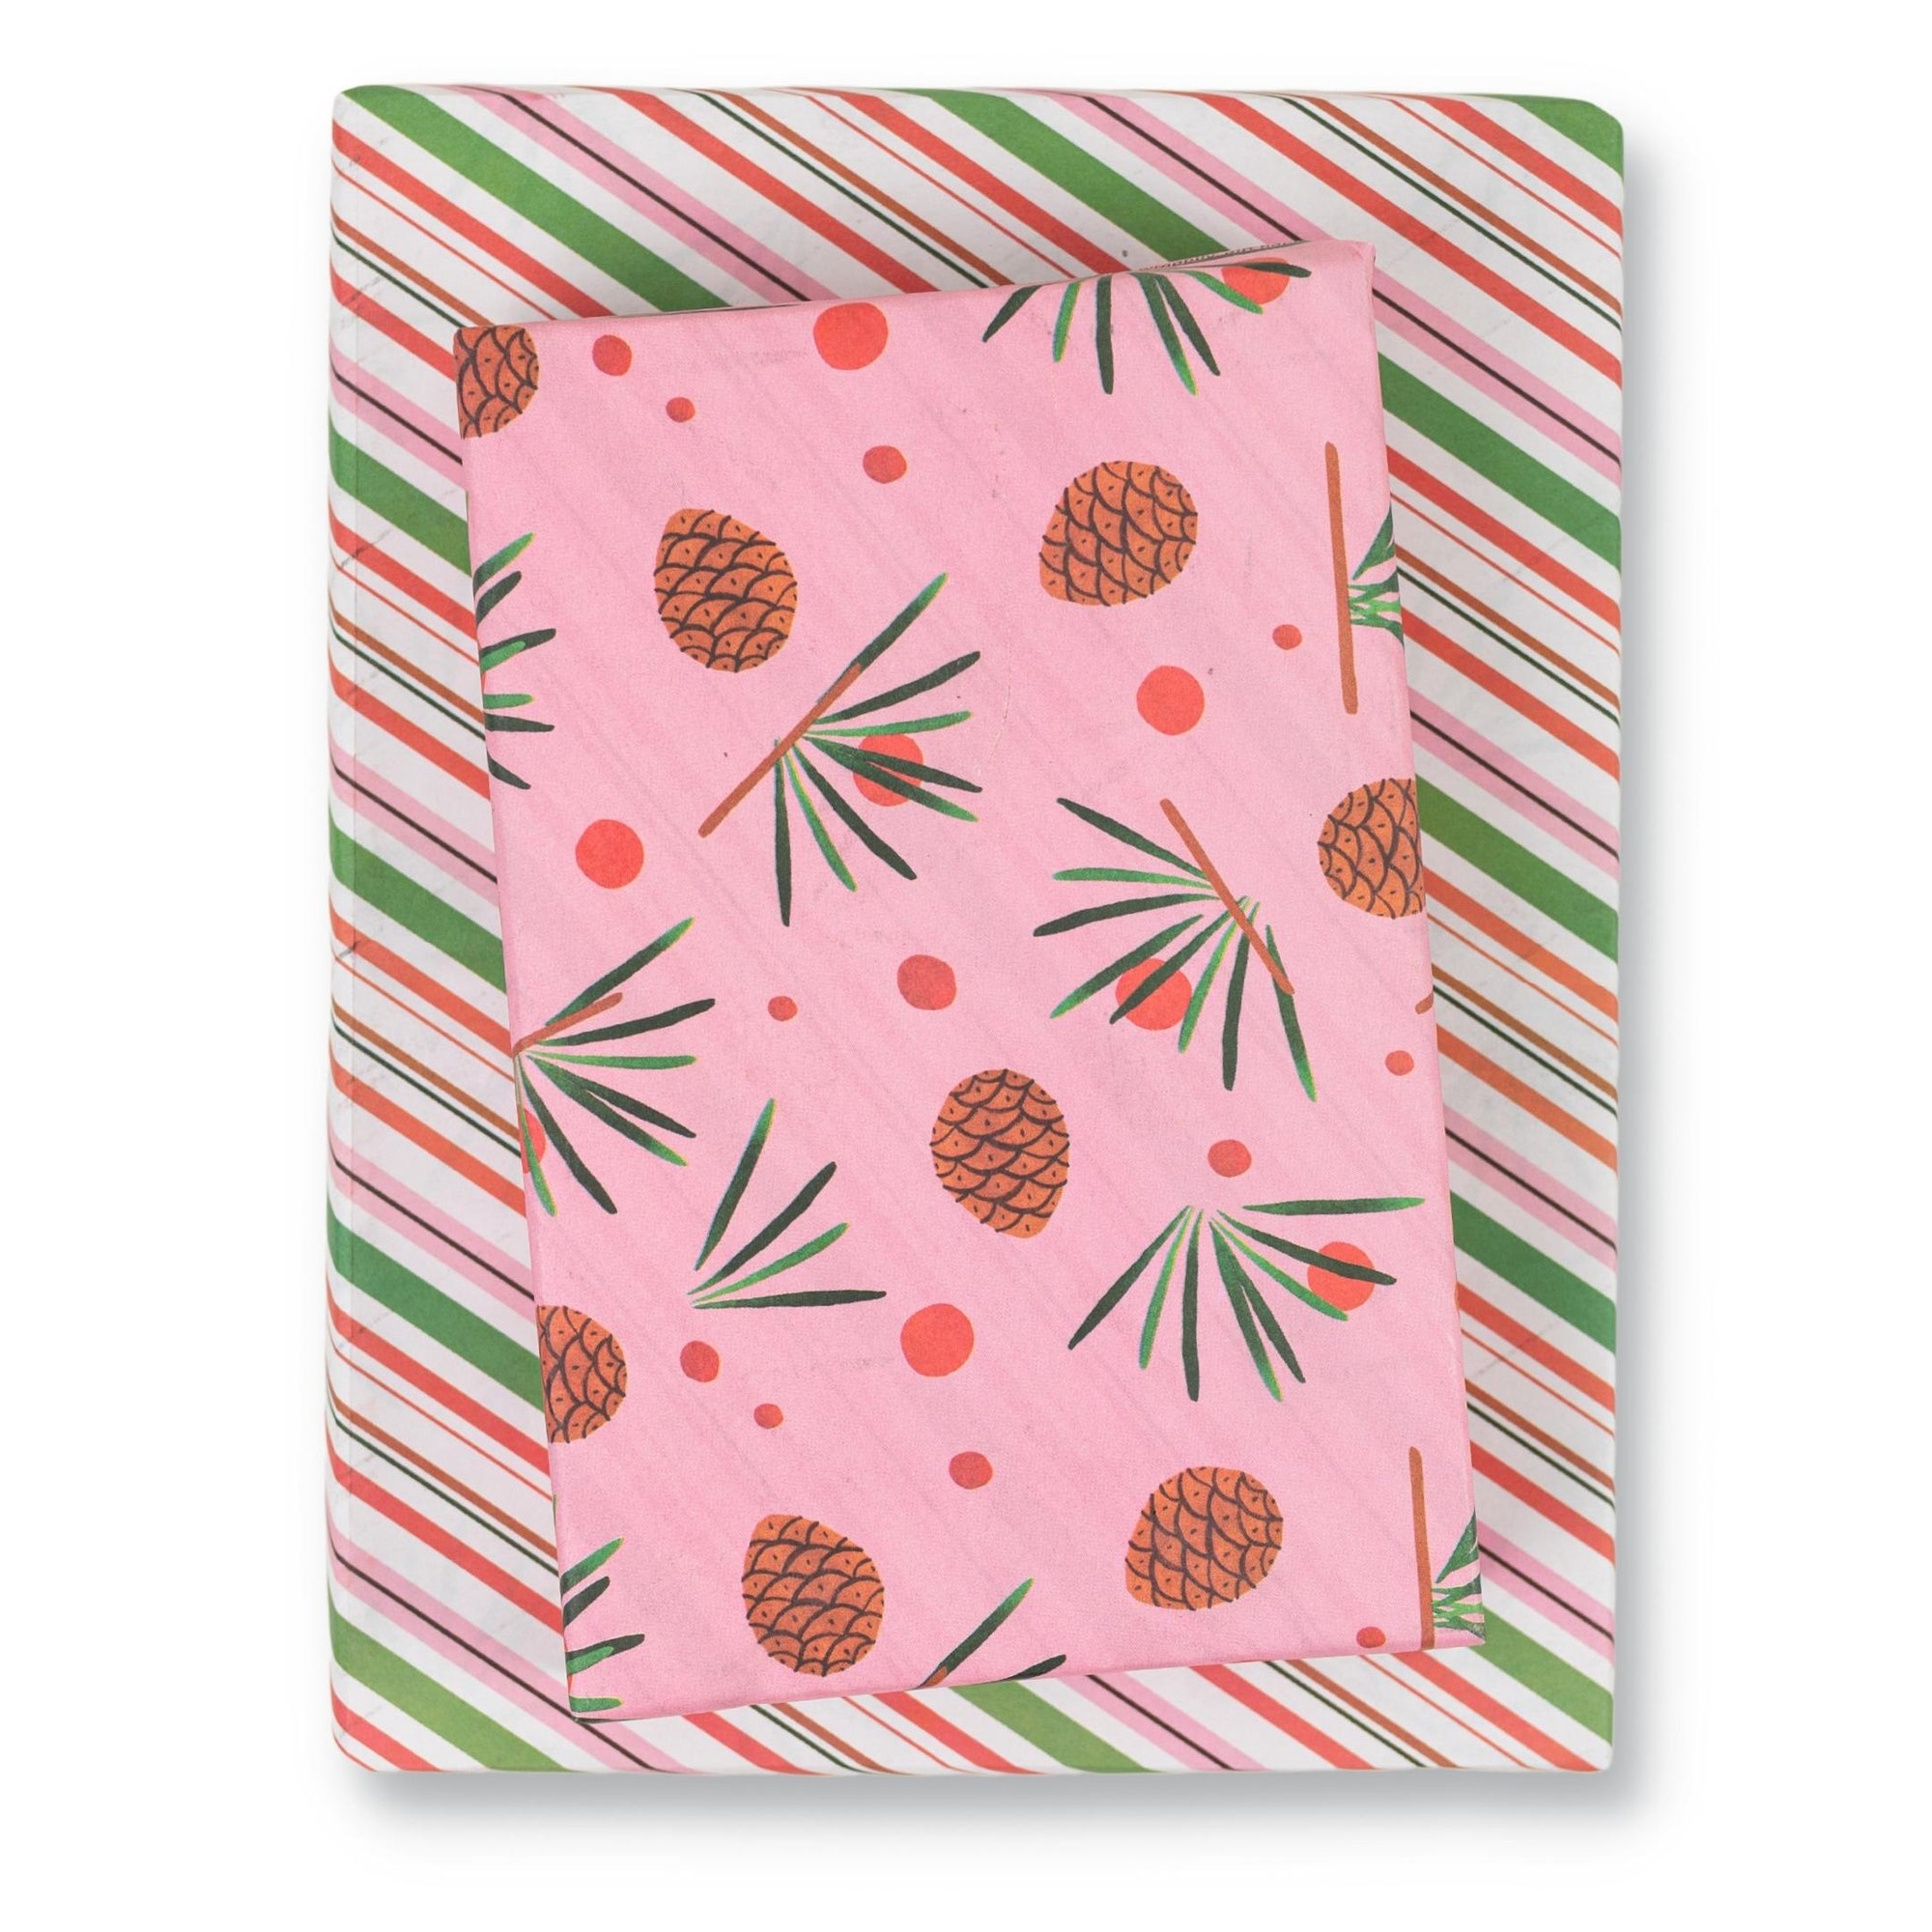
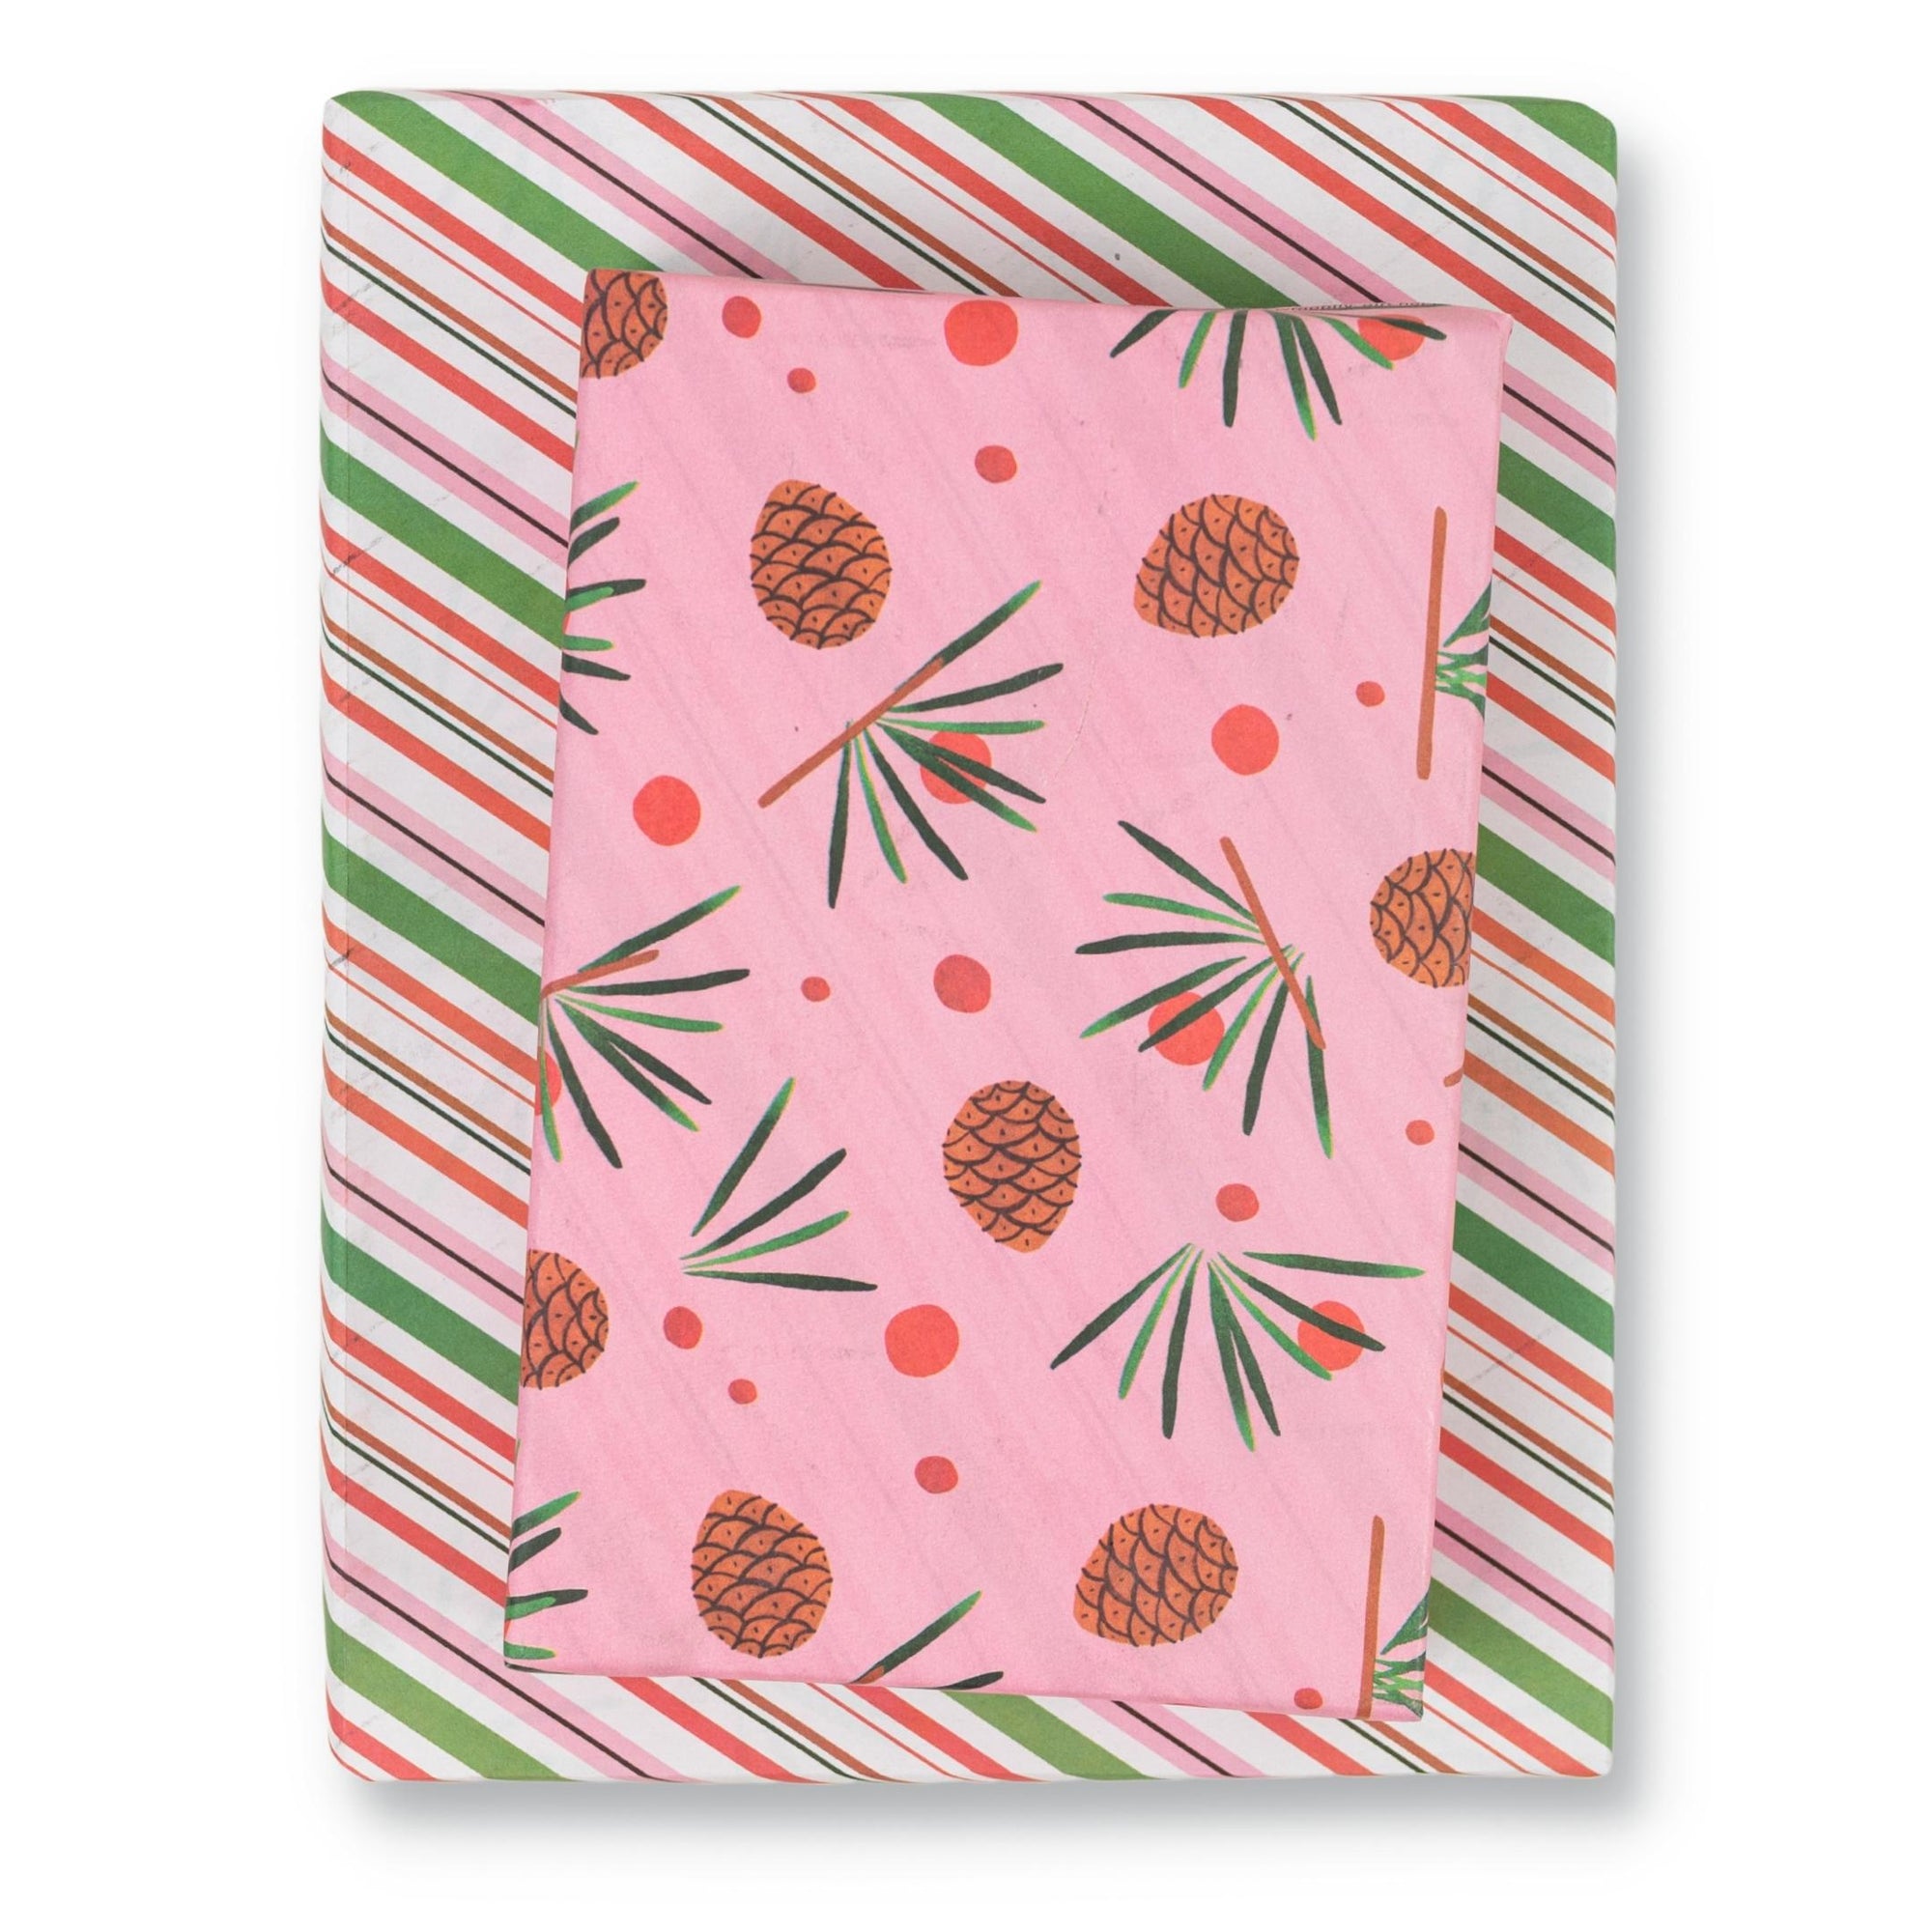


Pink Pinecone/ Candy Cane Stripe
$10.80
Your holiday gifts will look stunning in these playfully sophisticated patterns by Seattle designer Misha Zadeh. Celebrate sustainably with our recycled and recyclable wrapping paper. Reversible patterns make holiday gift wrapping fun! Paper works great for crafting, too.
Package includes three double-sided wrapping paper sheets + adhesive gift tags
• Sheet size 21.5" x 34"
• Premium newsprint + soy-based inks = eco-friendly wrapping paper
• Plastic-free PLA packaging
• Flat, folded sheet for easy storage
• No unnecessary cardboard tube
• 100% recyclable and compostable
• Milled, printed and packaged in Washington State
JOIN the mission to green-up gifting!
#wrapriprecycle #wraphappy #gifthappily


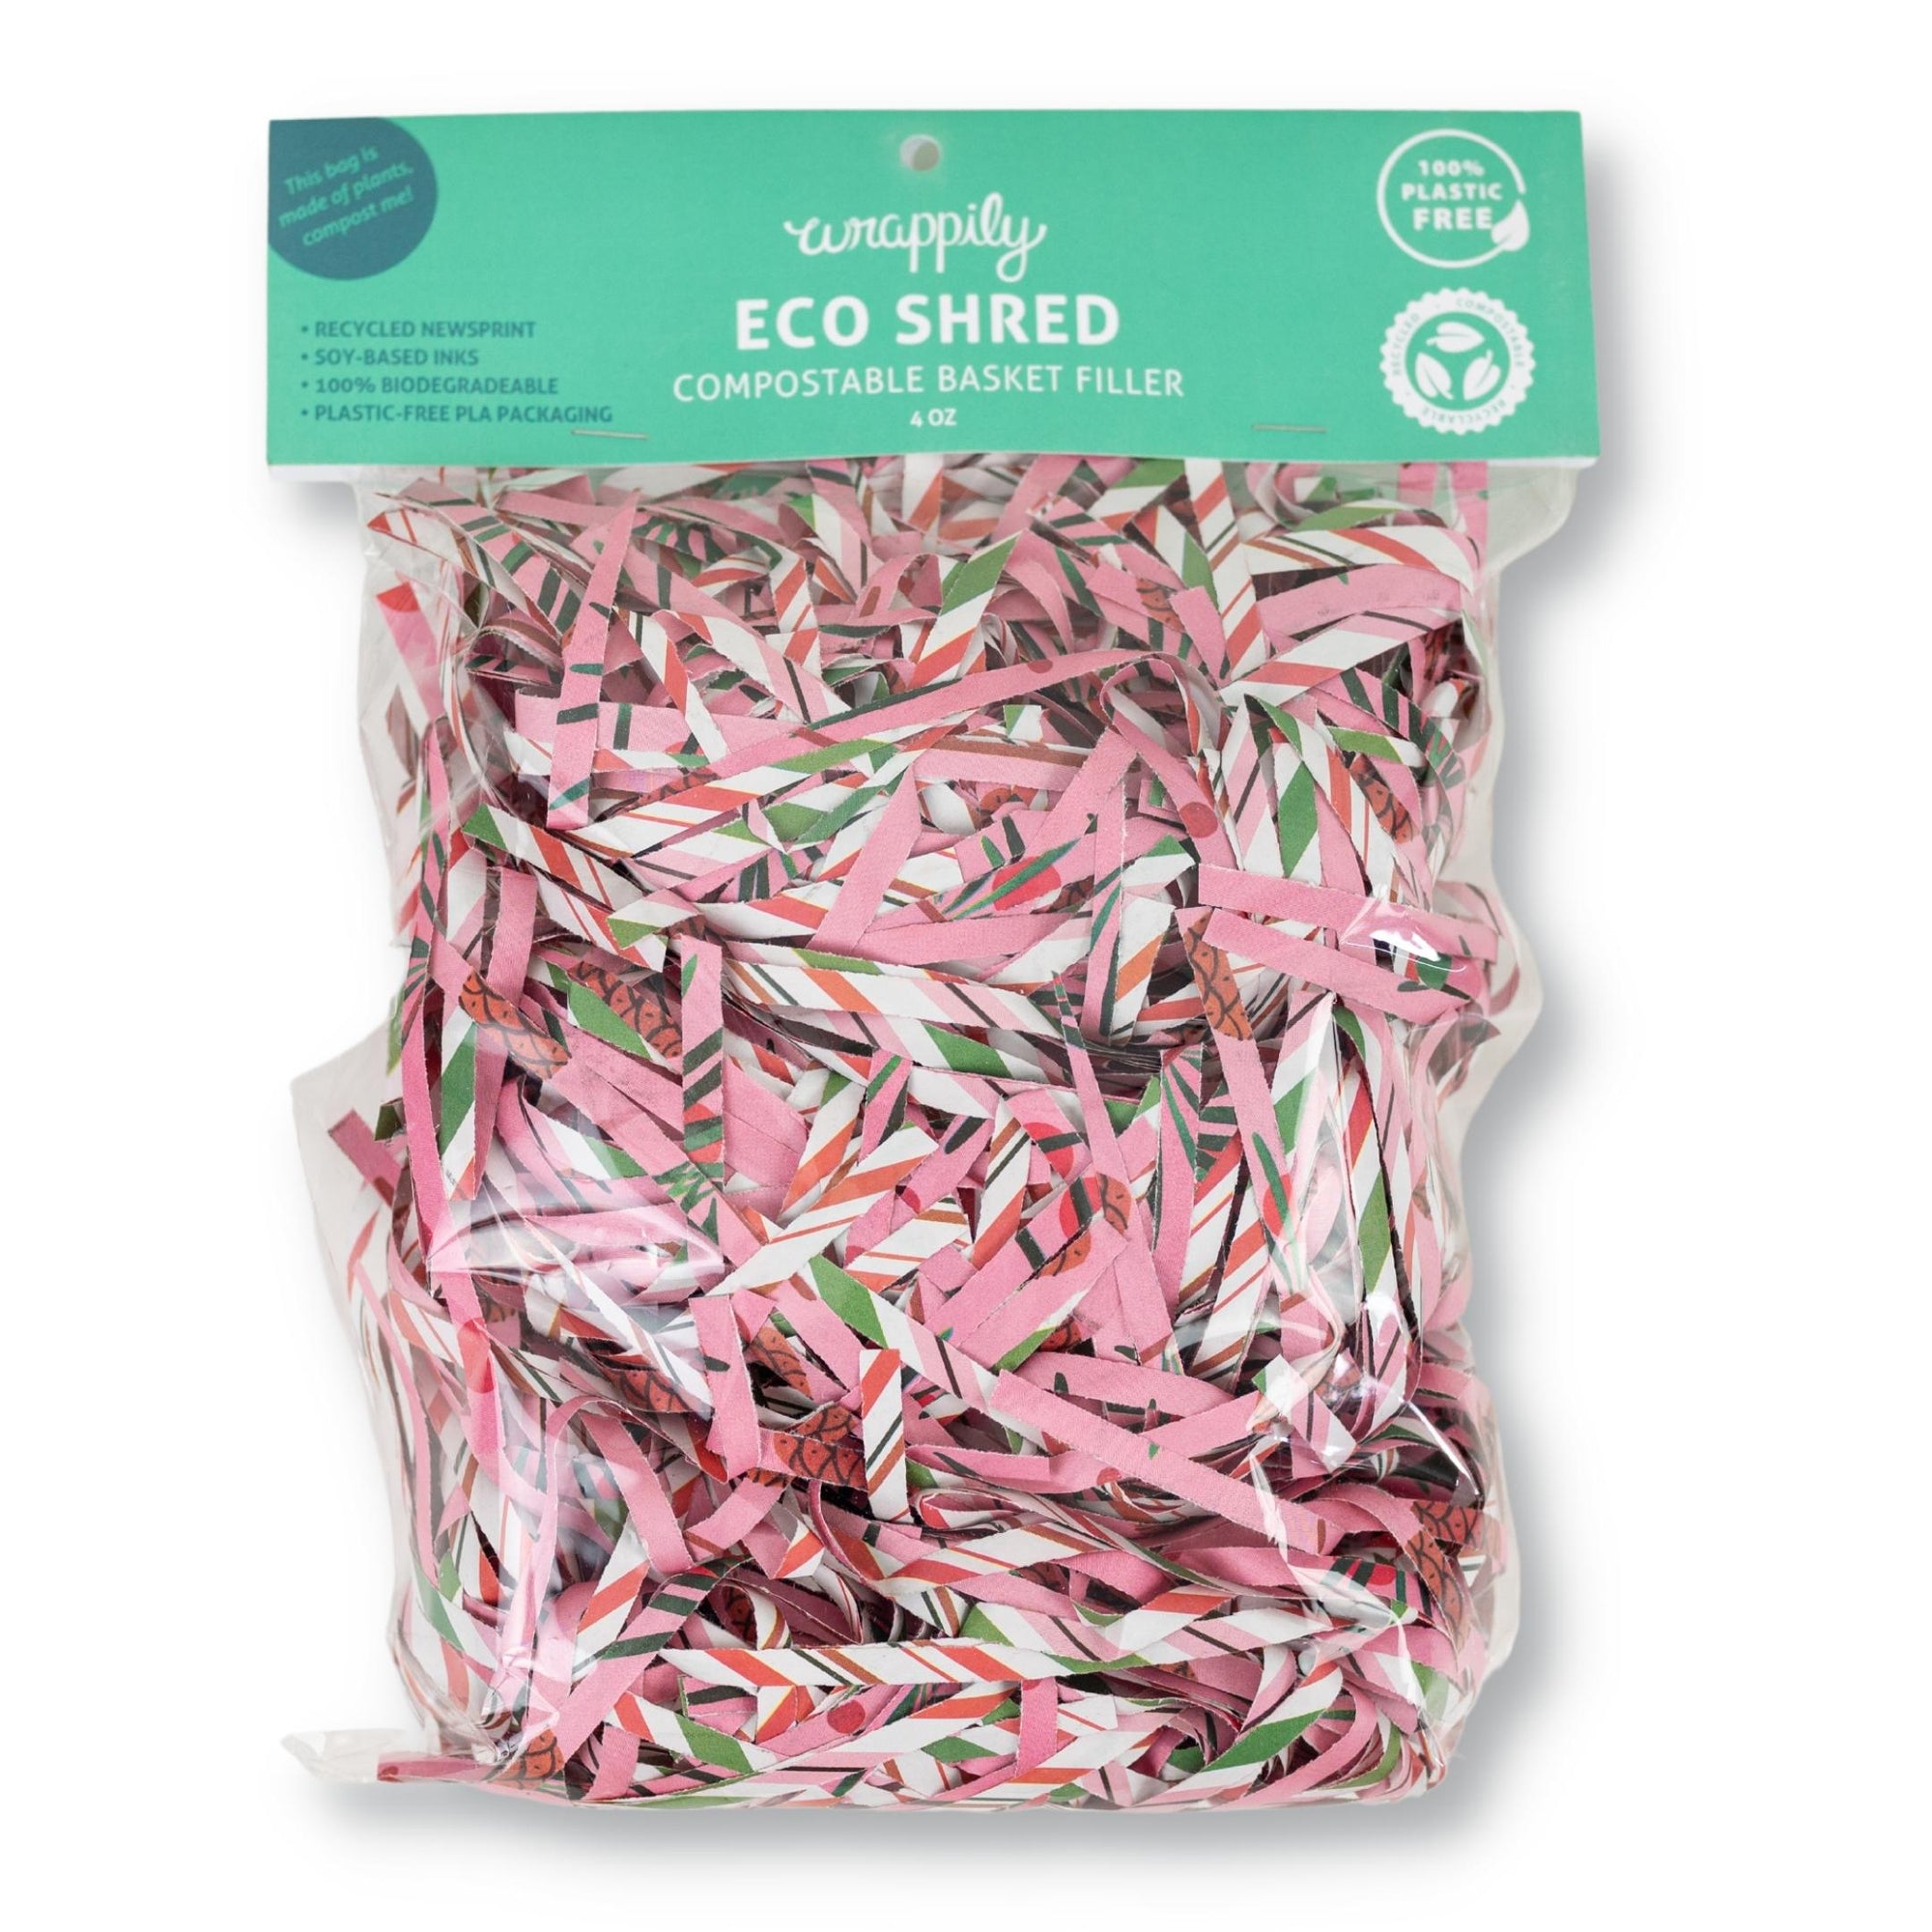
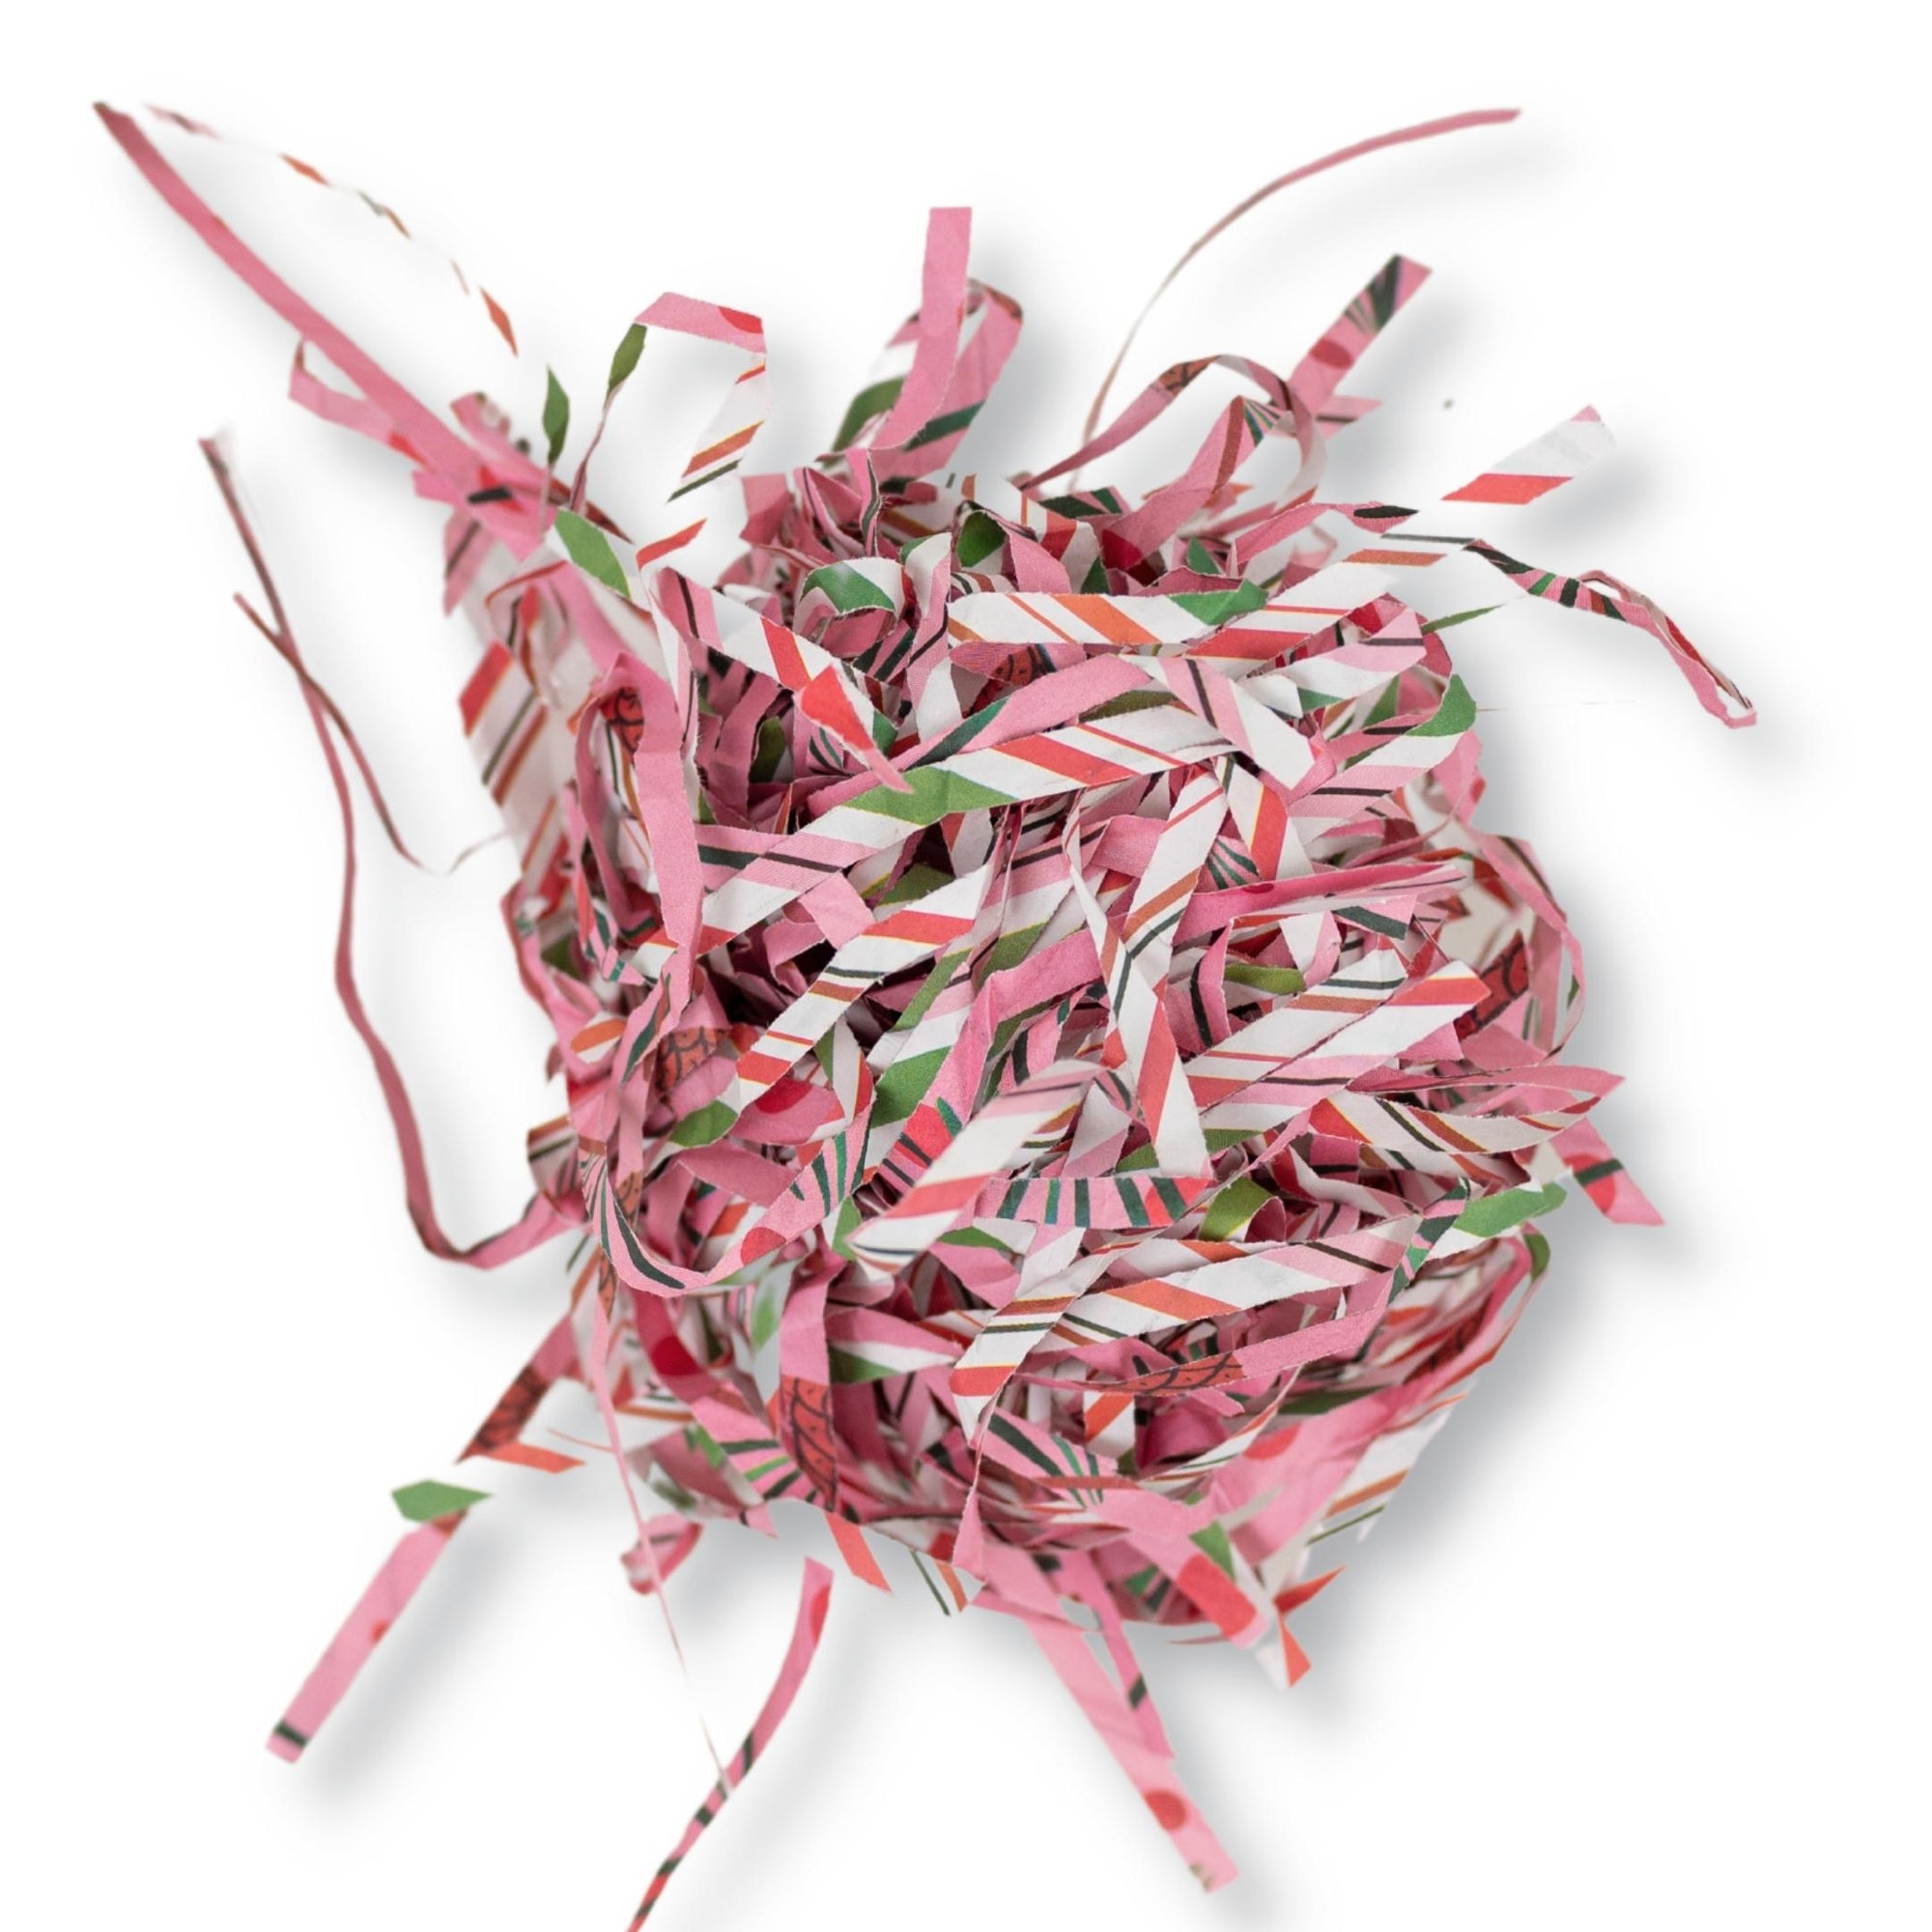


Eco Shred Basket Filler - Candy Stripe
$6.49
– Sold OutA perfect nest for your goodies, this pliable recycled printed paper shred is easy to work with and provides a lofty fill to be used as Easter grass, basket/box filler, or crinkle-paper alternative.
Why You’ll Love this Eco-Friendly Basket Filler:
- Colorful prints add a subtle pop of color to your gift baskets, party centerpieces, and care packages being shipped around the country.
- The perfect party decor that can be stored with Easter decorations and reused year after year. Have fun designing a perfect basket with this fluffy stuff! Keep the fun colors and whimsy you’d expect from Easter grass and crinkle-paper filler without the plastic.
- Feel good knowing your eco-shred is recyclable and compostable. Your choice makes a big impact to green-up gifting.
Sustainable Materials: Package includes approximately 4 ounces of recyclable & compostable paper shred. Made in the USA with recycled, premium-grade newsprint that is sustainably milled, printed, and packaged in Washington State. Printed with soy-based inks. Clear packaging is PLASTIC-FREE, made of biodegradable plant-based PLA


Boughs/ Twinkle - Double-sided Eco Wrapping Paper for Christmas & Holiday
$10.80
'Tis the season to bling out. Bold boughs bedecked brightly—say that ten times fast! We love how these branches swing and swoop, creating playful graphic elements that are amplified by the cheeriest coordinating holiday confetti scene you might not have known you ever needed (but clearly did.) This holiday brilliance is the work of surface pattern designer, Nadia Hassan, who puts the wham in whimsy and the cheer in our year.
Package includes three double-sided wrapping paper sheets + adhesive gift tags
• Sheet size 21.5" x 34"
• Premium newsprint + soy-based inks = eco-friendly wrapping paper
• Plastic-free PLA packaging
• Flat, folded sheet for easy storage
• No unnecessary cardboard tube
• 100% recyclable and compostable
• Milled, printed and packaged in Washington State


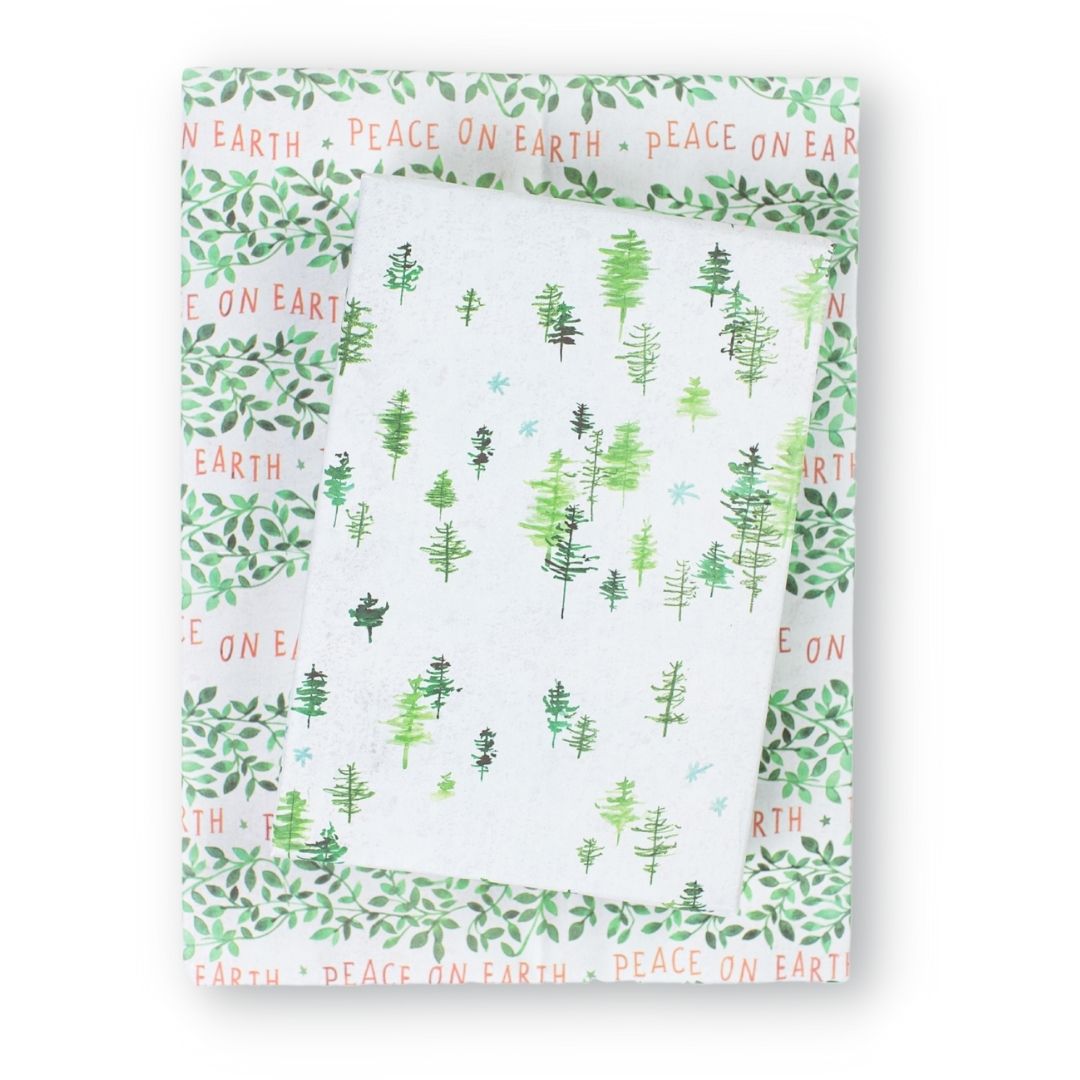
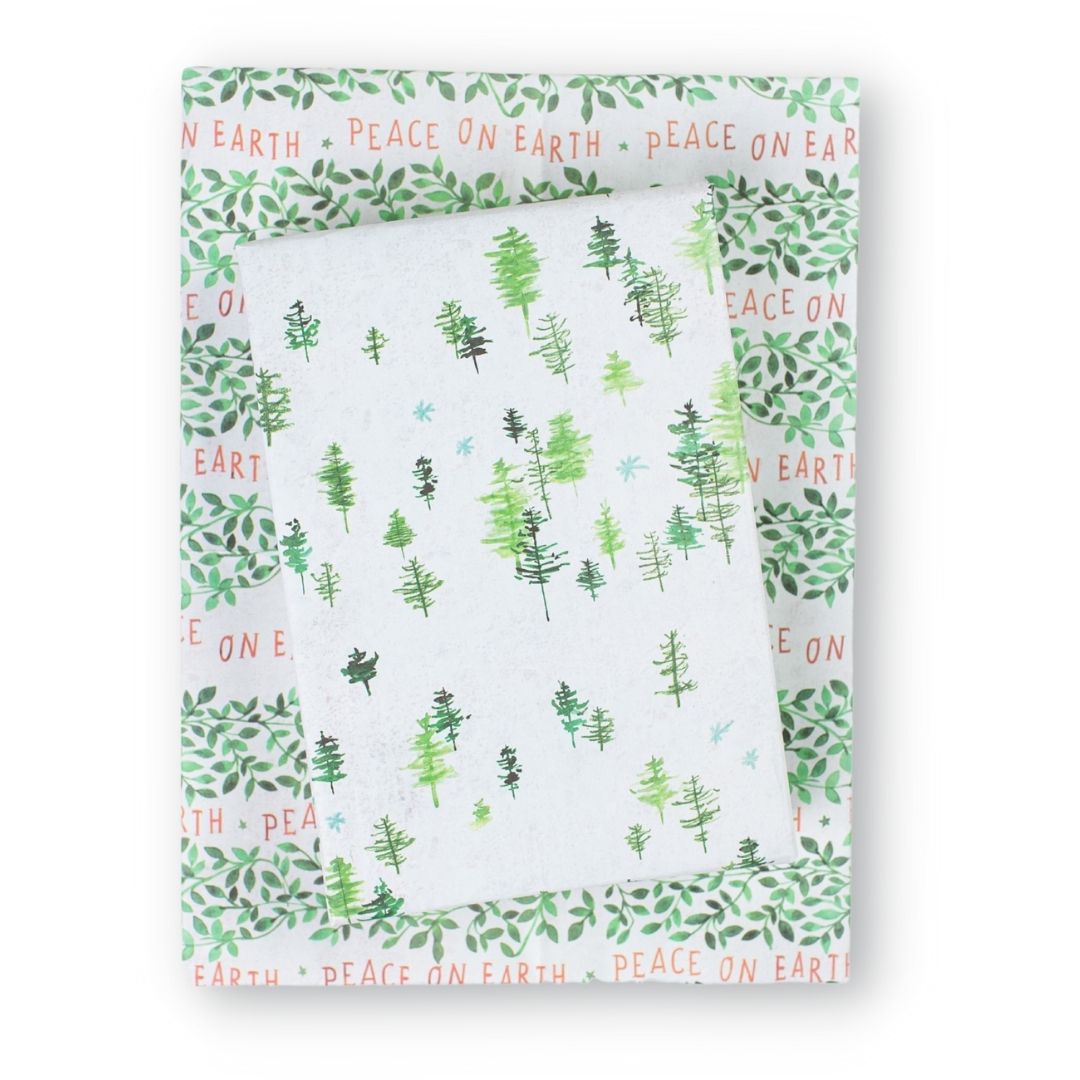


Peace on Earth/Evergreens
$10.80
Celebrate sustainably with our recycled and recyclable wrapping paper filled with hopeful holiday messages of peace on earth by watercolorist and published author, Meera Lee Patel. Reversible patterns make holiday gift wrapping fun! Paper works great for crafting, too.
Package includes three double-sided wrapping paper sheets + adhesive gift tags
• Sheet size 21.5" x 34"
• Premium newsprint + soy-based inks = eco-friendly wrapping paper
• Plastic-free PLA packaging
• Flat, folded sheet for easy storage
• No unnecessary cardboard tube
• 100% recyclable and compostable
• Milled, printed and packaged in Washington State
JOIN the mission to green-up gifting!
#wrapriprecycle #wraphappy #gifthappily


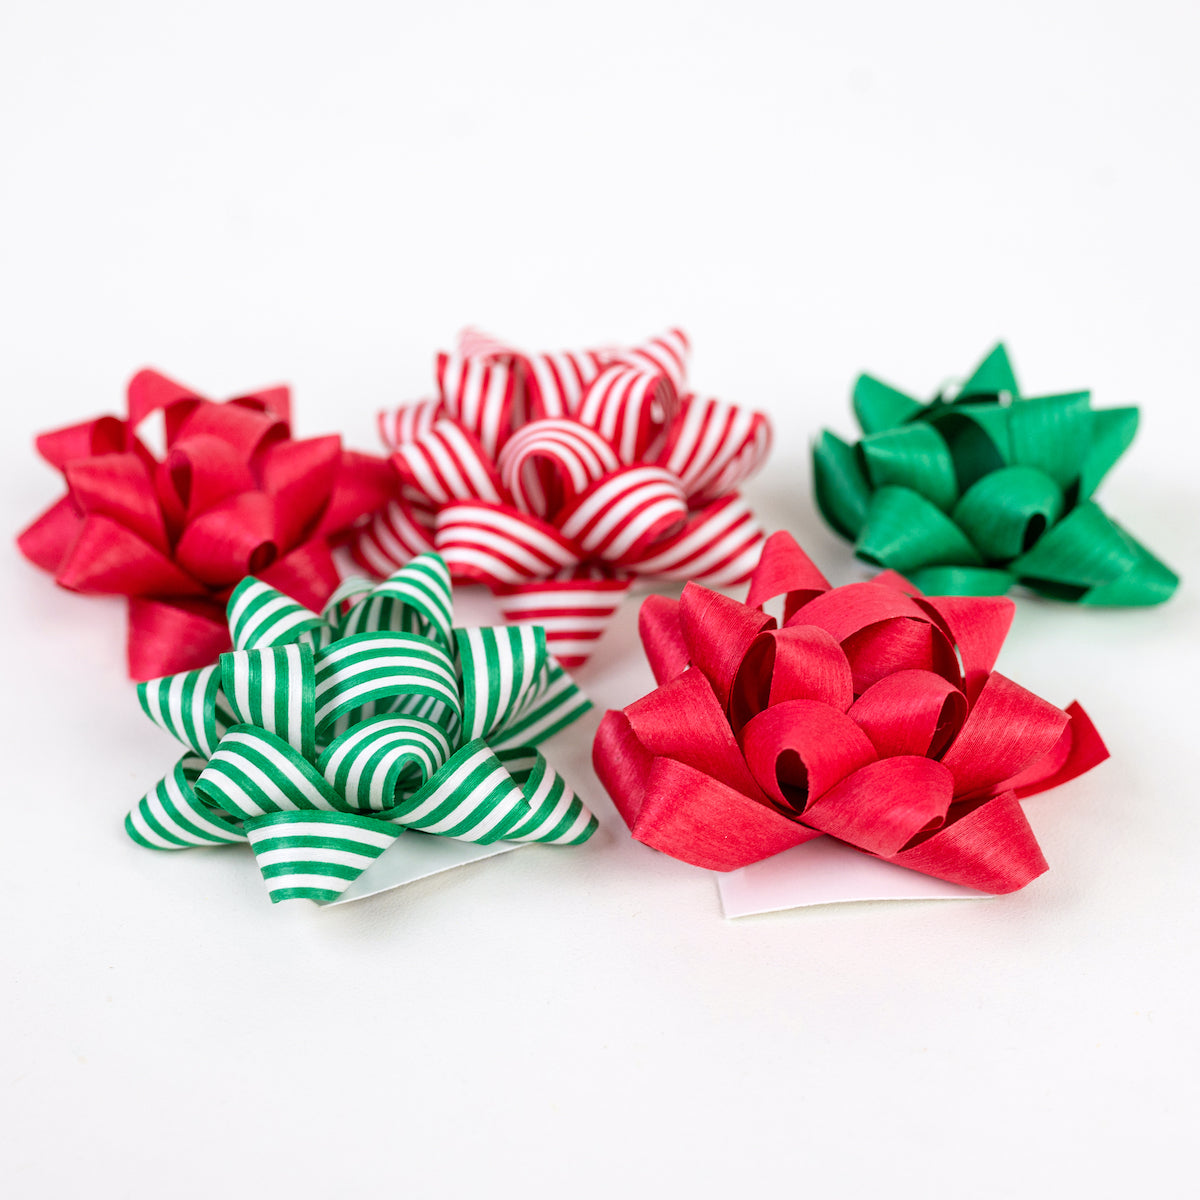


Christmas Mix - Natural Cotton Ribbon Bows, Pack of 5
$10.50 $11.00
You just found an eco-friendly alternative to conventional plastic gift bows. Artisanally made of biodegradable natural cotton ribbon, these adhesive gift topper bows are cute, convenient and compostable. This box includes FIVE small-to-medium sized bows (2-3/8" & 3") in a Christmassy mix. Made in the USA. (1) 3" Red (1) 3" Red & White Stripe (1) 2 3/8" Green (1) 2 3/8" Green & White Stripe (1) 2 3/8" Red

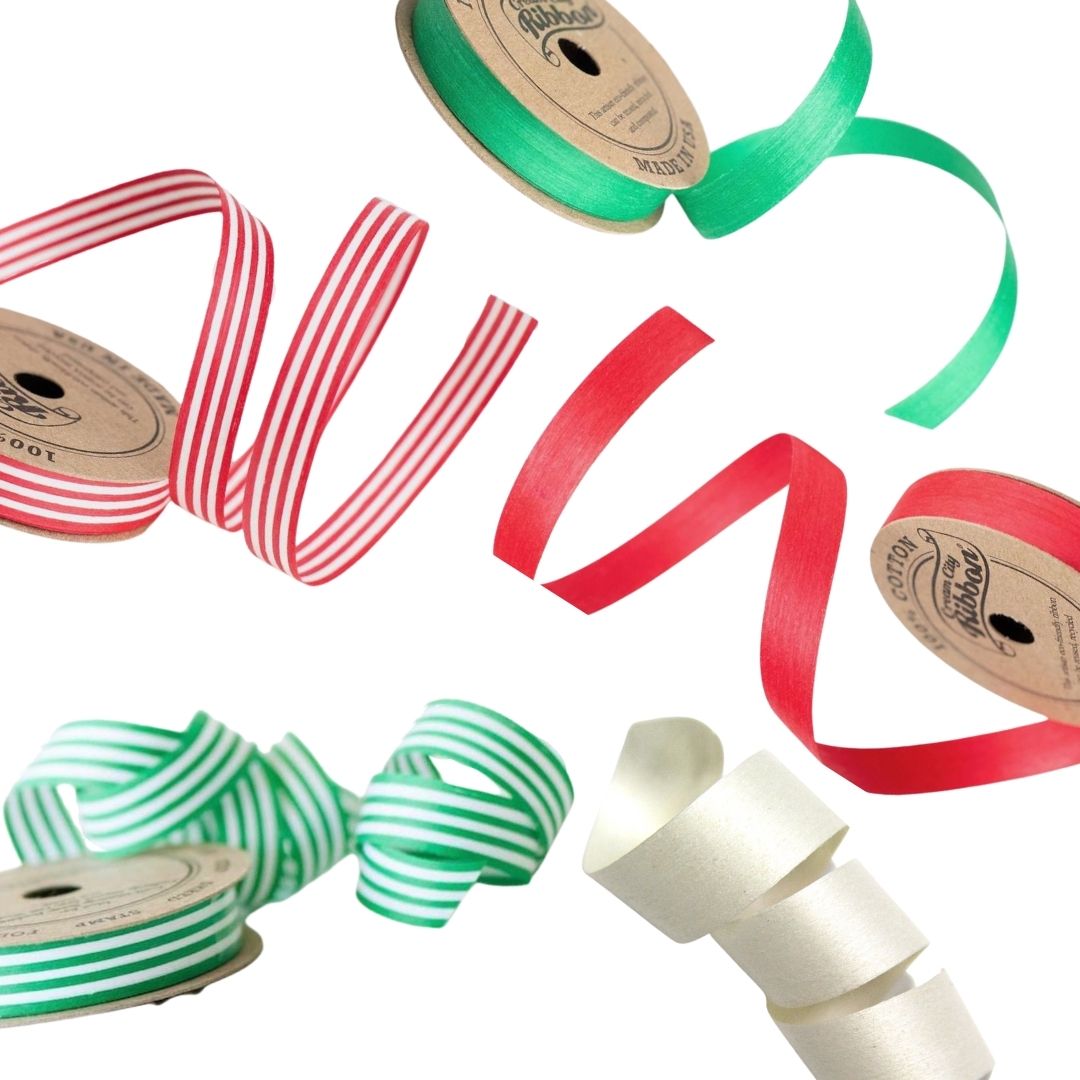
Colors of Christmas Natural Cotton Curling Ribbon Bundle, 5 Spools
$31.49 $35.00
All the colors of Christmas! Bundle & Save on our Natural Cotton Curling Ribbon, 50 yds total on plastic-free recycled kraft spools.
Loop it, tie it, curl it. This bundle includes: Organic Cream, 10 yds Solid Red, 10 yds Red & White Stripe, 10 yds Holiday Green, 10 yds Holiday Green & White Stripe, 10 yds
Our artisanal ribbon maker in Milwaukee, Wisconsin is committed to the highest levels of sustainability. They use water-based dyes, soy-based non-toxic inks, and cotton yarn that is 100% grown and dyed in the USA.


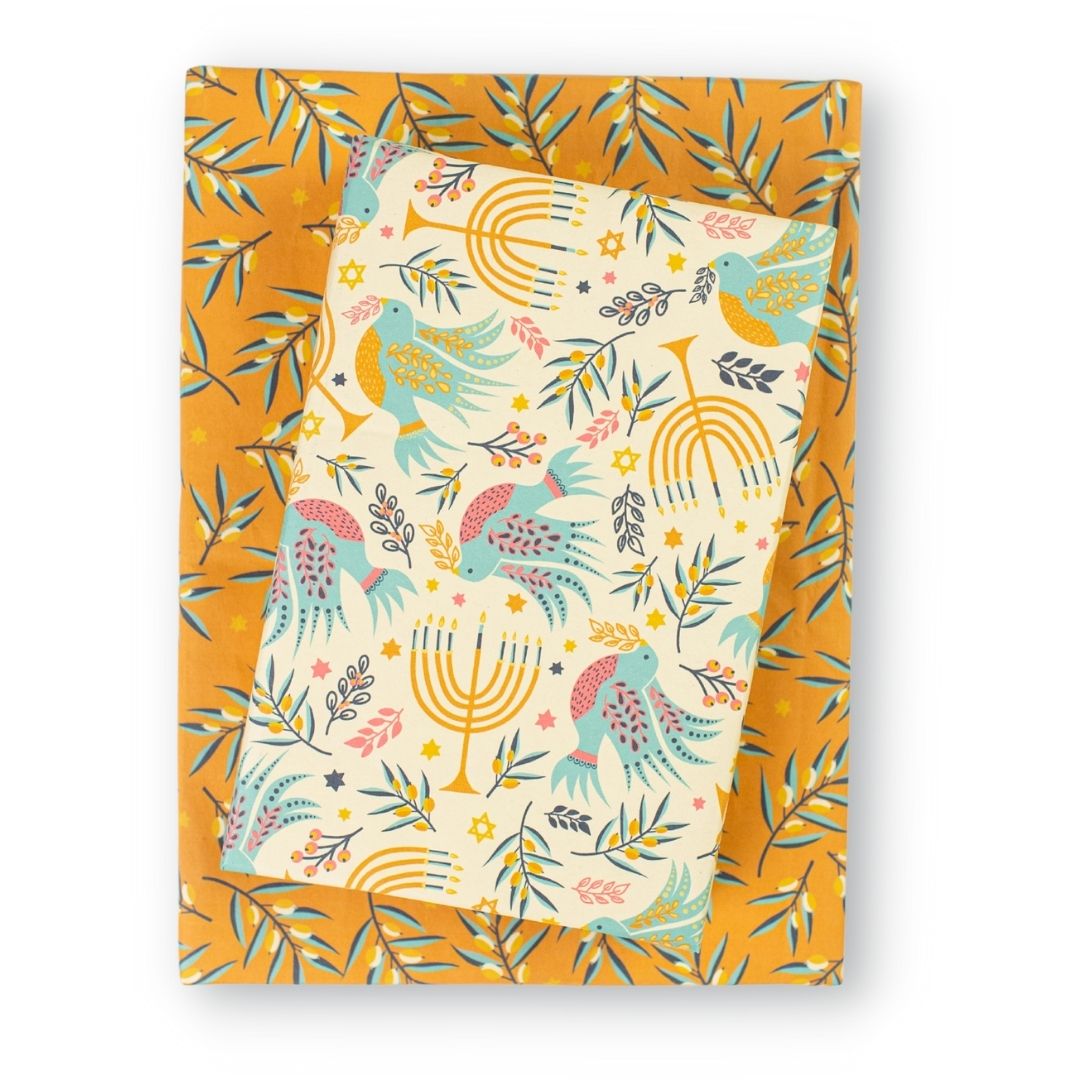


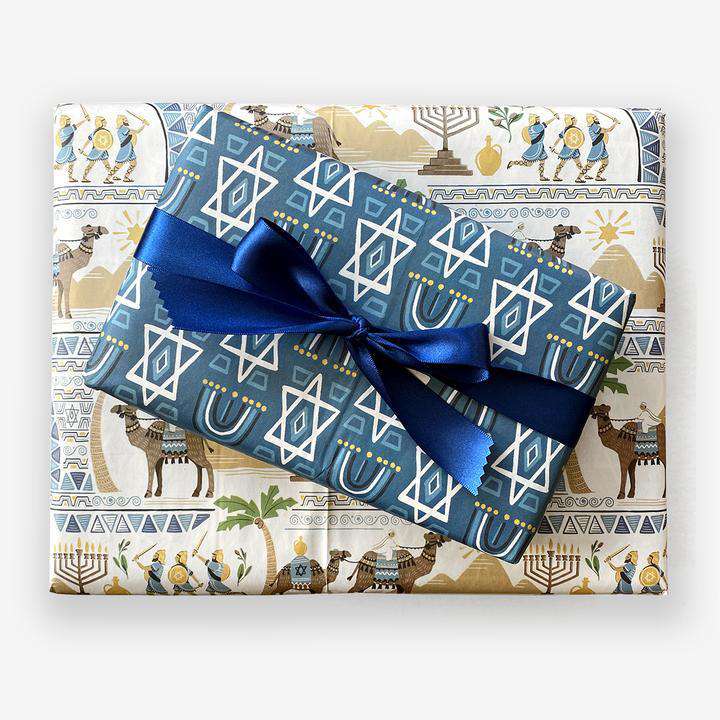
Hanukkah Doves
$10.80
Celebrate sustainably with our recycled and recyclable wrapping paper featuring the rich colors and symbols of Hanukkah by pattern designer Sandra Hutter. Reversible patterns make holiday gift wrapping fun! Paper works great for crafting, too.
Package includes three double-sided wrapping paper sheets + adhesive gift tags
• Sheet size 21.5" x 34"
• Premium newsprint + soy-based inks = eco-friendly wrapping paper
• Plastic-free PLA packaging
• Flat, folded sheet for easy storage
• No unnecessary cardboard tube
• 100% recyclable and compostable
• Milled, printed and packaged in Washington State
JOIN the mission to green-up gifting!
#wrapriprecycle #wraphappy #gifthappily

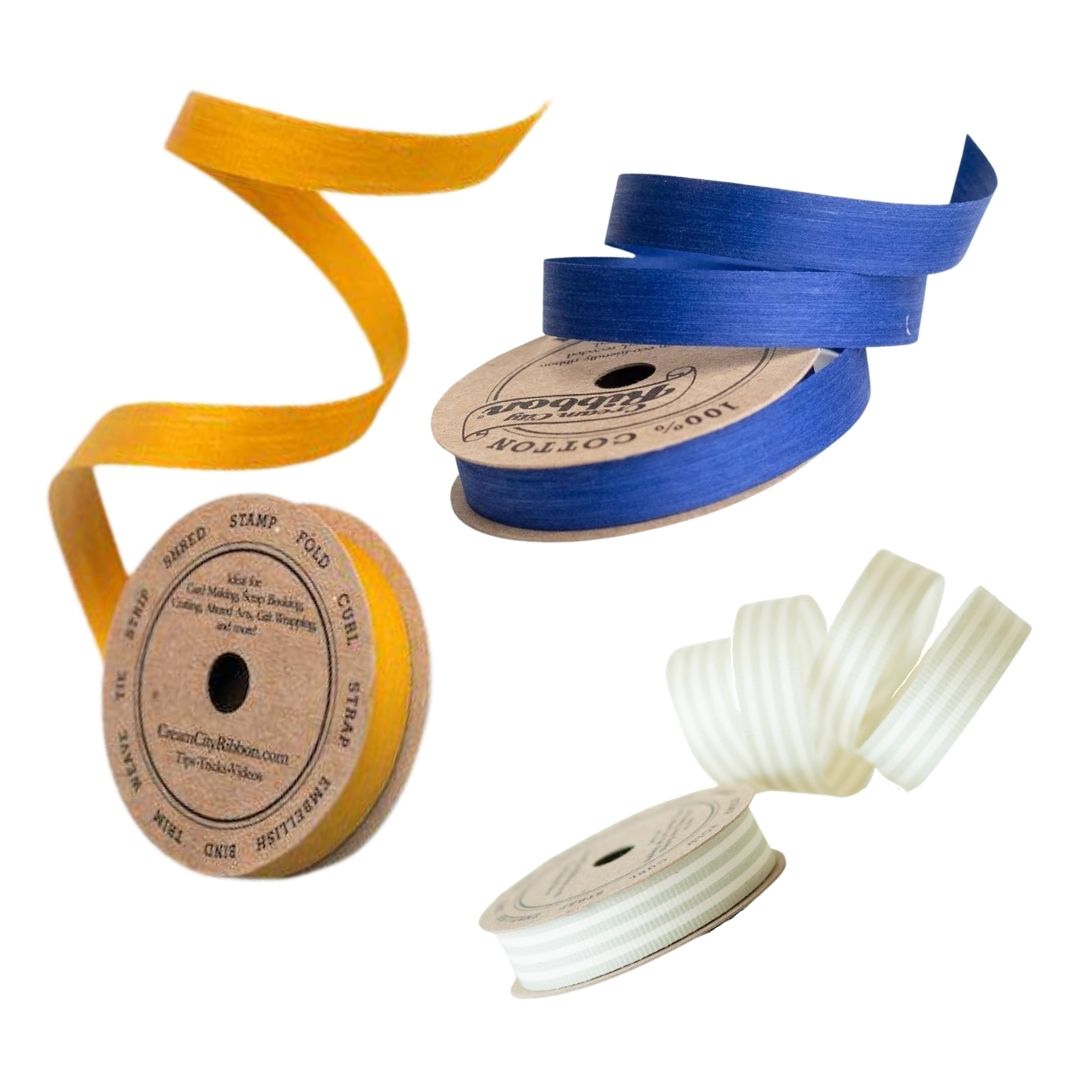
Starry Night Natural Cotton Curling Ribbon Bundle, 3 Spools
$19.49 $21.00
All the colors inspired by a Starry Night - Bundle and Save on our Natural Cotton Curling Ribbon, 30 yds total on plastic-free recycled kraft spools. Loop it, tie it, curl it. This bundle includes: Midnight Blue, 10 yds Curry, 10 yds Grey & Cream Stripe, 10 yds. Perfect for Hanukkah and everyday gifting celebrations
Our artisanal ribbon maker in Milwaukee, Wisconsin is committed to the highest levels of sustainability. They use water-based dyes, soy-based non-toxic inks, and cotton yarn that is 100% grown and dyed in the USA.
Spool measurements: 1/2" x 10yds. each


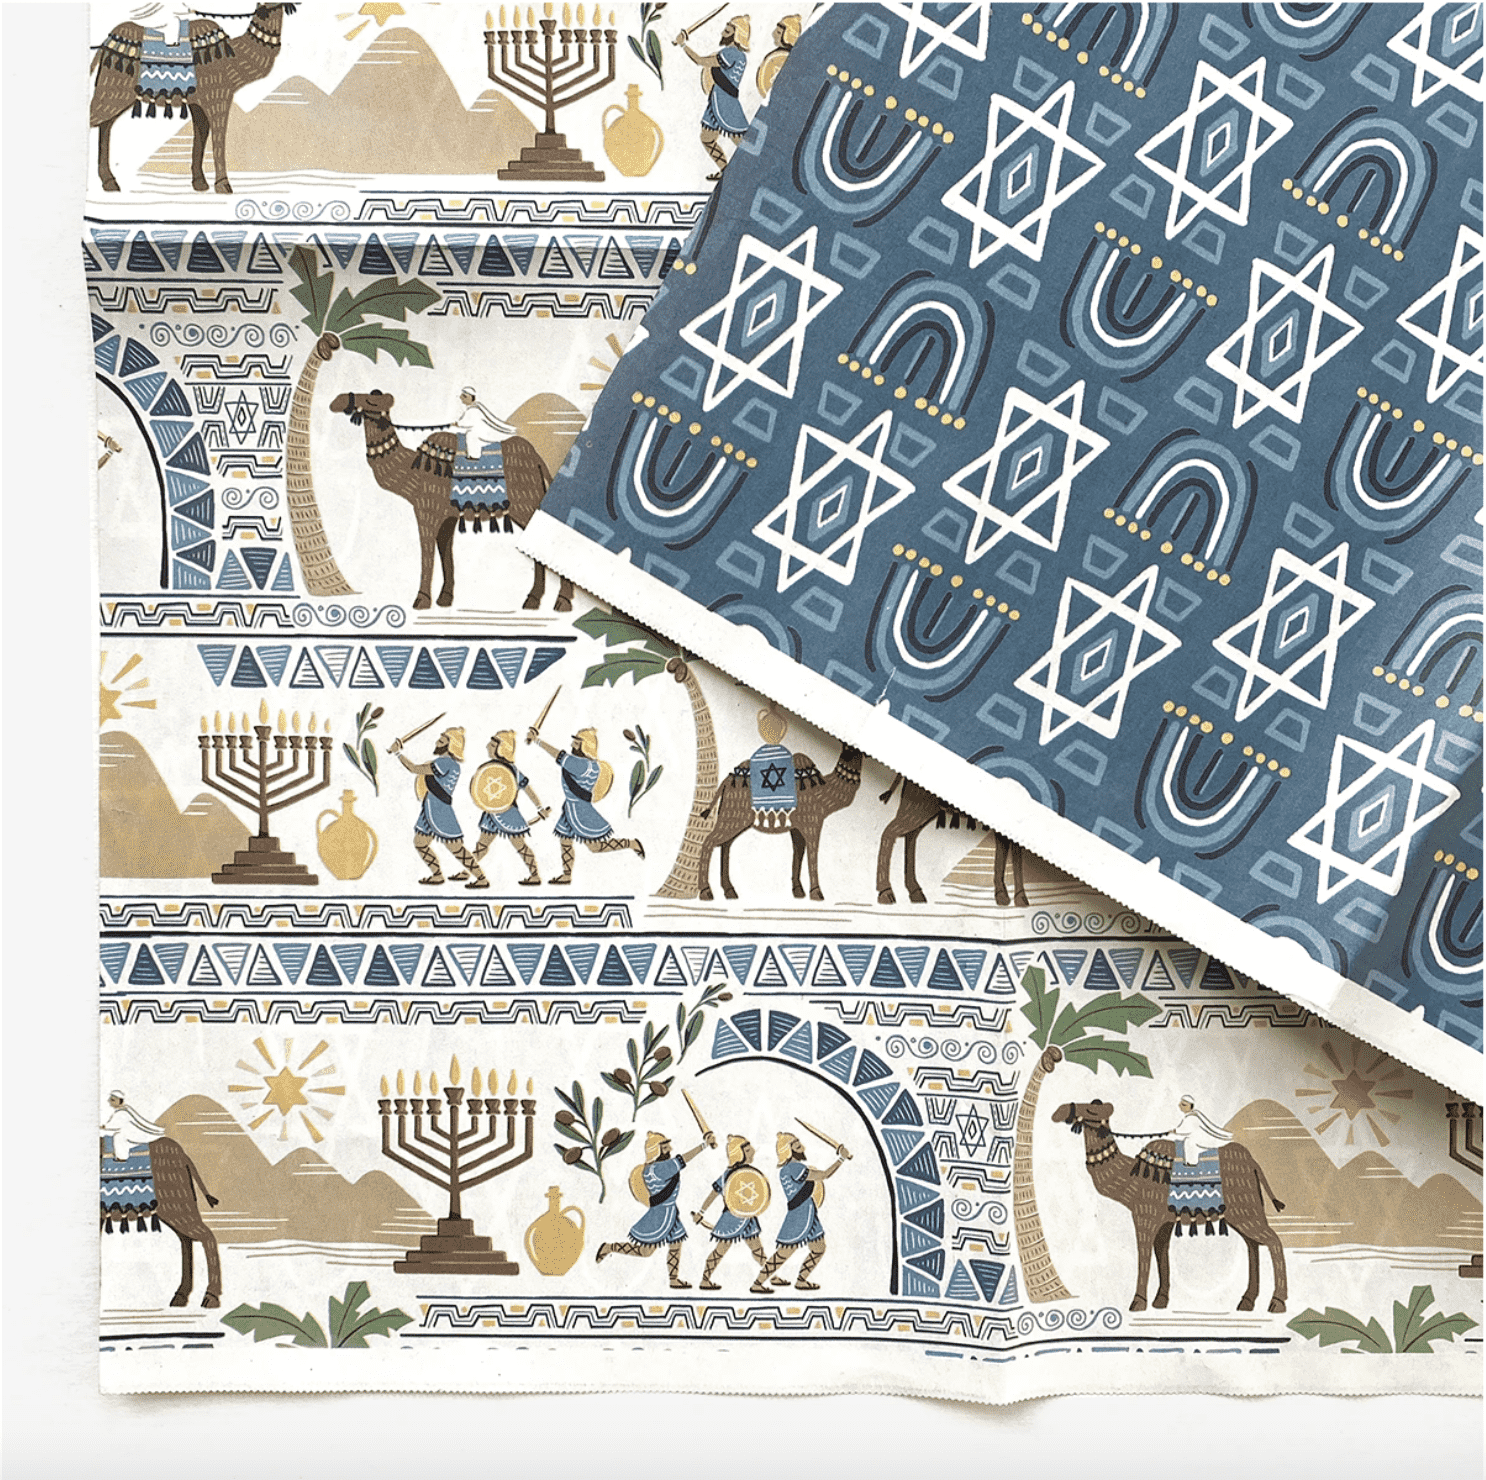


Hanukkah Story by Paper Pony
$10.80
Share the story of Hanukkah with a whimsical scene featuring the Maccabees on one side and a bold Star of David pattern on the reverse.


Artist Series Wrap Bundle: Allport x Two Can Art Collection
$29.99 $32.40
Celebrate sustainably with our recycled and recyclable wrapping paper featuring the full collection of Christmas gift wrap designed by Mother-Son duo, Two Can Art x Allport Editions! Reversible patterns make holiday gift wrapping fun! Paper works great for crafting, too.
Bundle includes one package of each:
Fox Moment • Knit 'n Kitty • Snowy Owl
Each package includes 3 sheets + adhesive gift tags
• Sheet size 21.5" x 34"
• Premium newsprint + soy-based inks
• Plastic-free PLA packaging (plus no unnecessary cardboard tube!)
• Flat, folded sheets for easy storage
• 100% recyclable and compostable
• Milled, printed and packaged in Washington State
JOIN the mission to green-up gifting! #wrapriprecycle #wraphappy #gifthappily


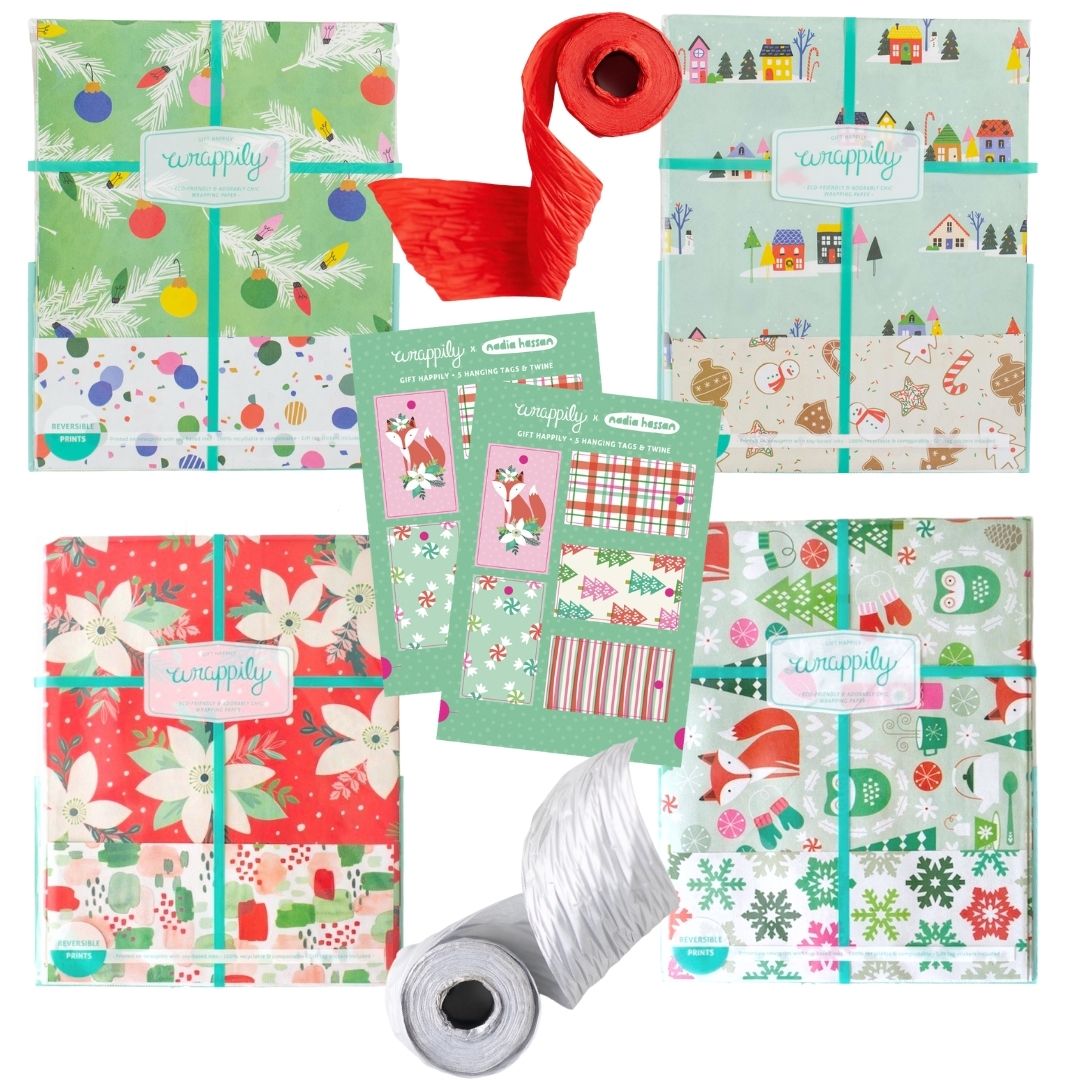
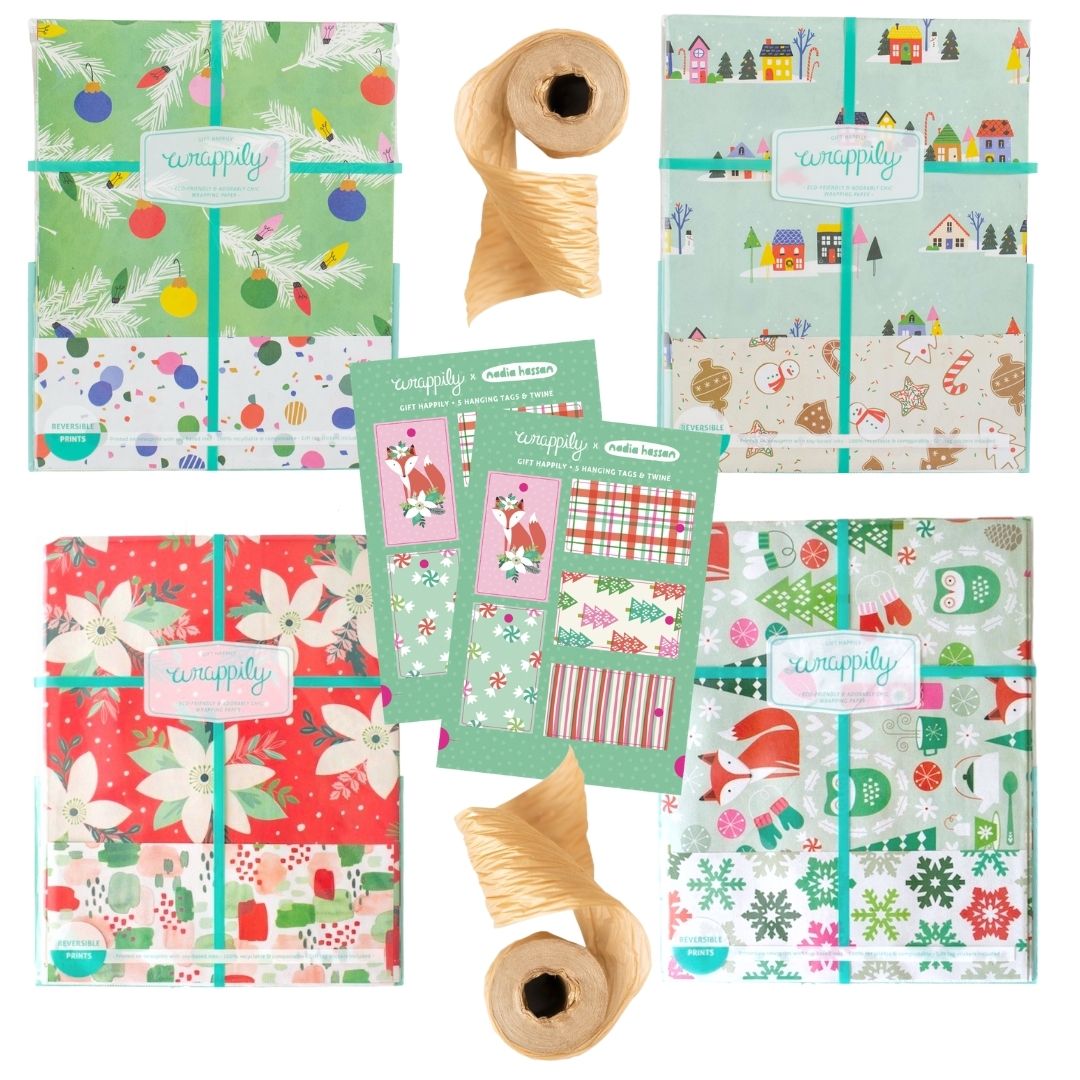


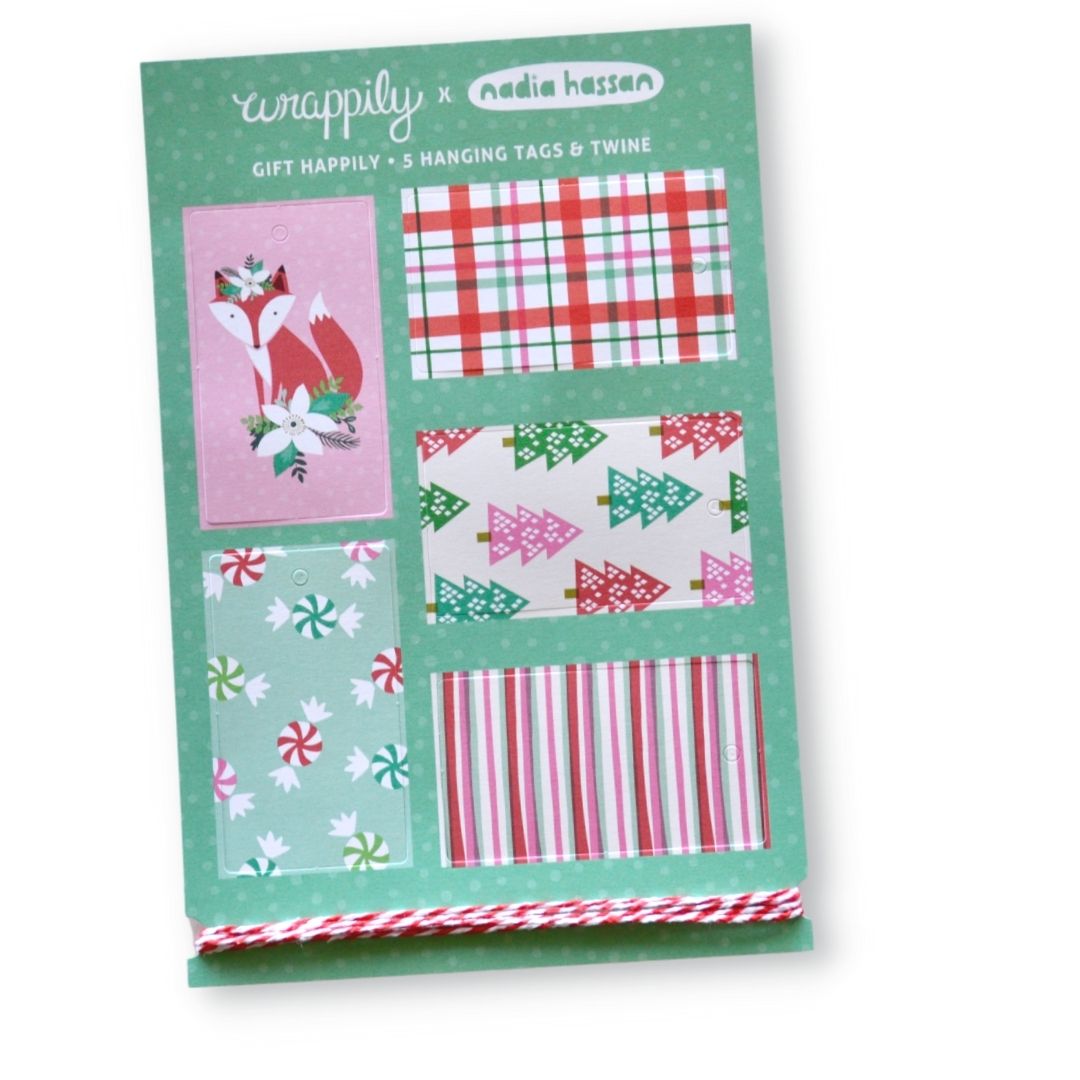
Festive Holidays by Nadia - Complete Eco Gift Wrap Bundle
$69.99 $75.00
Celebrate sustainably with a season's worth of recycled and recyclable gift wrap goodies featuring the art of cheeriest gal we know, designer, Nadia Hassan. Reversible patterns make gift wrapping fun!
Bundle includes:
• Poinsettia/Painterly double-sided wrapping paper, 3 sheets
• Festive Forest double-sided wrapping paper, 3 sheets
• Boughs/Twinkle double-sided wrapping paper, 3 sheets
• Home For The Holidays double-sided wrapping paper, 3 sheets
• (2) Festive Holiday Pop Out Gift Tags & Twine (10 tags total)
• (2) Rolls of Paper Ribbon, 25 yards each (Red and/or Silver)
JOIN the mission to green-up gifting! #wrapriprecycle #wraphappy #gifthappily
- Sheet size 21.5" x 34"
- Premium newsprint + soy-based inks
- Plastic-free PLA packaging (plus no unnecessary cardboard tube!)
- Flat, folded sheets for easy storage
- 100% recyclable and compostable
- Milled, printed and packaged in Washington State


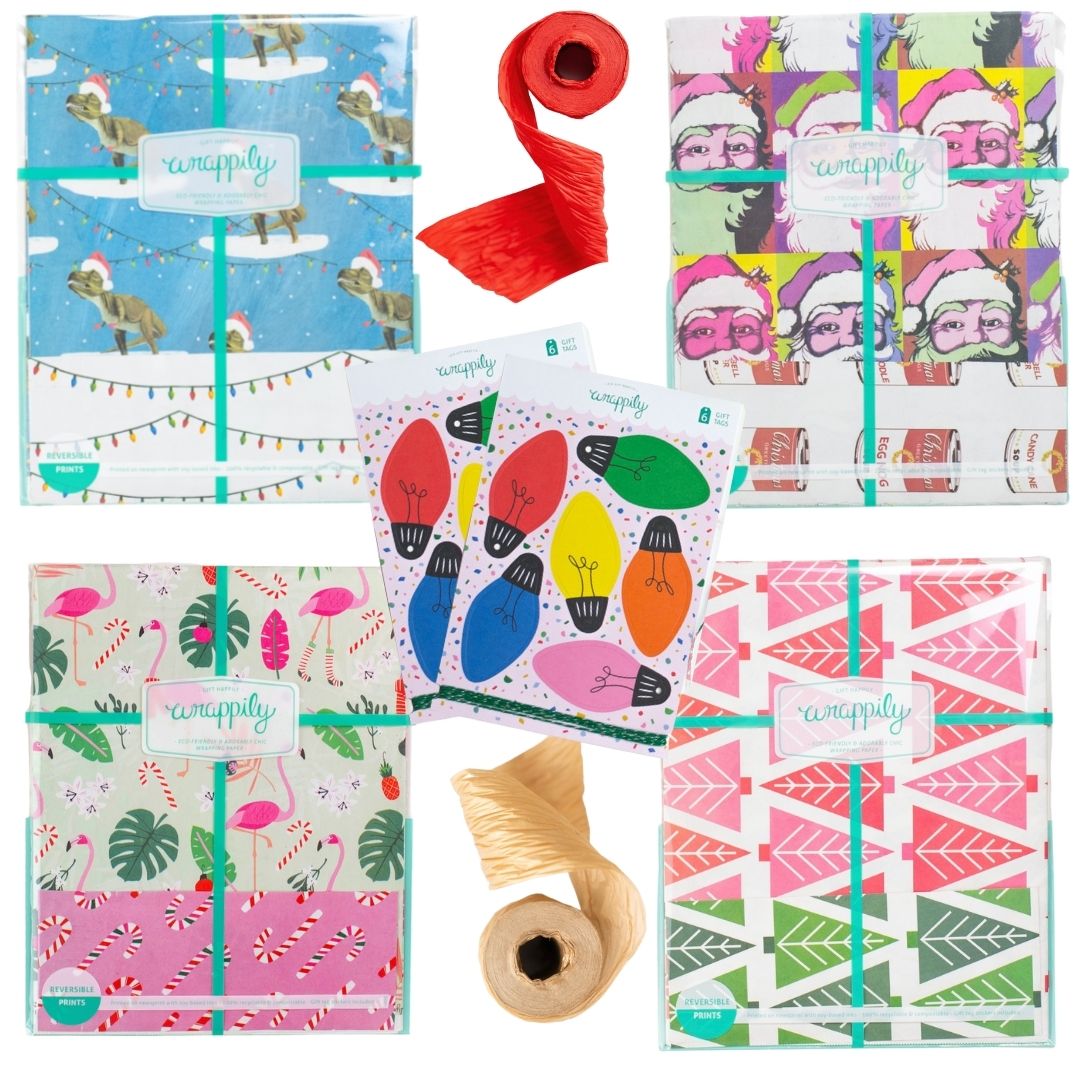


Kids Christmas Fun - Complete Eco Gift Wrap Bundle
$69.99 $75.00
Celebrate sustainably with this eco-friendly gift wrap collection of Christmas favorites for kids. Recycled and recyclable wrapping paper with reversible patterns make gift wrapping fun! Paper works great for crafting, too.
Kids Christmas Wrapping Paper Bundle includes:
- O Tannenbaum double-sided gift wrap, 3 sheets
- Warhol Santa double-sided gift wrap, 3 sheets
- Dino Lights double-sided gift wrap, 3 sheets
- Feliz Flamingos double-sided gift wrap, 3 sheets
- (2) Christmas Lights Pop Out Gift Tags & Twine (12 total tags)
- Red and Gold Paper Ribbon, 25 yards each
JOIN the mission to green-up gifting! #wrapriprecycle #wraphappy #gifthappily


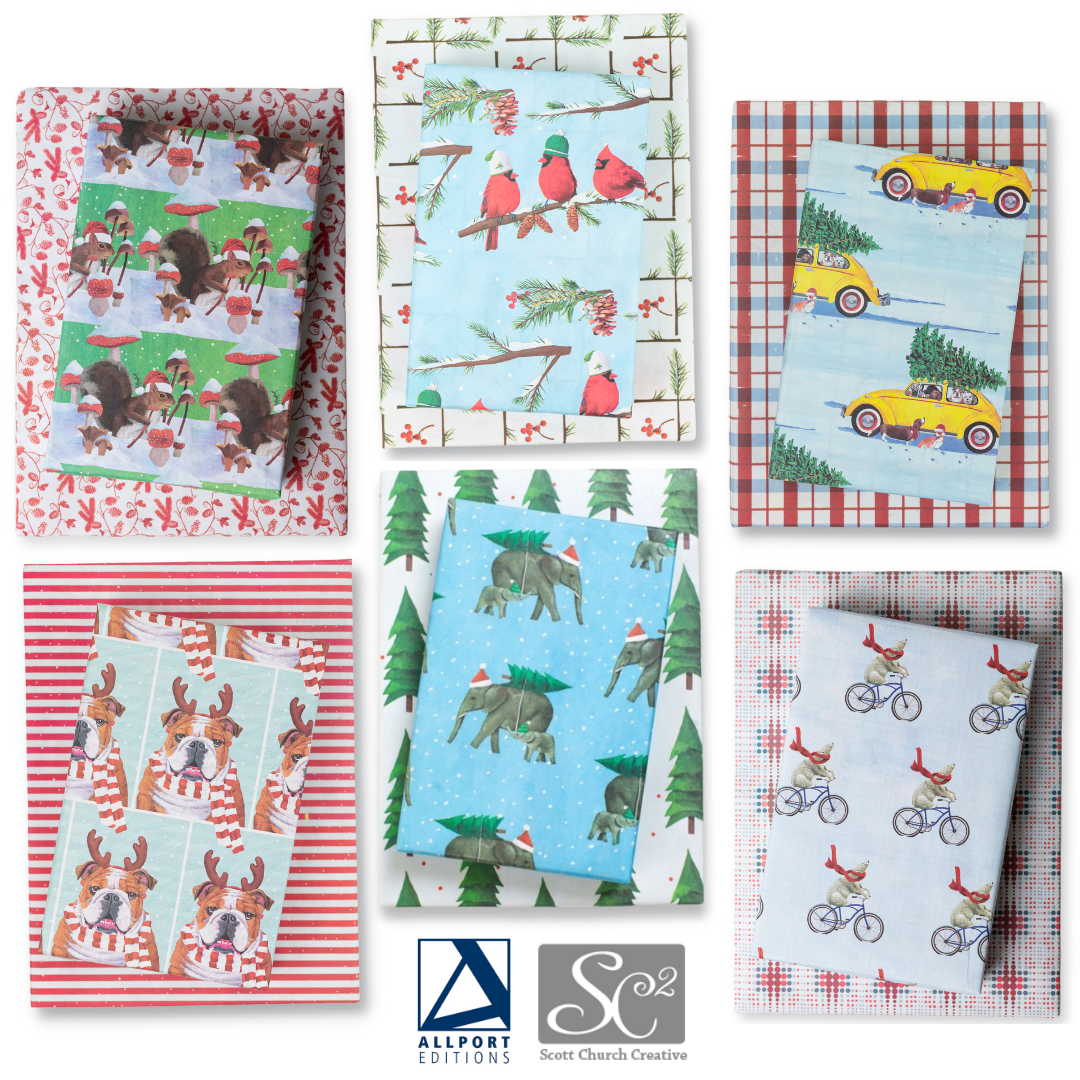


Artist Series Wrapping Paper Bundle: Christmas Critters by Scott Church
$57.99 $64.80
Celebrate sustainably with our recycled and recyclable gift wrap featuring the playful holiday scenes of artist Scott Church for Allport Editions. Reversible patterns make holiday gift wrapping fun! Double-sided paper works great for crafting, too.
This holiday wrap bundle includes a total of 18 double-sided gift wrap sheets with 12 coordinating patterns. One package each of the following included:- Elephant Trees
- VW 'n Dogs
- Squirrel + Mushrooms
- Polar Bear Bike
- Bulldogs in Scarf
- Winter Cardinals
• Sheet size 21.5" x 34" (5 sq ft)
• Premium newsprint + soy-based inks
• Plastic-free PLA packaging (plus no unnecessary cardboard tube!)
• Flat, folded sheets for easy storage
• 100% recyclable and compostable
• Milled, printed and packaged in Washington State
JOIN the mission to green-up gifting! #wrapriprecycle #wraphappy #gifthappily


Artist Series Wrap Bundle: Noel Forest by Esther Fallon-Lau
$40.99
– Sold OutCelebrate sustainably with our recycled and recyclable gift wrap featuring our full pattern collection Aussie designer Esther Fallon-Lau. Reversible patterns make gift wrapping fun! Paper works great for crafting, too.
Bundle includes one package of each:
- Homespun Plaid Red/ Winter Floral
- Noel Forest/ Wintery Wood
- Winter Floral Cream/ Homespun Plaid Green
- Cozy Cabins/ Jewels
Each package includes 3 sheets + adhesive gift tags. Sheet size 21.5" x 34"
• Premium newsprint + soy-based inks
• Plastic-free PLA packaging (plus no unnecessary cardboard tube!)
• Flat, folded sheets for easy storage
• 100% recyclable and compostable
• Milled, printed and packaged in Washington State
JOIN the mission to green-up gifting! #wrapriprecycle #wraphappy #gifthappily


Christmas Bestsellers - Complete Eco Gift Wrap Bundle
$68.99 $75.00
Celebrate sustainably with this eco-friendly collection of all-time Christmas Wrappily favorites. These coordinated Holiday gift wrapping goodies provide the height of sustainability and beautifully wrapped gifts under the tree. Reversible patterns make gift wrapping fun!
Bundle includes:
• O Tannenbaum double-sided eco wrapping paper, 3 sheets
• Poinsettia/Painterly double-sided eco wrapping paper, 3 sheets
• Marbled/Mistletoe double-sided eco wrapping paper, 3 sheets
• Stags & Birch double-sided eco wrapping paper, 3 sheets
• (2) Snow Scenes Pop Out Gift Tags & Twine (12 total tags)
• (2) Rolls of Paper Ribbon, 25 yards each (Red and Gold)
100% Plastic-free PLA packaging! Flat, folded sheet provide easy storage and eliminate the need for that unnecessary cardboard tube. 100% recyclable and compostable. Milled, printed and packaged in Washington State
JOIN the mission to green-up gifting! #wrapriprecycle #wraphappy #gifthappily


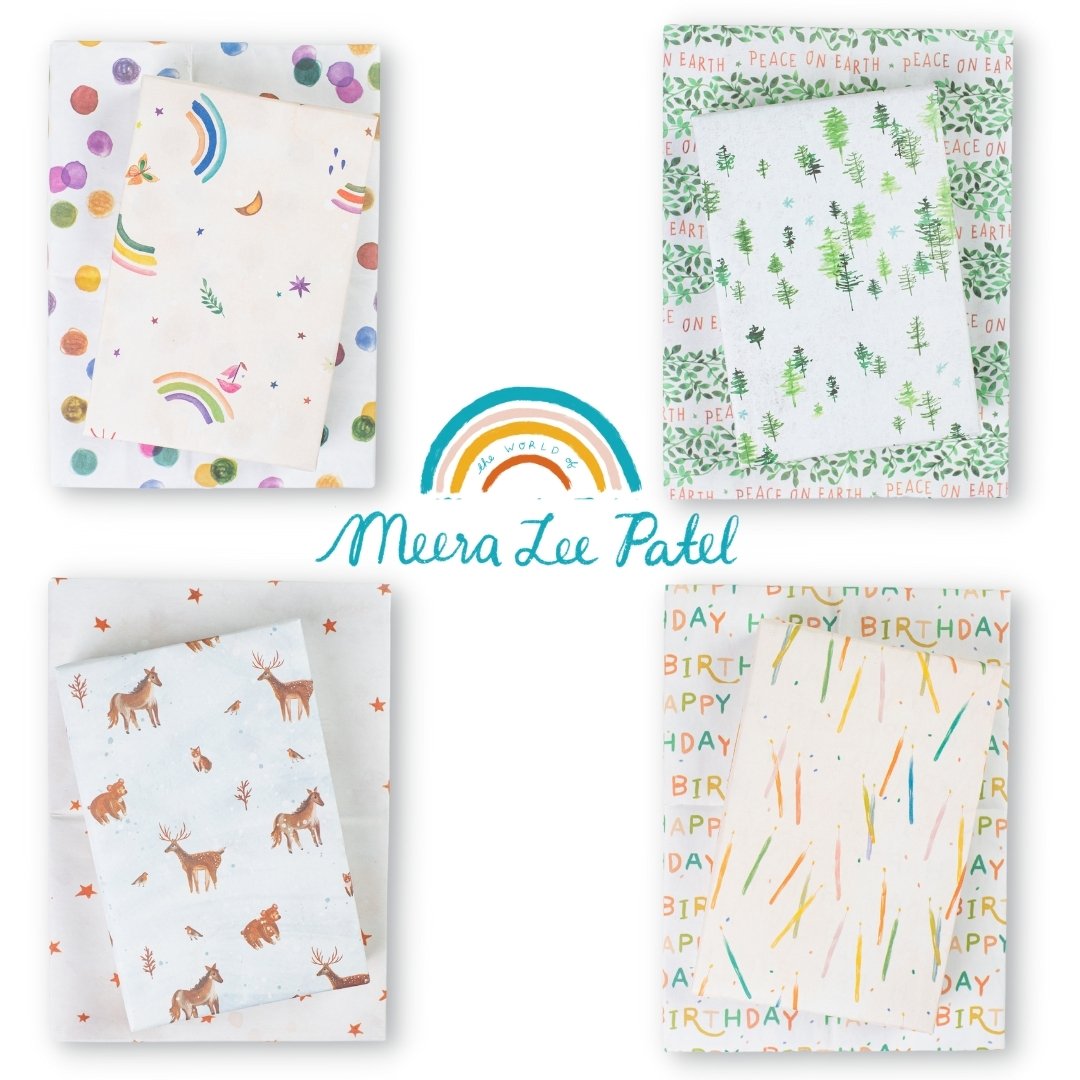
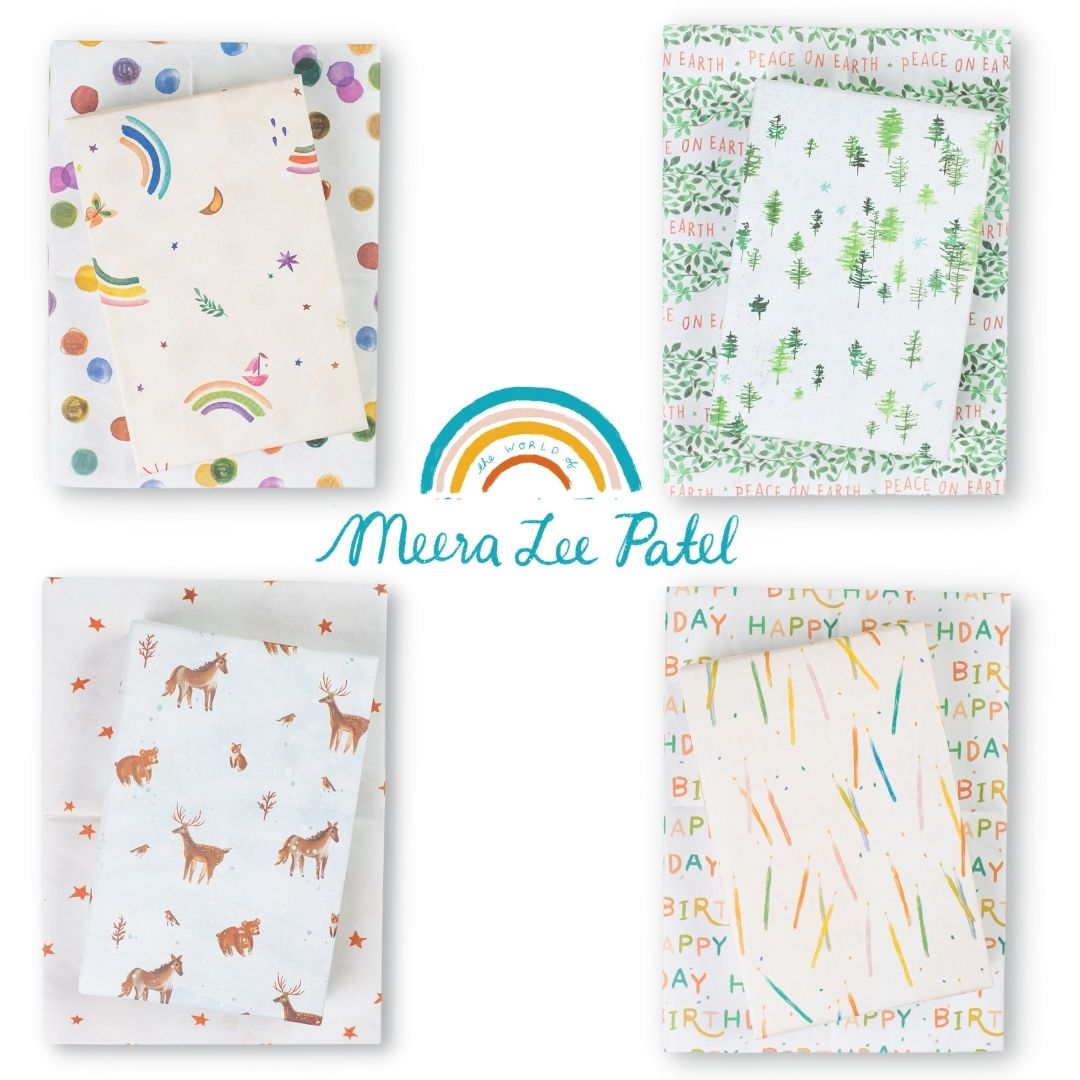
Artist Series Wrap Bundle: Meera Lee Patel
$39.99 $43.20
These double-sided wrapping paper patterns play so well together...why choose?! Bundle and Save on the entire Artist's Collection by Meera Lee Patel, guaranteed to bring joy to any birthday party, baby shower, or holiday celebration.
Bundle includes one each:
- Peace on Earth, 3 sheets
- Winter Animals/Stars, 3 sheets
- Candles/ Happy Birthday, 3 sheets
- Rainbow Sails/Dots, 3 sheets
Full sheet size is 21.5 x 34" Paper arrives flat and folded in a plastic-free PLA bag made of plant starch, Adhesive gift tags. included.
Printed in Washington State on recycled and recyclable/ compostable newsprint. Wrappily is on a mission to green-up gifting, join us!


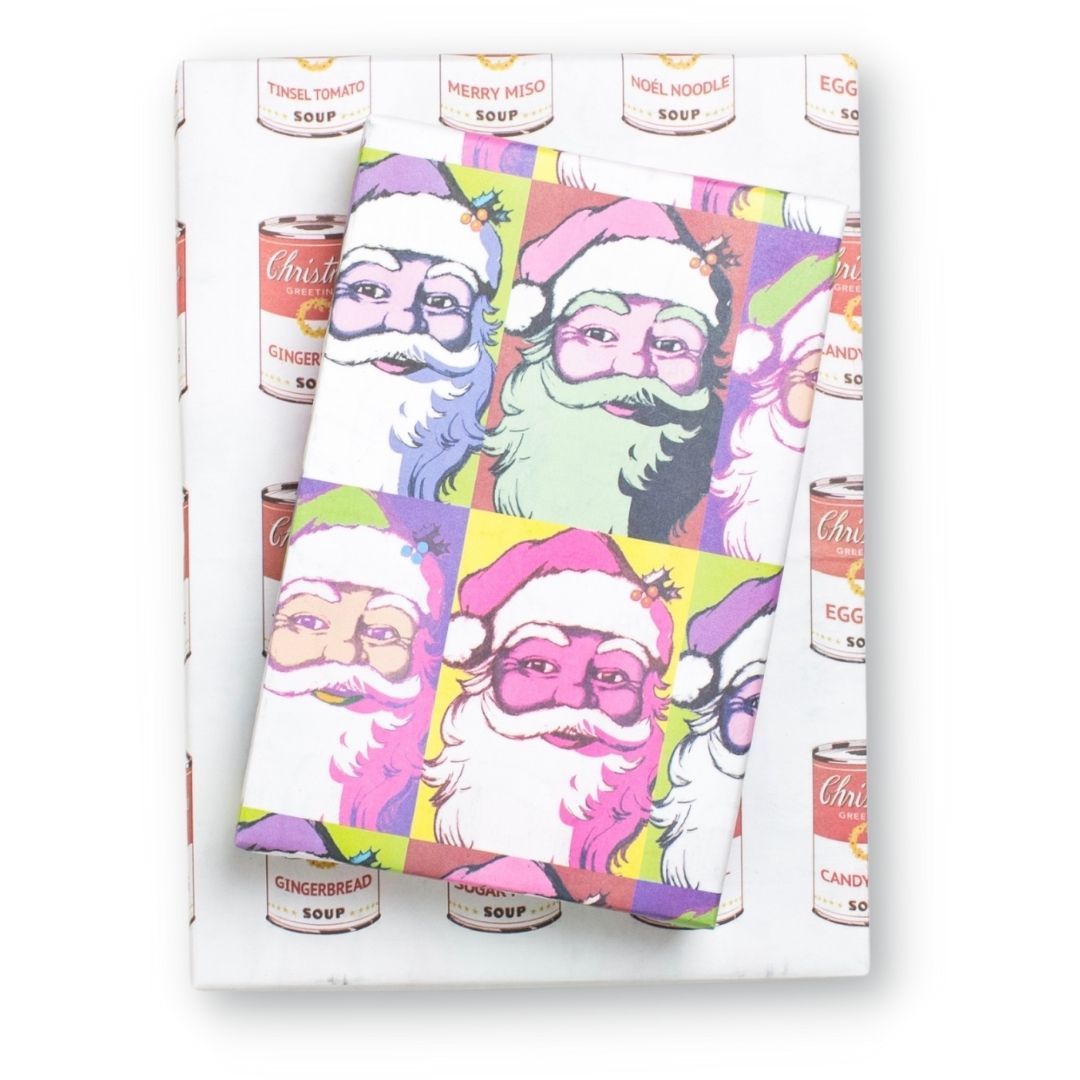
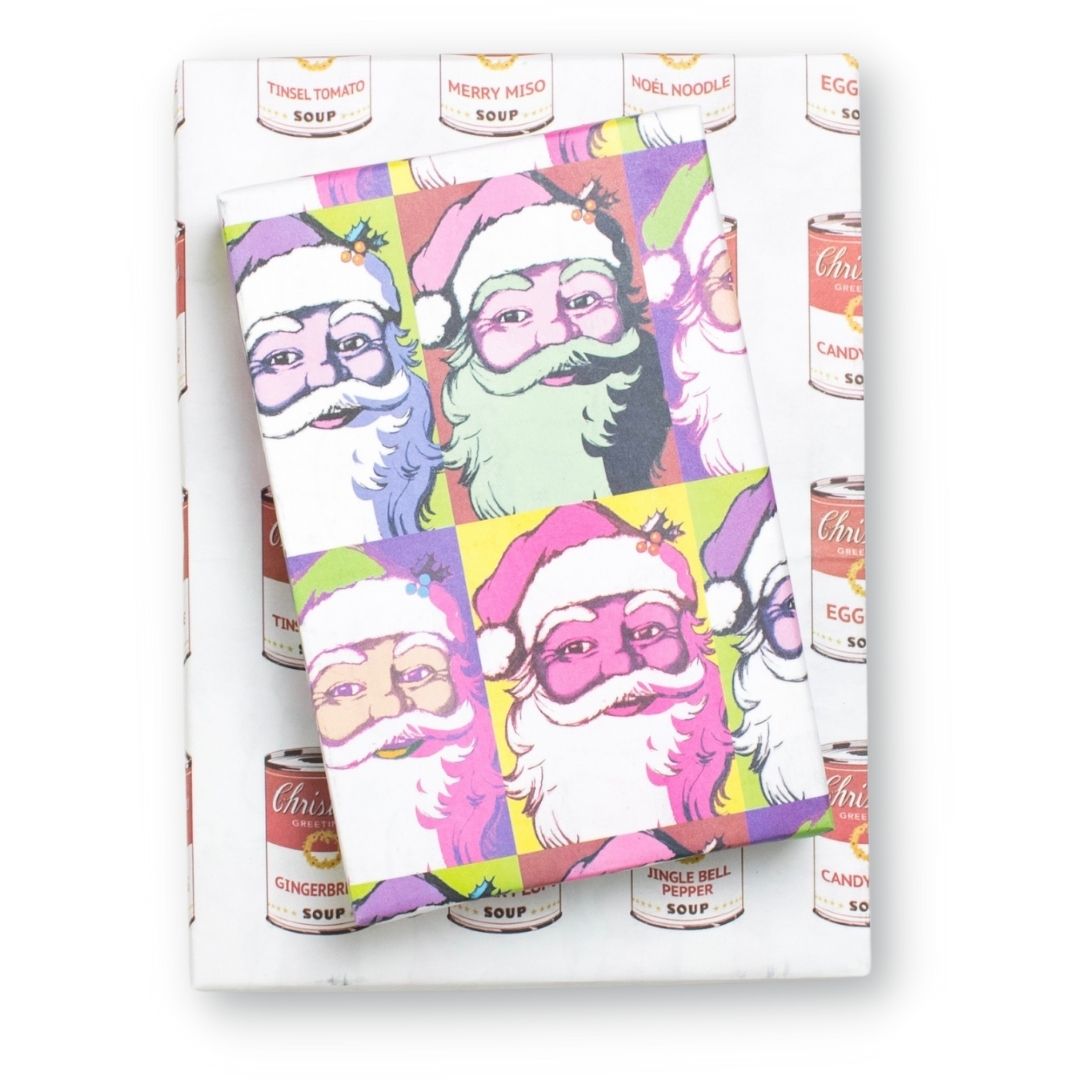


Warhol Santa by Allport Editions
$10.80
Pop Art Santa, need we say more? Package includes three sheets of wrapping paper with a coordinating pattern on the back for easy mix-n-match gift wrapping.
Package includes three double-sided wrapping paper sheets + adhesive gift tags
• Sheet size 21.5" x 34"
• Premium newsprint + soy-based inks = eco-friendly wrapping paper
• Plastic-free PLA packaging
• Flat, folded sheet for easy storage
• No unnecessary cardboard tube
• 100% recyclable and compostable
• Milled, printed and packaged in Washington State


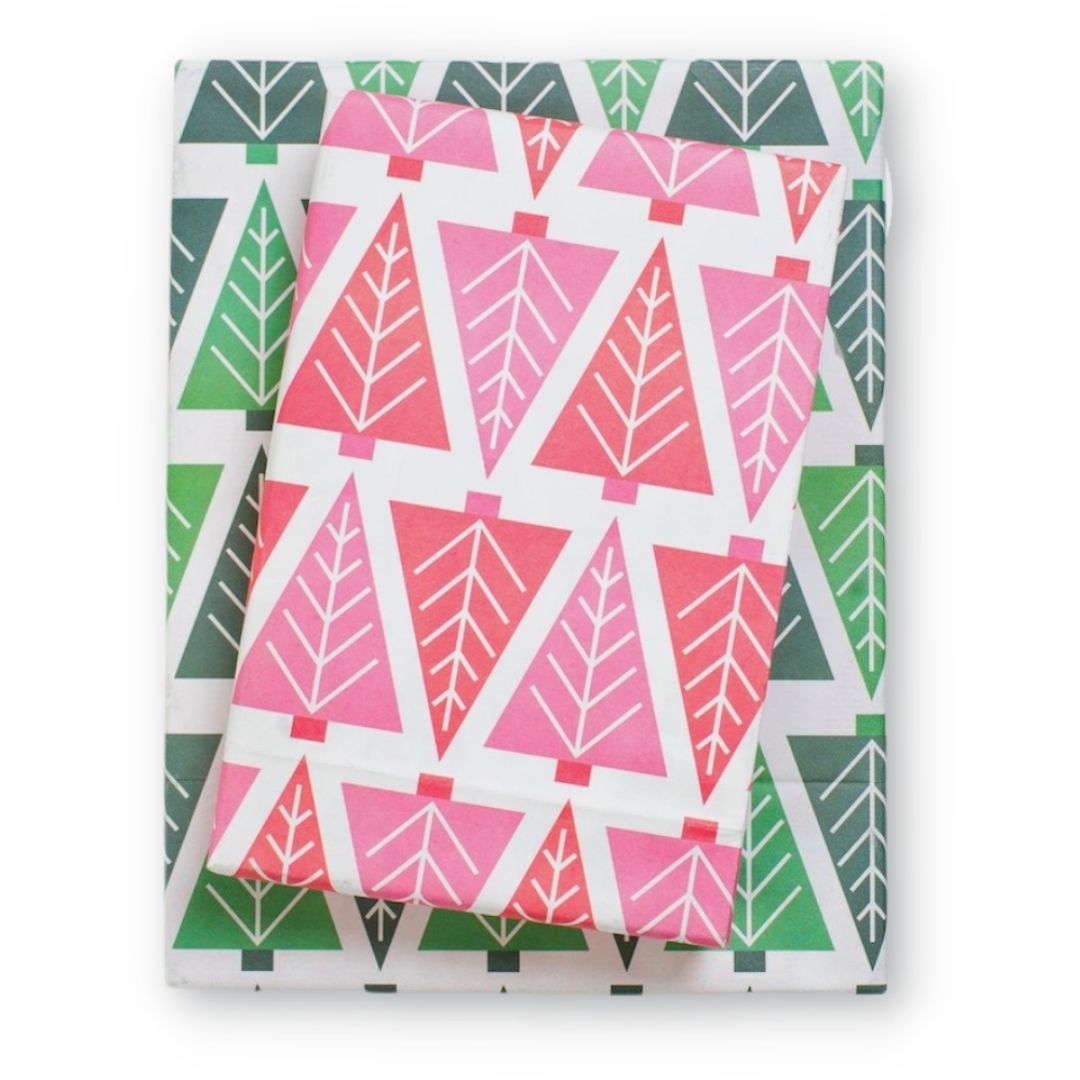


O Tannenbaum
$10.80
-
Geometric holiday trees in bright, festive color ways. It's a Christmas classic!
-
Reversible gift wrap sheets come flat and folded with complementary gift tag stickers. Sheet is 21.5" x 34". Printed in Washington on recycled and recyclable newsprint.


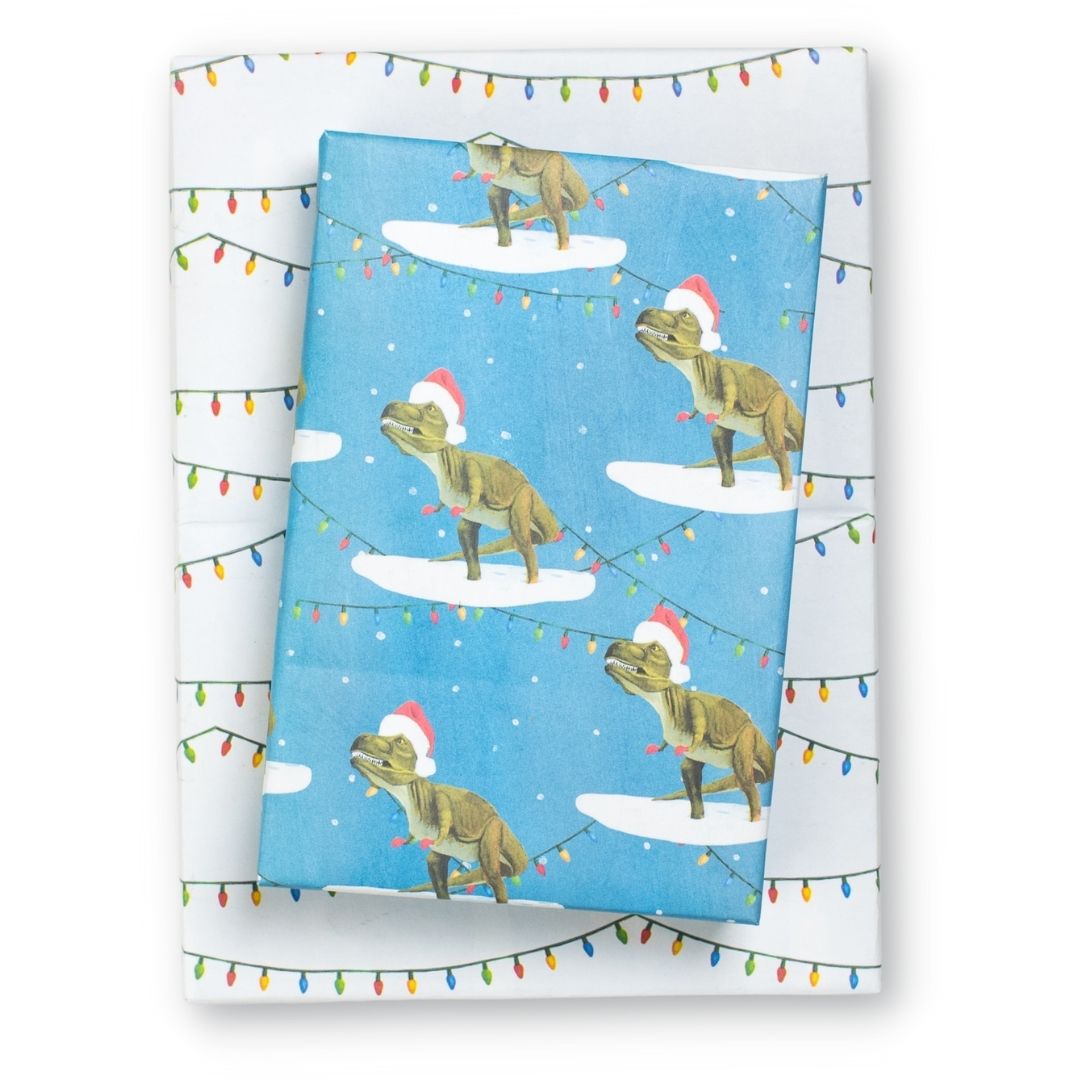
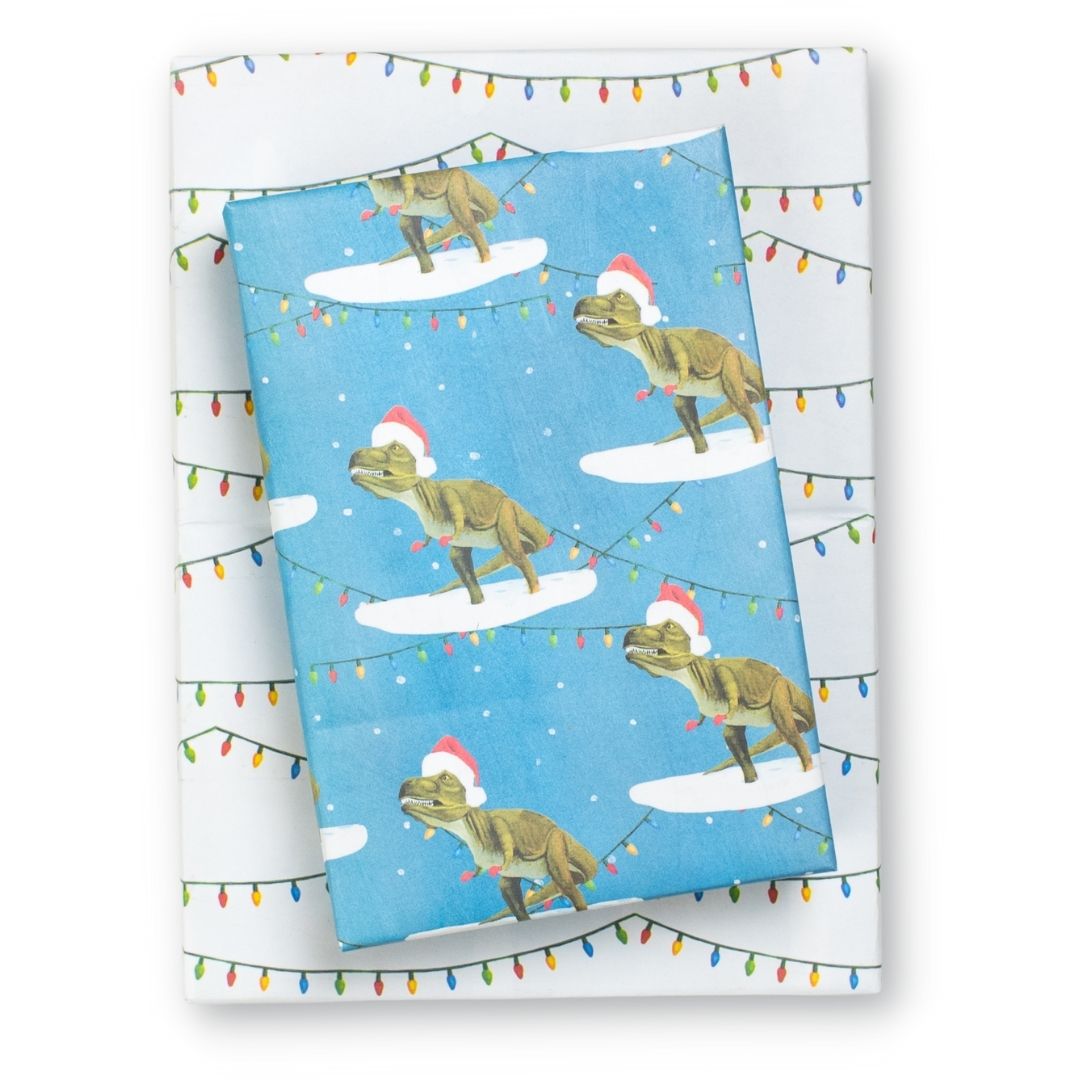


Dino Lights By Allport Editions
$10.80
Dinosaur Wrapping Paper paired with festive Christmas Lights to add some fun and adventure to your kids' Christmas gifts this year. Artist Scott Church's collection of fun-loving animals are top-selling favorites at Portland-based stationers, Allport Editions. Rendered primarily in acrylics, his fun display of festive dinosaur gift wrap is perfect for the T-Rex lovers in your life.
Package includes three double-sided wrapping paper sheets + adhesive gift tags
• Sheet size 21.5" x 34"
• Premium newsprint + soy-based inks = eco-friendly wrapping paper
• Plastic-free PLA packaging
• Flat, folded sheet for easy storage
• No unnecessary cardboard tube
• 100% recyclable and compostable
• Milled, printed and packaged in Washington State


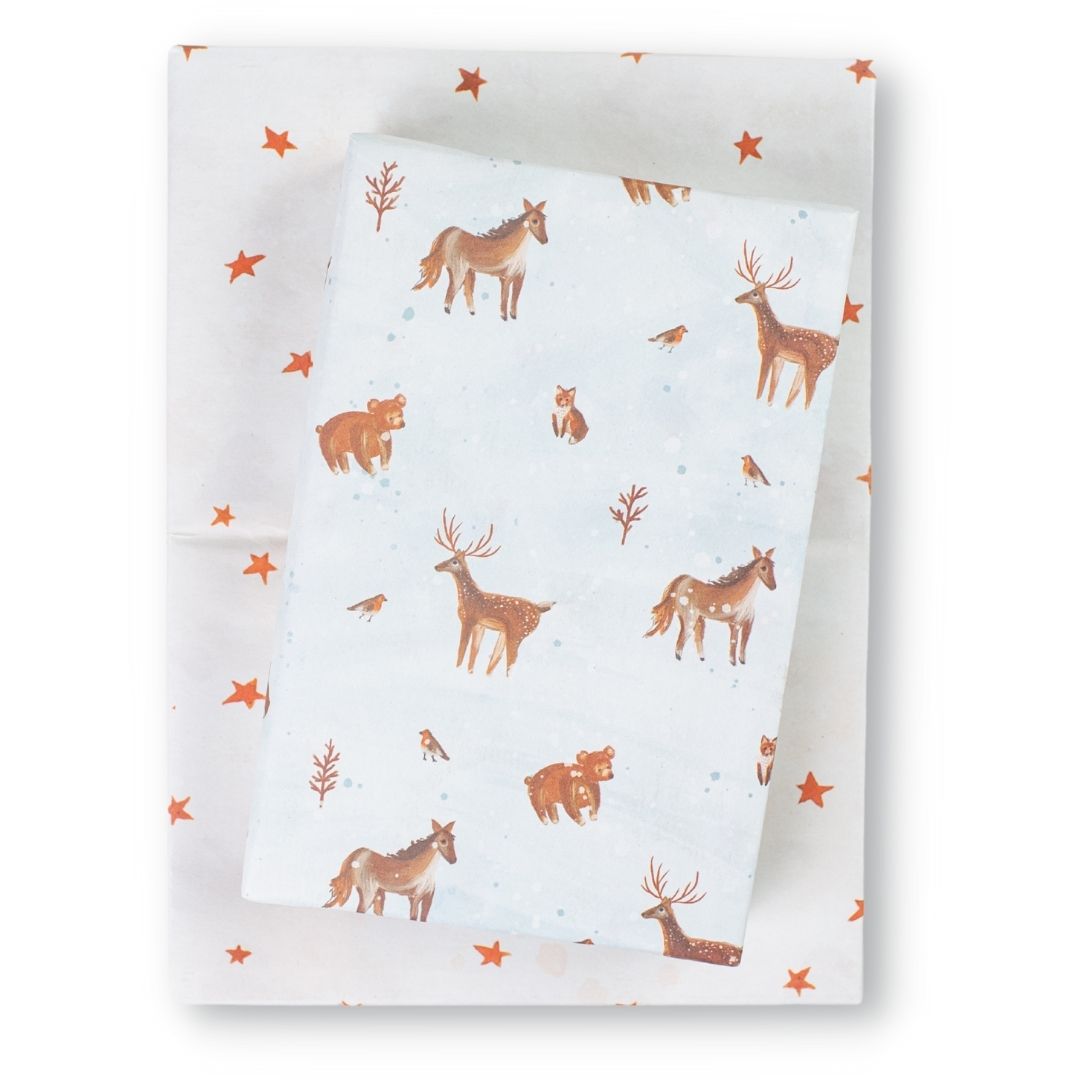
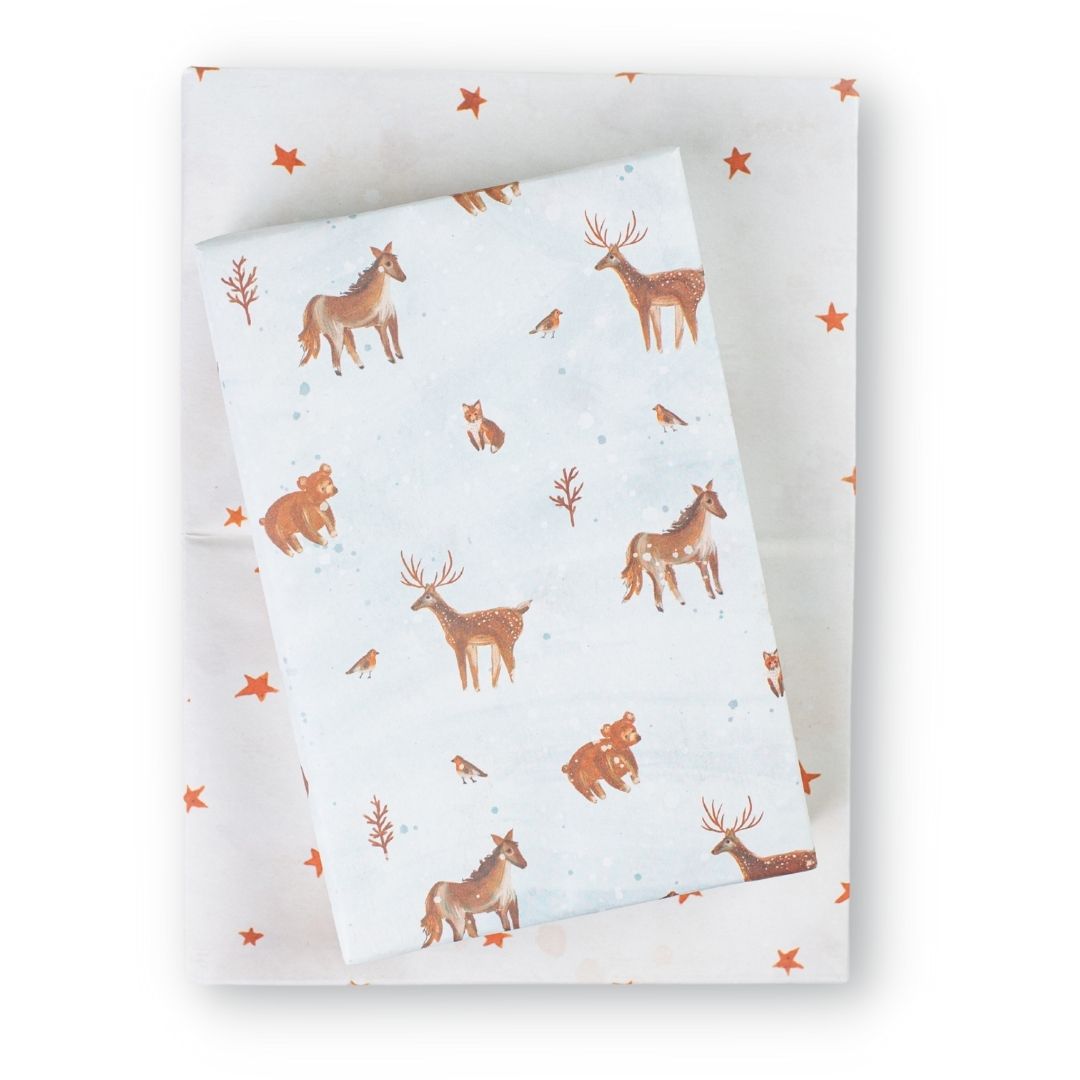


Winter Animals/Stars
$10.80
Celebrate sustainably with our recycled and recyclable wrapping paper featuring sweet wintery holiday themes of snowy animals and starry nights by watercolorist and published author, Meera Lee Patel. Reversible patterns make holiday gift wrapping fun! Paper works great for crafting, too.
Package includes three double-sided wrapping paper sheets + adhesive gift tags
• Sheet size 21.5" x 34"
• Premium newsprint + soy-based inks = eco-friendly wrapping paper
• Plastic-free PLA packaging
• Flat, folded sheet for easy storage
• No unnecessary cardboard tube
• 100% recyclable and compostable
• Milled, printed and packaged in Washington State
JOIN the mission to green-up gifting!
#wrapriprecycle #wraphappy #gifthappily


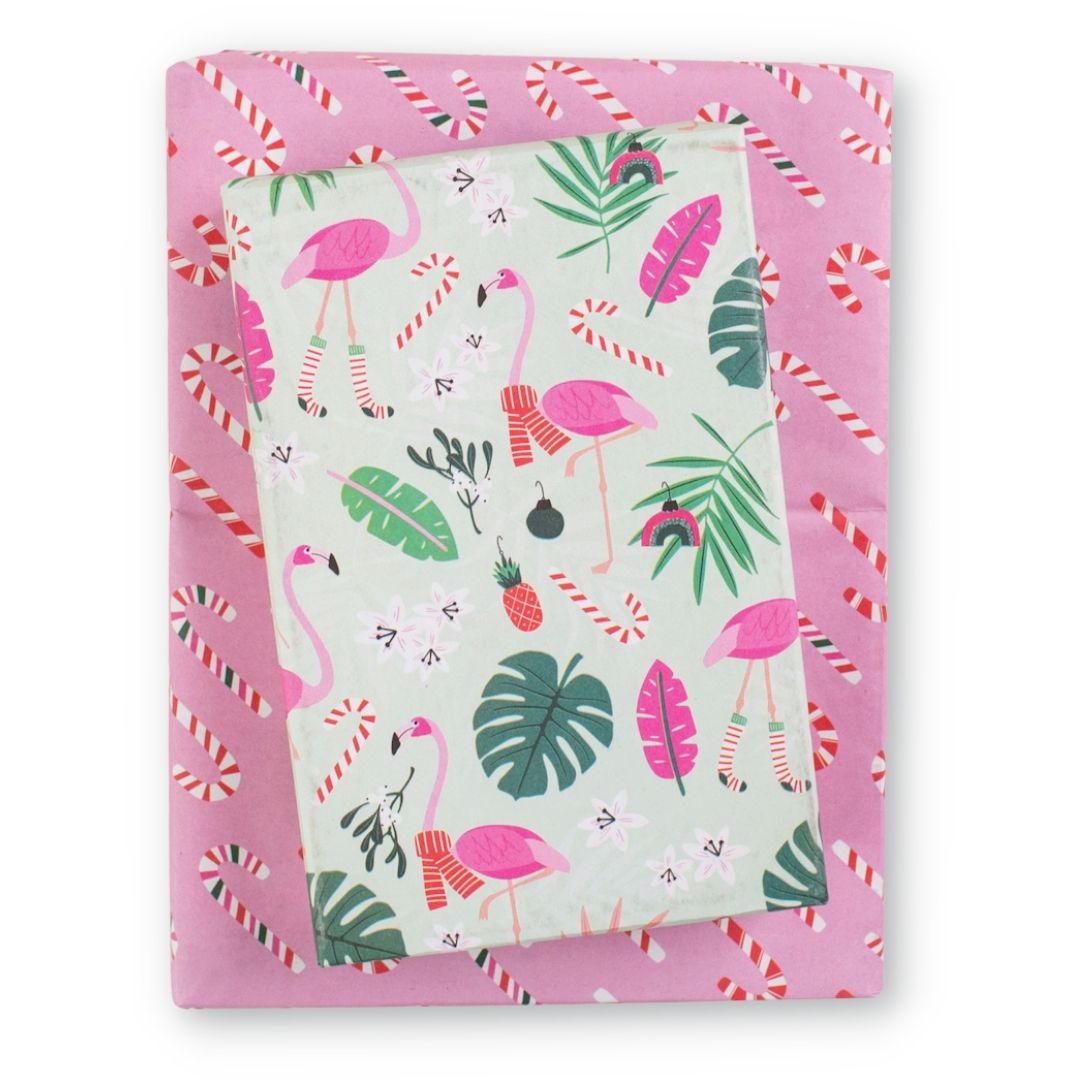
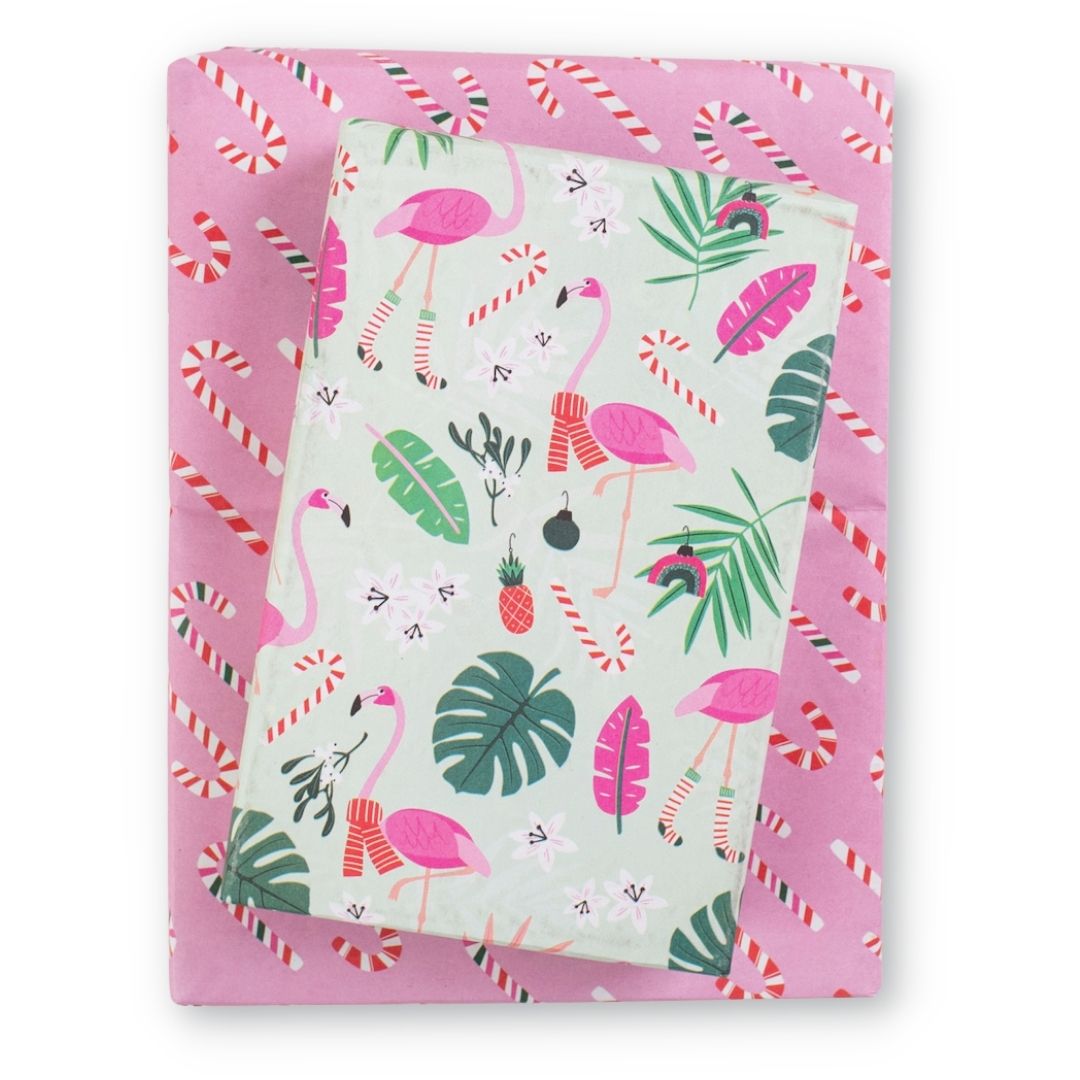


Feliz Flamingos/ Candy Canes
$10.80
Tis' the season to think pink. Lots of pink. These jaunty birds and jungle foliage make any tropical holiday scene complete. Paired with this maximalist's candy cane dream, we think you'll have the whole 'merry and bright' thing on lock. Feliz Flamingos/Candy Canes is a new Wrappily exclusive by surface pattern designer Nadia Hassan.
Package includes three double-sided wrapping paper sheets + adhesive gift tags
• Sheet size 21.5" x 34"
• Premium newsprint + soy-based inks = eco-friendly wrapping paper
• Plastic-free PLA packaging
• Flat, folded sheet for easy storage
• No unnecessary cardboard tube
• 100% recyclable and compostable
• Milled, printed and packaged in Washington State


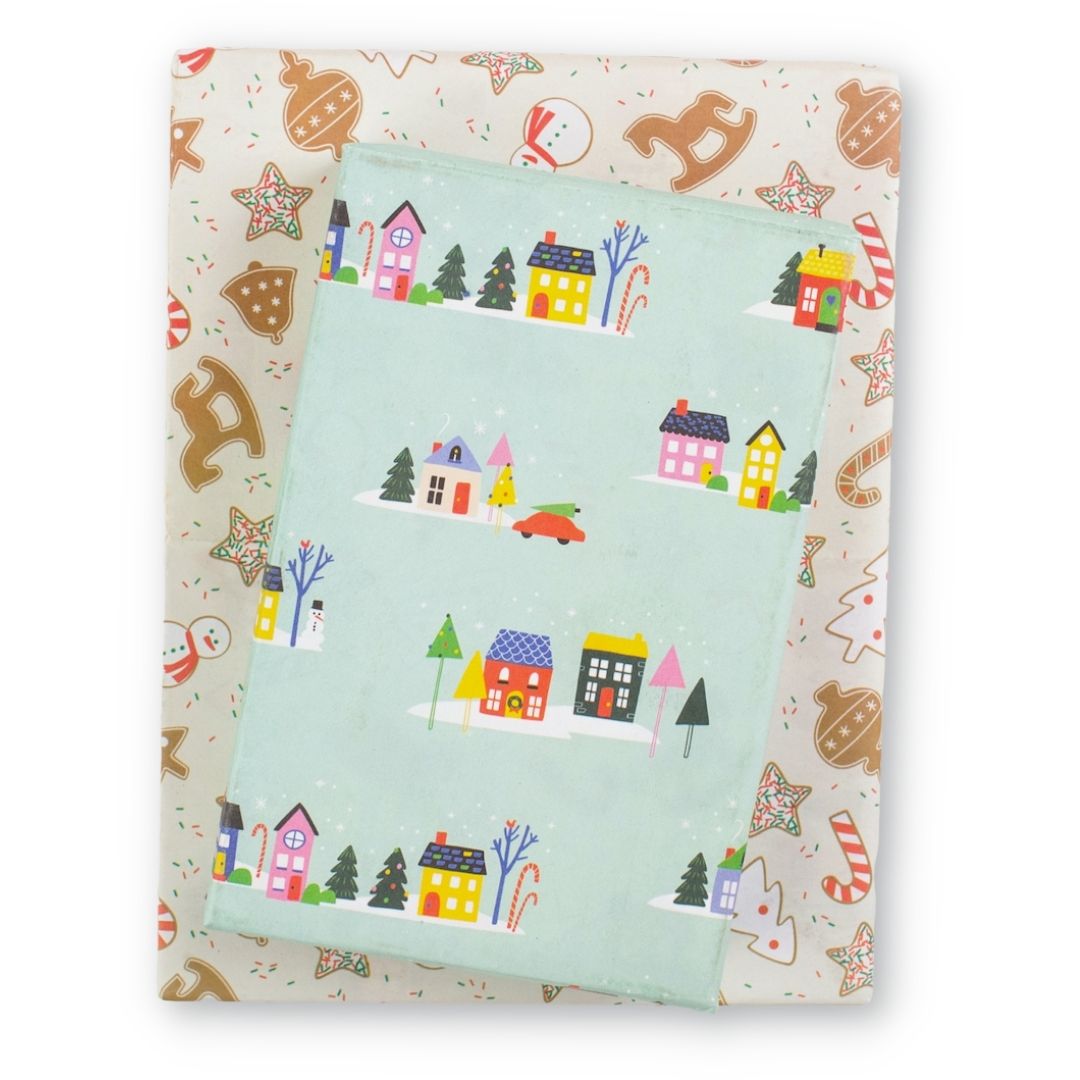


Home for the Holidays/ Christmas Cookies
$10.80
'Tis the season to stay cozy. String lights from the eaves and perfect your cookie icing, there's no better place to be than Home for the Holidays. This charming pattern combo playing with indoor/ outdoor homey holiday scenes is the clever work of surface pattern designer Nadia Hassan.
Package includes three double-sided wrapping paper sheets + adhesive gift tags
• Sheet size 21.5" x 34"
• Premium newsprint + soy-based inks = eco-friendly wrapping paper
• Plastic-free PLA packaging
• Flat, folded sheet for easy storage
• No unnecessary cardboard tube
• 100% recyclable and compostable
• Milled, printed and packaged in Washington State


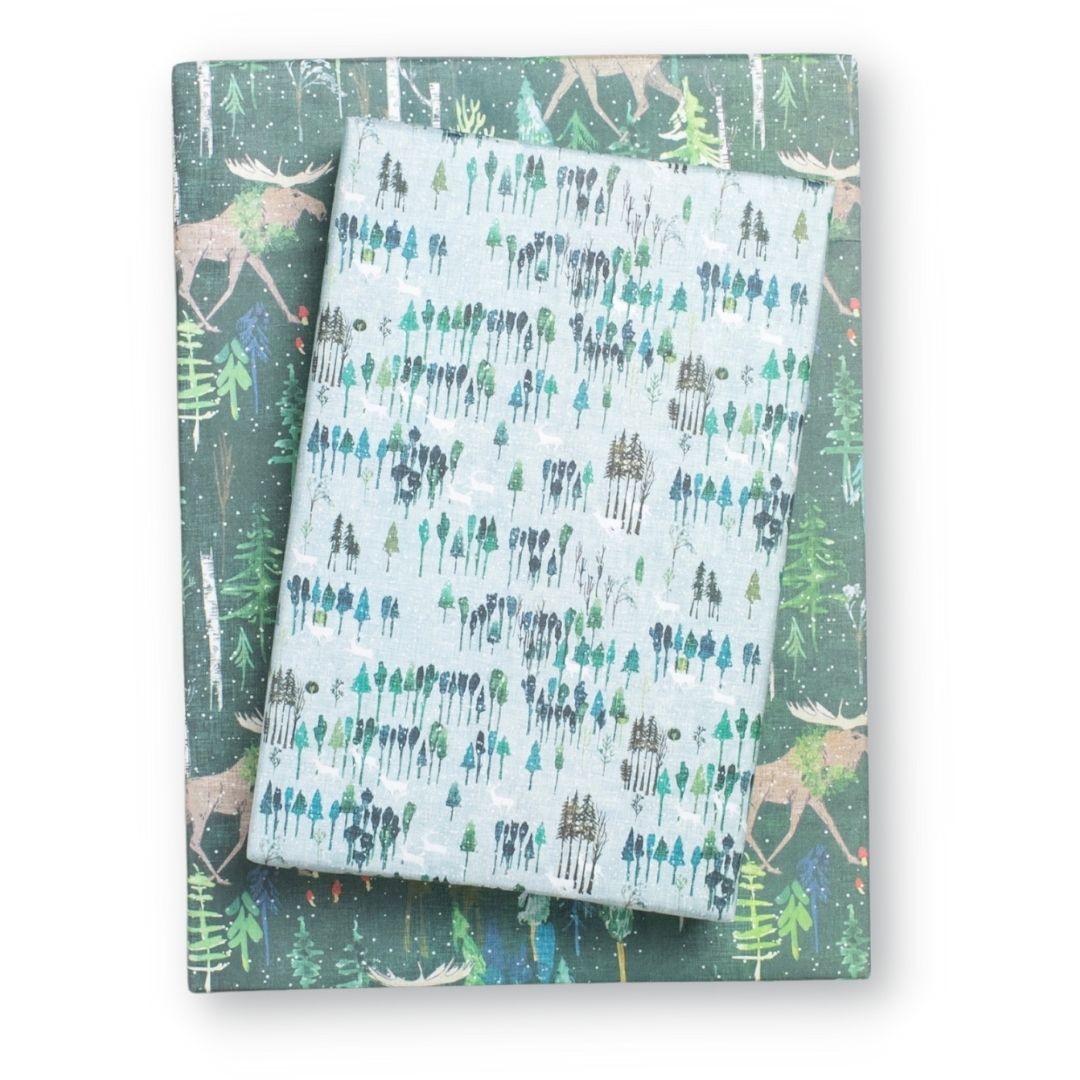
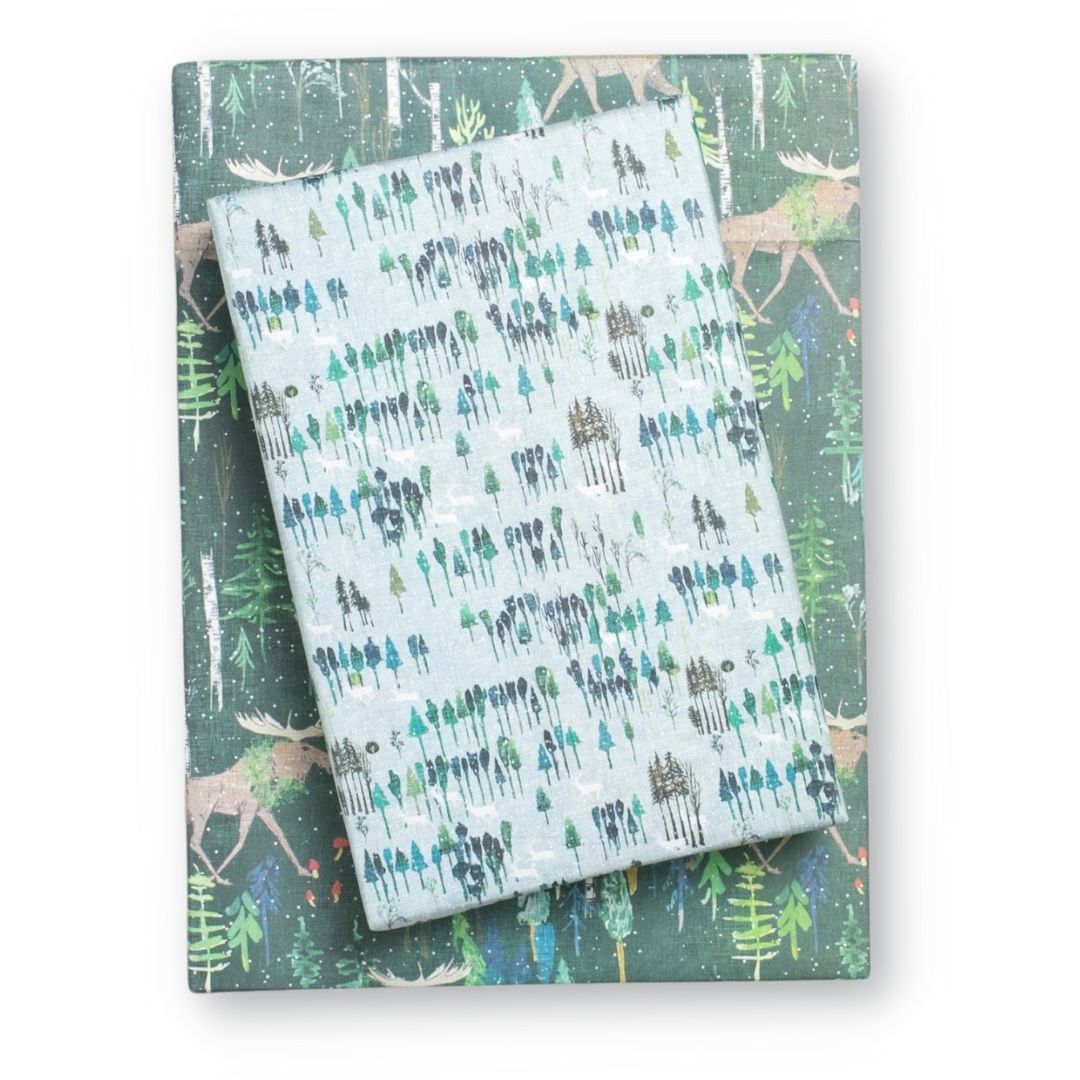


Noel Forest/ Wintery Wood
$10.80
What merry moose roam this Noel Forest! And on the back, a pale and dreamy Wintry Wood, these fantastical wintry scenes are from the imagination of Australian artist Esther Fallon Lau. They coordinate perfectly with rustic plaids and swirling florals in her Noel Forest holiday collection for Wrappily.
Package includes three double-sided wrapping paper sheets + adhesive gift tags
• Sheet size 21.5" x 34"
• Premium newsprint + soy-based inks = eco-friendly wrapping paper
• Plastic-free PLA packaging
• Flat, folded sheet for easy storage
• No unnecessary cardboard tube
• 100% recyclable and compostable
• Milled, printed and packaged in Washington State
PLEASE NOTE: We don’t want a little smudge to come between us. Wrappily is uncoated newsprint, ink from darkly saturated patterns such as this will likely transfer onto fingertips during the wrapping process. Our soy-based inks are safe, non-toxic, and rinse right off with water. If this sounds like more than you bargained for, we suggest you select from our lighter patterned papers.


Homespun Plaid Red/ Winter Floral Evergreen
$10.80
Greens, reds, plaids, holly and evergreens—all that holiday charm makes this duo an absolute delight for seasonal gift wrapping. Use alone or pair together with others from the Noel Forest collection, Esther Fallon Lau’s festive and fantastical wintry pattern wonderland.
Package includes three double-sided wrapping paper sheets + adhesive gift tags
• Sheet size 21.5" x 34"
• Premium newsprint + soy-based inks = eco-friendly wrapping paper
• Plastic-free PLA packaging
• Flat, folded sheet for easy storage
• No unnecessary cardboard tube
• 100% recyclable and compostable
• Milled, printed and packaged in Washington State
PLEASE NOTE: We don’t want a little smudge to come between us. Wrappily is uncoated newsprint, ink from darkly saturated patterns such as this will likely transfer onto fingertips during the wrapping process. Our soy-based inks are safe, non-toxic, and rinse right off with water. If this sounds like more than you bargained for, we suggest you select from our lighter patterned papers.


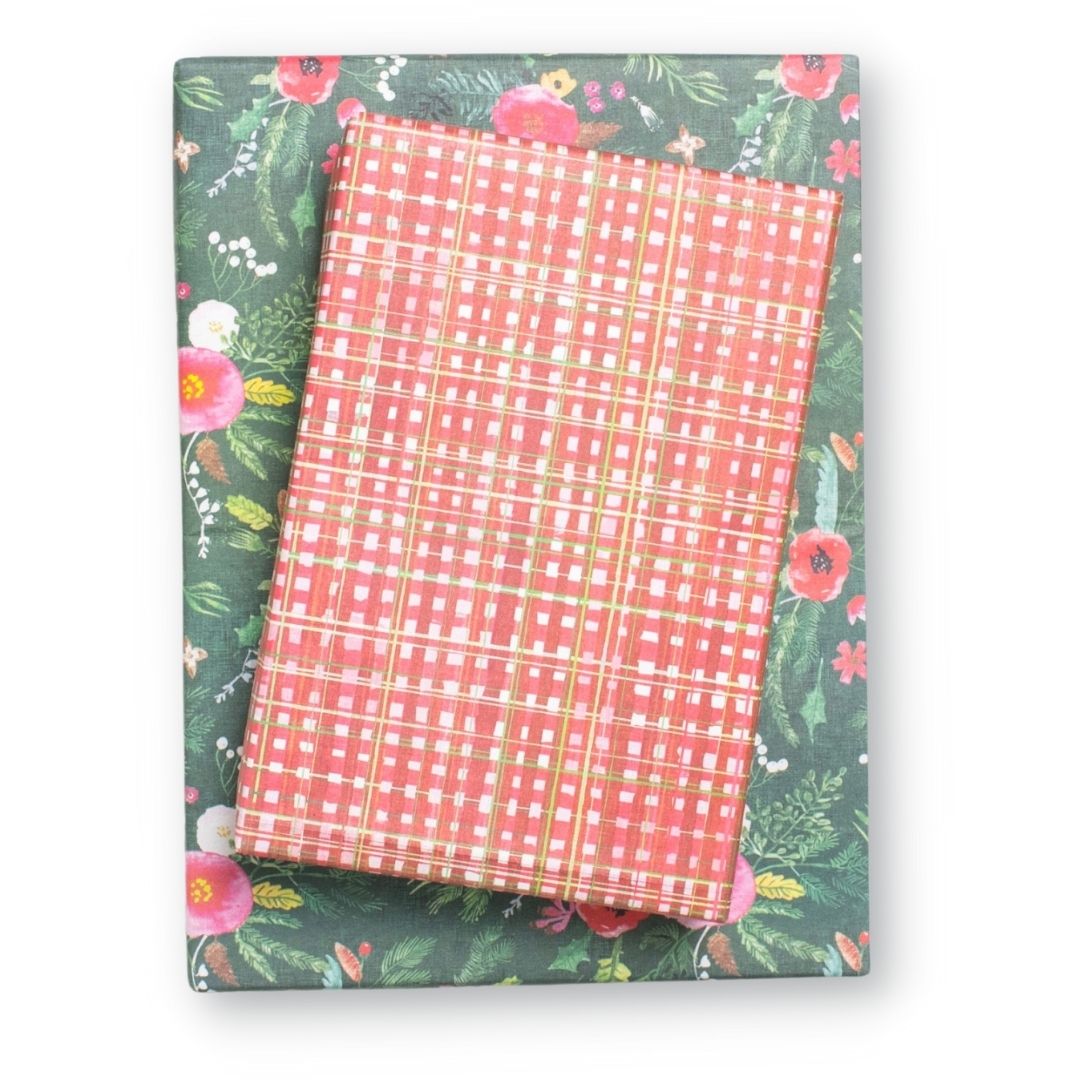
Winter Floral Cream/ Homespun Plaid Green
$10.80
Rustic green plaid pairs lovely with this elegant swirl of holly, evergreens, hearty winter flowers, and a snip-of-an-ode to artist Esther Fallon Lau’s Australian homeland (can you spot it?) Use alone or pair with other festive and fantastical wintry scenes from the Noel Forest holiday collection.
Package includes three double-sided wrapping paper sheets + adhesive gift tags
• Sheet size 21.5" x 34"
• Premium newsprint + soy-based inks = eco-friendly wrapping paper
• Plastic-free PLA packaging
• Flat, folded sheet for easy storage
• No unnecessary cardboard tube
• 100% recyclable and compostable
• Milled, printed and packaged in Washington State


Cozy Cabins/ Jewels - Double-sided Eco Wrapping Paper for Holiday Gifting
$10.80
This wooded cabin scene is a wee bit festive, a wee bit minimalist, and a whole lot charming. Rustic and earthy with its geometric counterpart, Serendipity Jewels, this pairing completes the festive and fantastical winter scenes in Esther Fallon Lau’s Noel Forest holiday collection.
Package includes three double-sided wrapping paper sheets + adhesive gift tags
• Sheet size 21.5" x 34"
• Premium newsprint + soy-based inks = eco-friendly wrapping paper
• Plastic-free PLA packaging
• Flat, folded sheet for easy storage
• No unnecessary cardboard tube
• 100% recyclable and compostable
• Milled, printed and packaged in Washington State


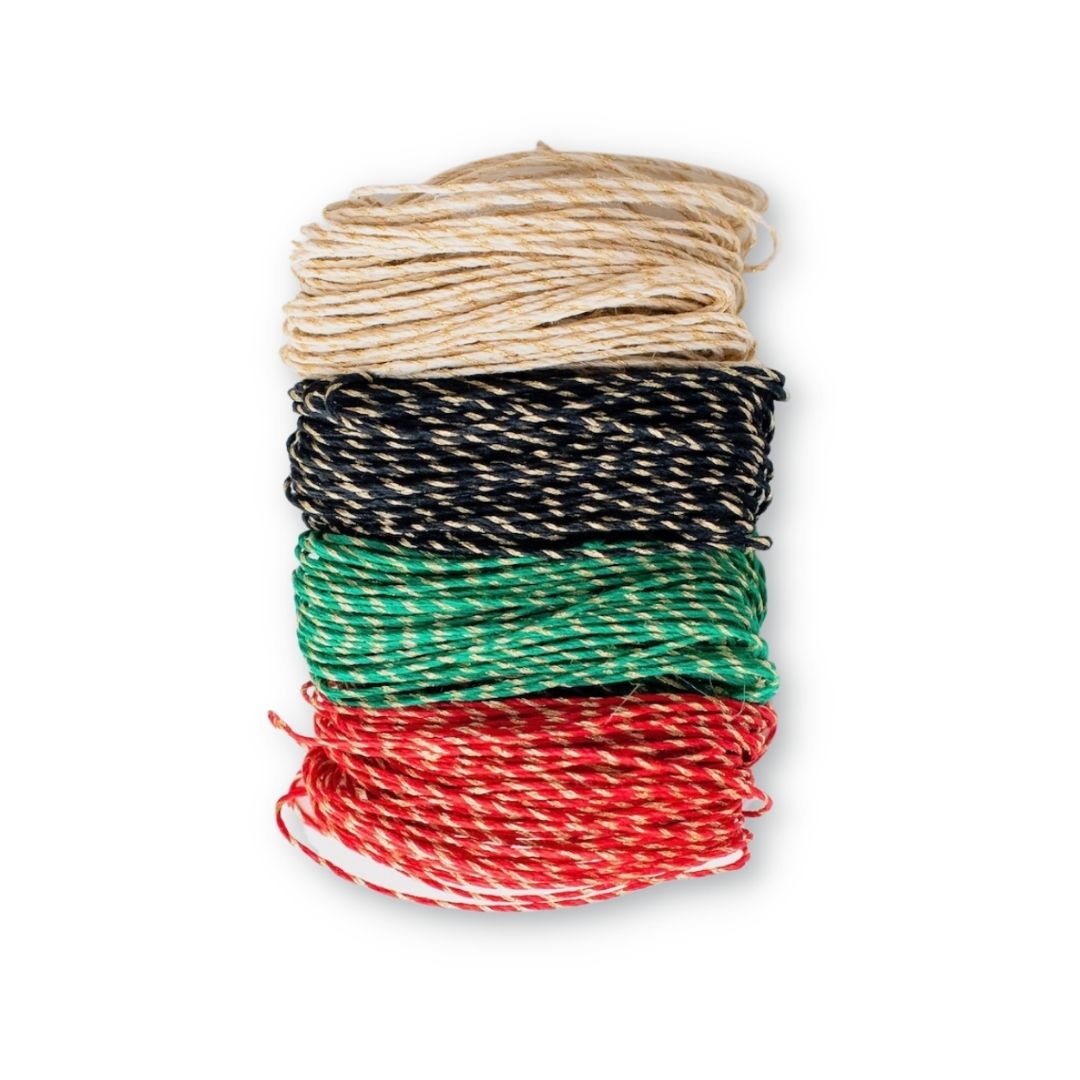


Holiday Sparkle Hemp Twine Quad
$5.89
– Sold OutAll you need for holiday gifts that sparkle under the tree and beyond this season. This premium-grade polished 100% hemp twine is a dainty touch that packs a punch for your gift wrapping. Brilliantly colored with a touch of metallic sparkle, this fine crafted twine is biodegradable, eco-friendly, vegan, AZO dye-free, and oil-free.
Cord diameter is 1mm diameter, 4x30 ft. spools.


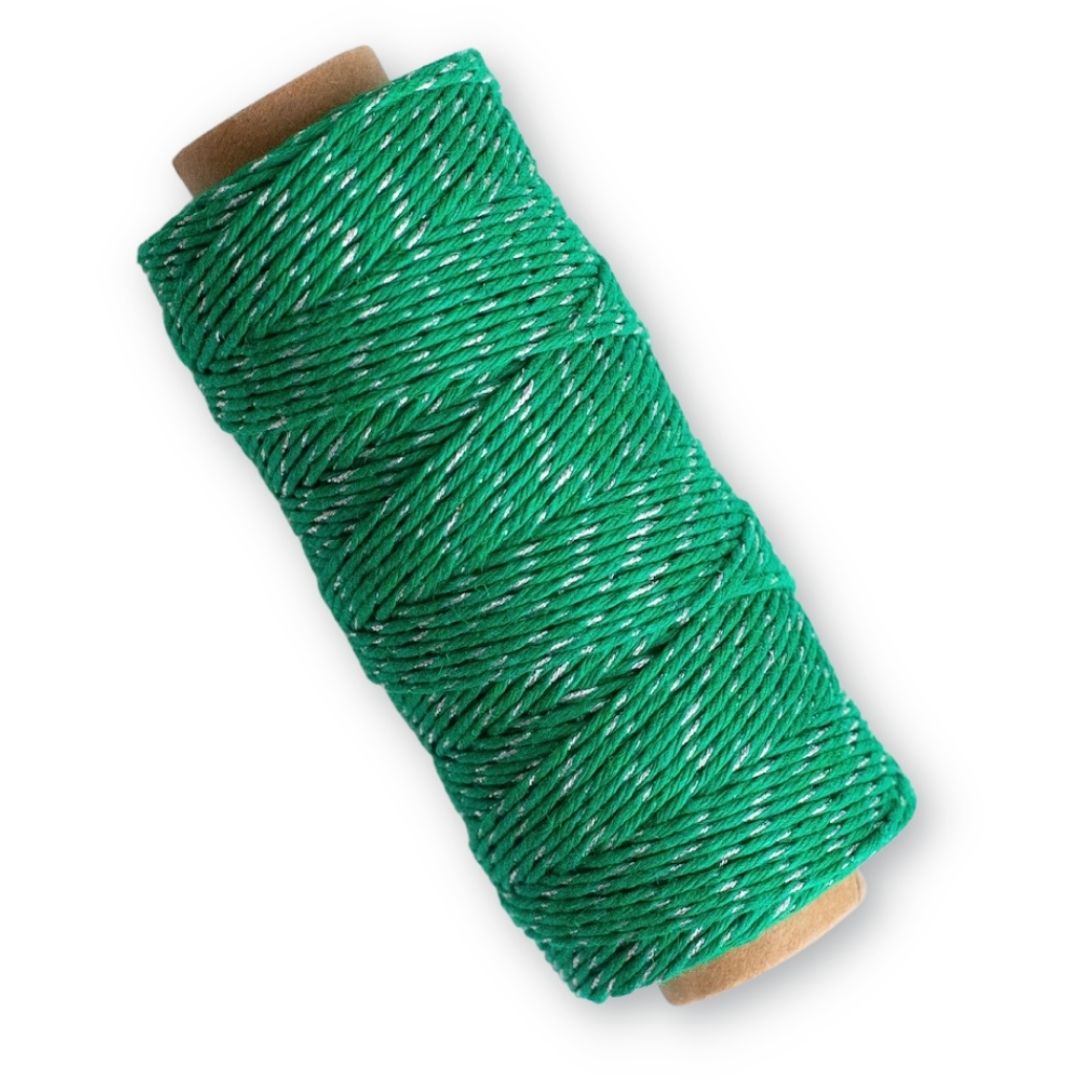
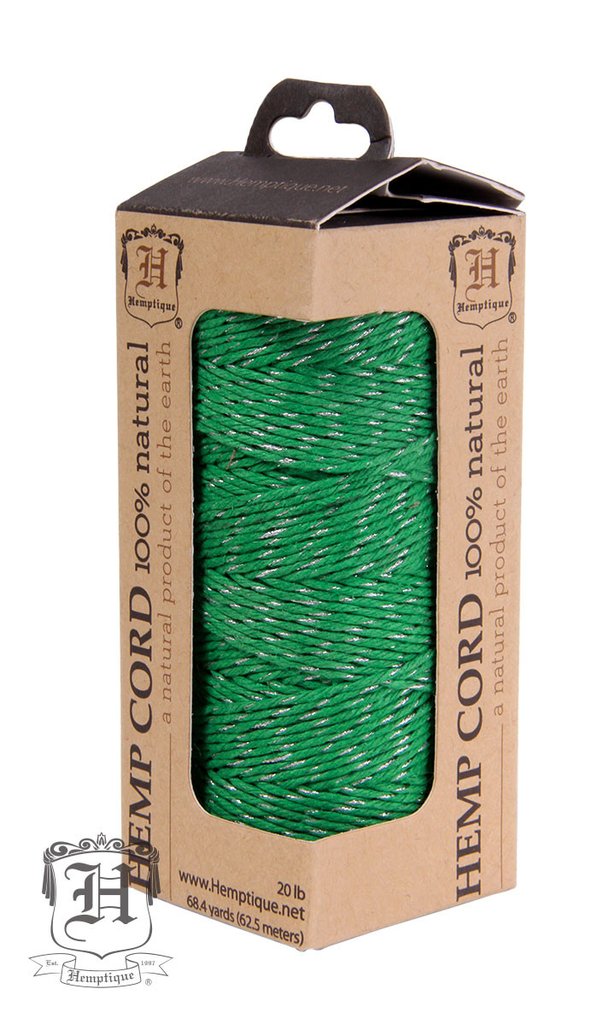

Green Glitter Hemp Twine
$8.00
– Sold OutFestive as a fir tree on Christmas Eve, this premium-grade polished 100% hemp twine is a dainty touch that packs a punch for your gift wrapping. Brilliantly colored with a touch of metallic sparkle, this fine crafted twine is biodegradable, eco-friendly, vegan, AZO dye-free, and oil-free.
Cord diameter is 1mm, 205 ft. spool.


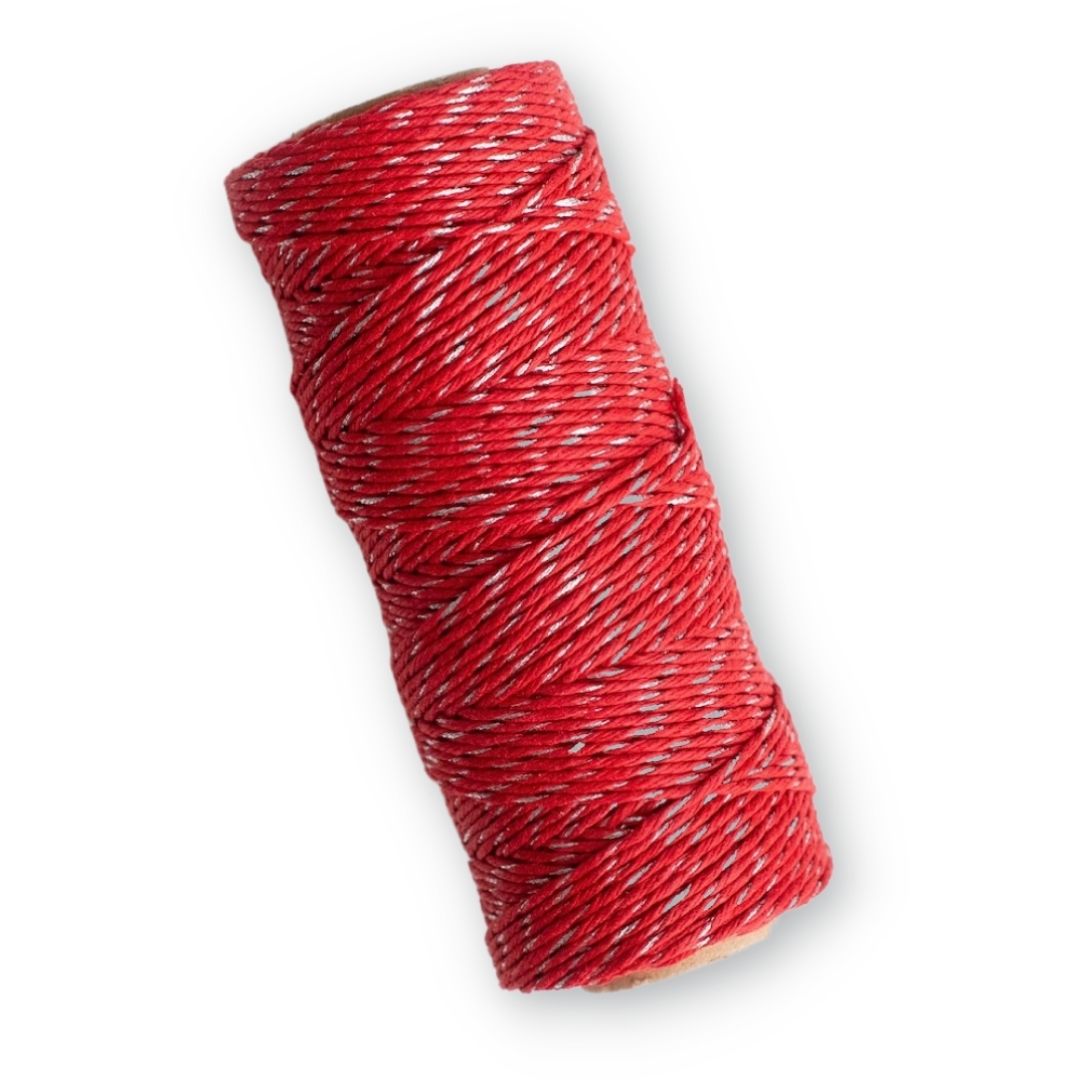
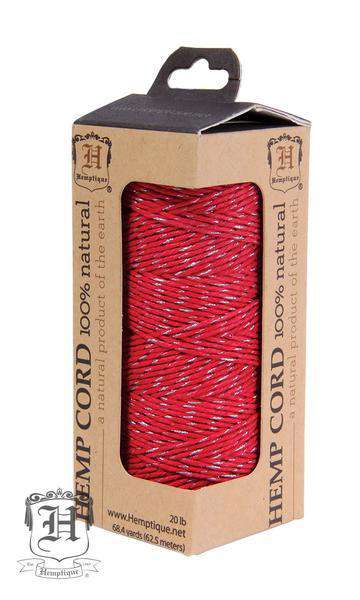

Red Sparkle Hemp Twine
$8.00
– Sold OutRed as rich as a royalty, this premium-grade polished 100% hemp twine is a dainty touch that packs a punch for your gift wrapping. Brilliantly colored with a touch of metallic sparkle, this fine crafted twine is biodegradable, eco-friendly, vegan, AZO dye-free, and oil-free.
Cord diameter is 1mm, 205 ft. spool.


Fox Moment By Allport Editions
$10.80
Celebrate sustainably with our recycled and recyclable wrapping paper featuring a Winter Fox and Snowy Trees designed by Mother-Son duo, Two Can Art x Allport Editions! Reversible patterns make holiday gift wrapping fun! Paper works great for crafting, too.
Package includes three double-sided wrapping paper sheets + adhesive gift tags
• Sheet size 21.5" x 34"
• Premium newsprint + soy-based inks = eco-friendly wrapping paper
• Plastic-free PLA packaging
• Flat, folded sheet for easy storage
• No unnecessary cardboard tube
• 100% recyclable and compostable
• Milled, printed and packaged in Washington State
JOIN the mission to green-up gifting!
#wrapriprecycle #wraphappy #gifthappily


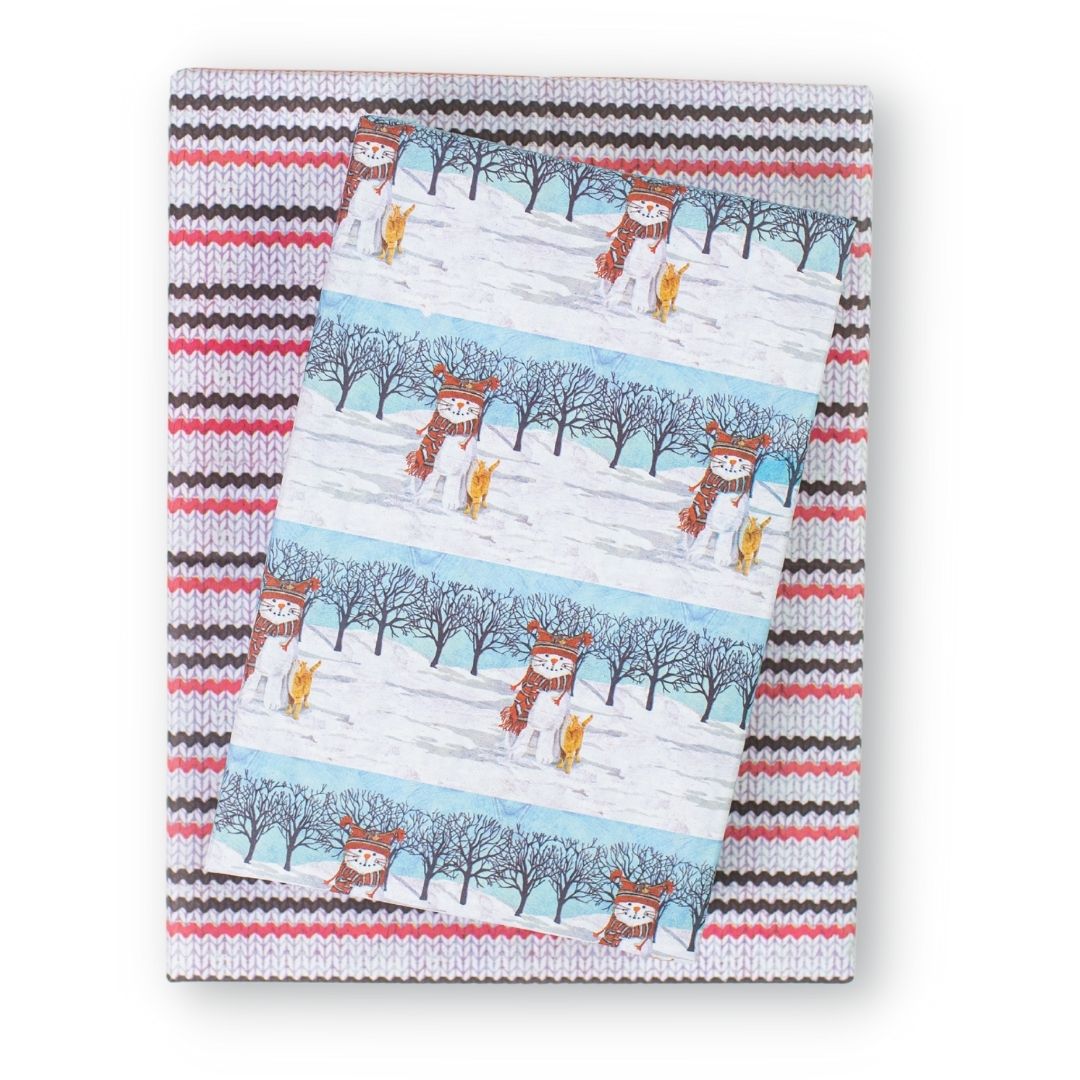
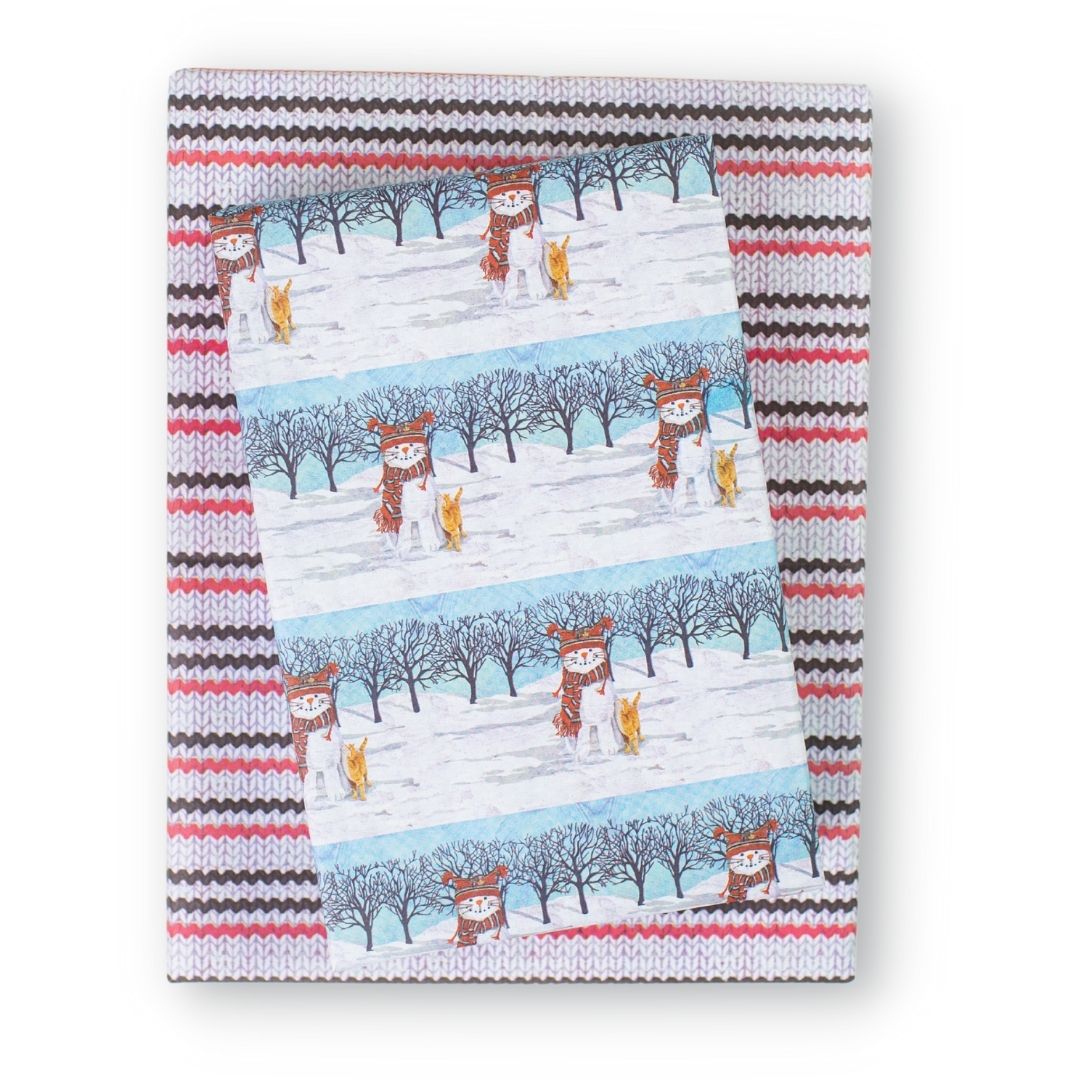


Knit 'n Kitty
$10.80
Celebrate sustainably with our recycled and recyclable wrapping paper featuring a SnowCat Knitting Kitten and matching sweater pattern designed by Mother-Son duo, Two Can Art! Reversible patterns make holiday gift wrapping fun! Paper works great for crafting, too.
Package includes three double-sided wrapping paper sheets + adhesive gift tags
• Sheet size 21.5" x 34"
• Premium newsprint + soy-based inks = eco-friendly wrapping paper
• Plastic-free PLA packaging
• Flat, folded sheet for easy storage
• No unnecessary cardboard tube
• 100% recyclable and compostable
• Milled, printed and packaged in Washington State
JOIN the mission to green-up gifting!
#wrapriprecycle #wraphappy #gifthappily


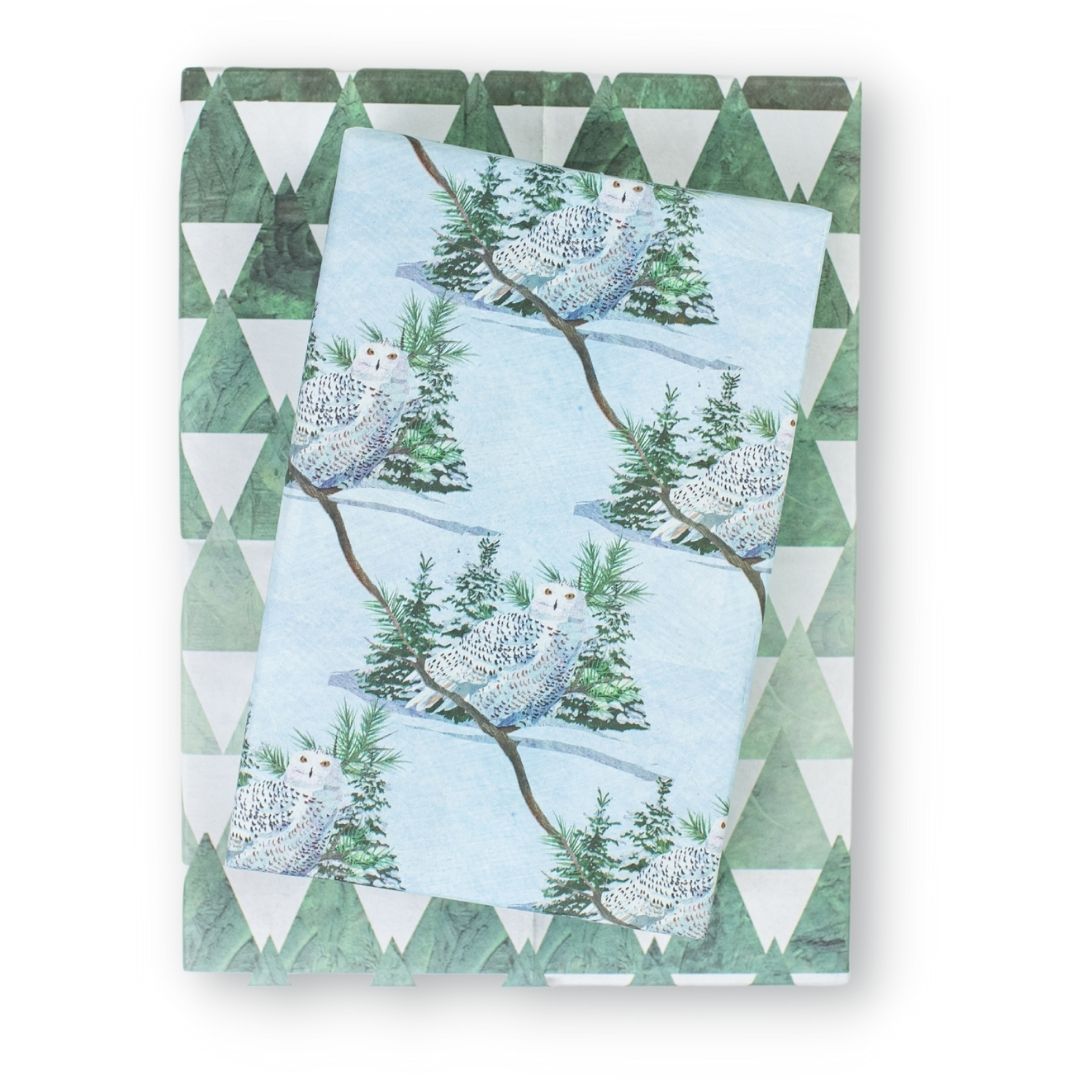
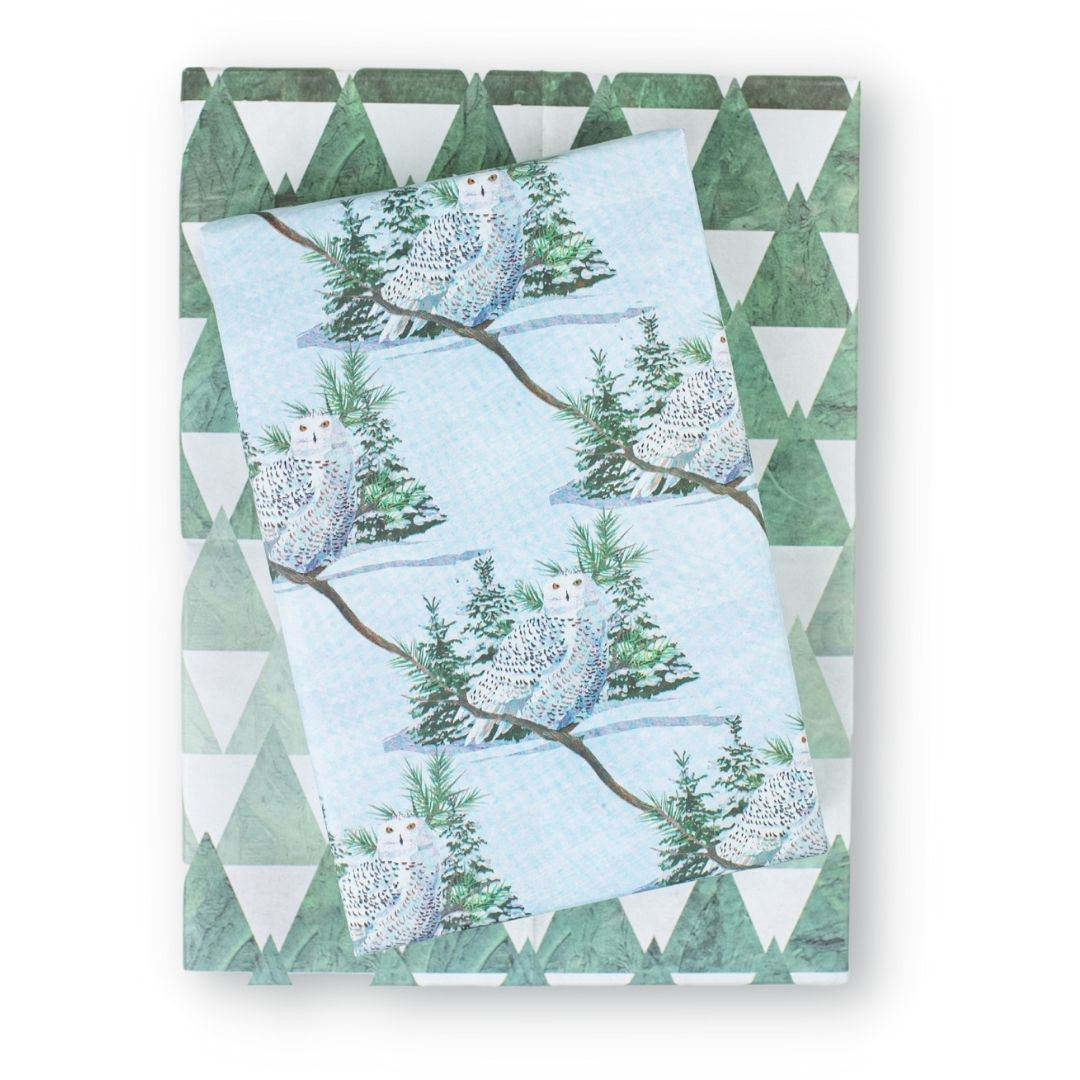


Snowy Owl
$10.80
Celebrate sustainably with our recycled and recyclable wrapping paper featuring a Snowy White Owls & Ombre Christmas Tree Patterns designed by Mother-Son duo, Two Can Art! Reversible patterns make holiday gift wrapping fun! Paper works great for crafting, too.
Package includes three double-sided wrapping paper sheets + adhesive gift tags
• Sheet size 21.5" x 34"
• Premium newsprint + soy-based inks = eco-friendly wrapping paper
• Plastic-free PLA packaging
• Flat, folded sheet for easy storage
• No unnecessary cardboard tube
• 100% recyclable and compostable
• Milled, printed and packaged in Washington State
JOIN the mission to green-up gifting!
#wrapriprecycle #wraphappy #gifthappily


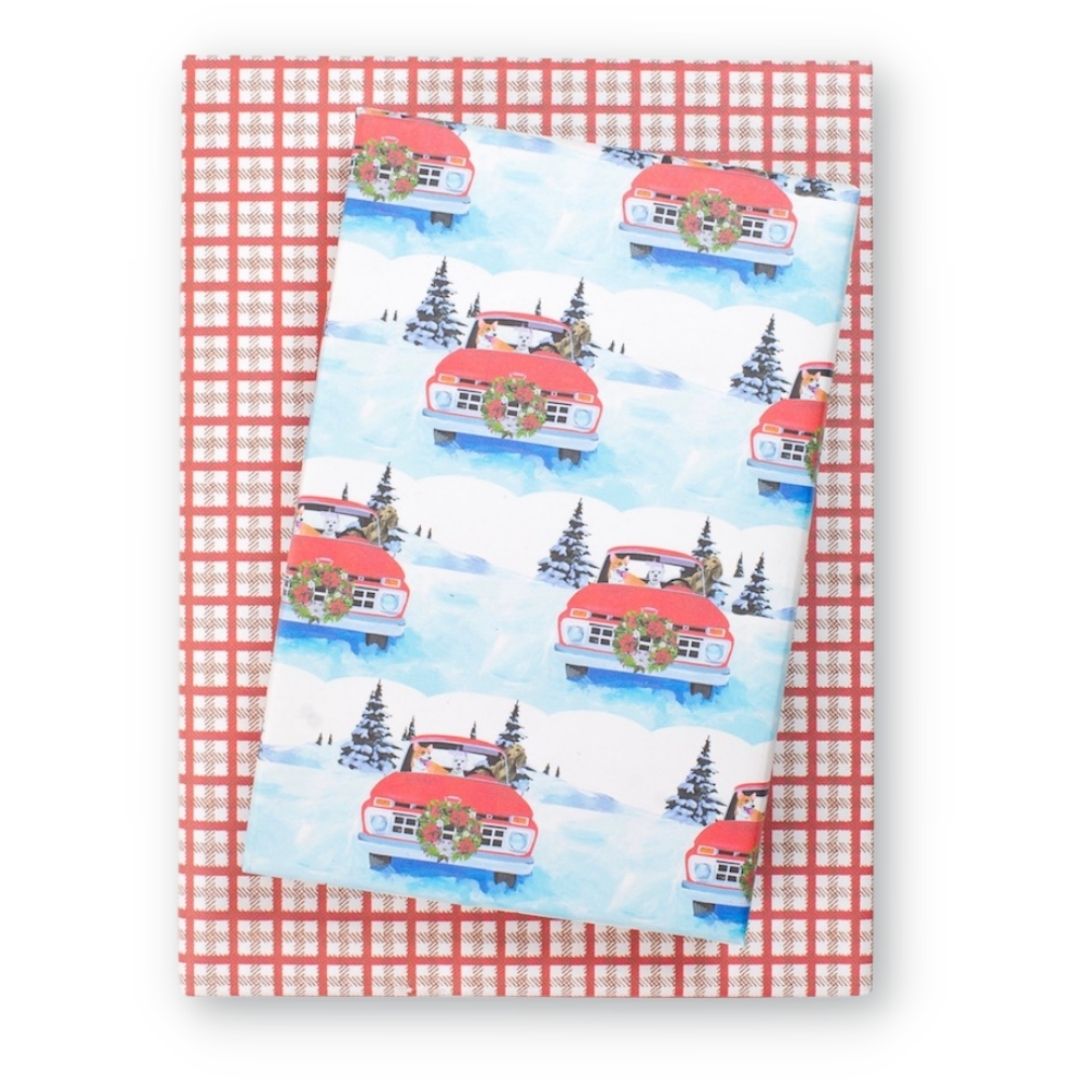
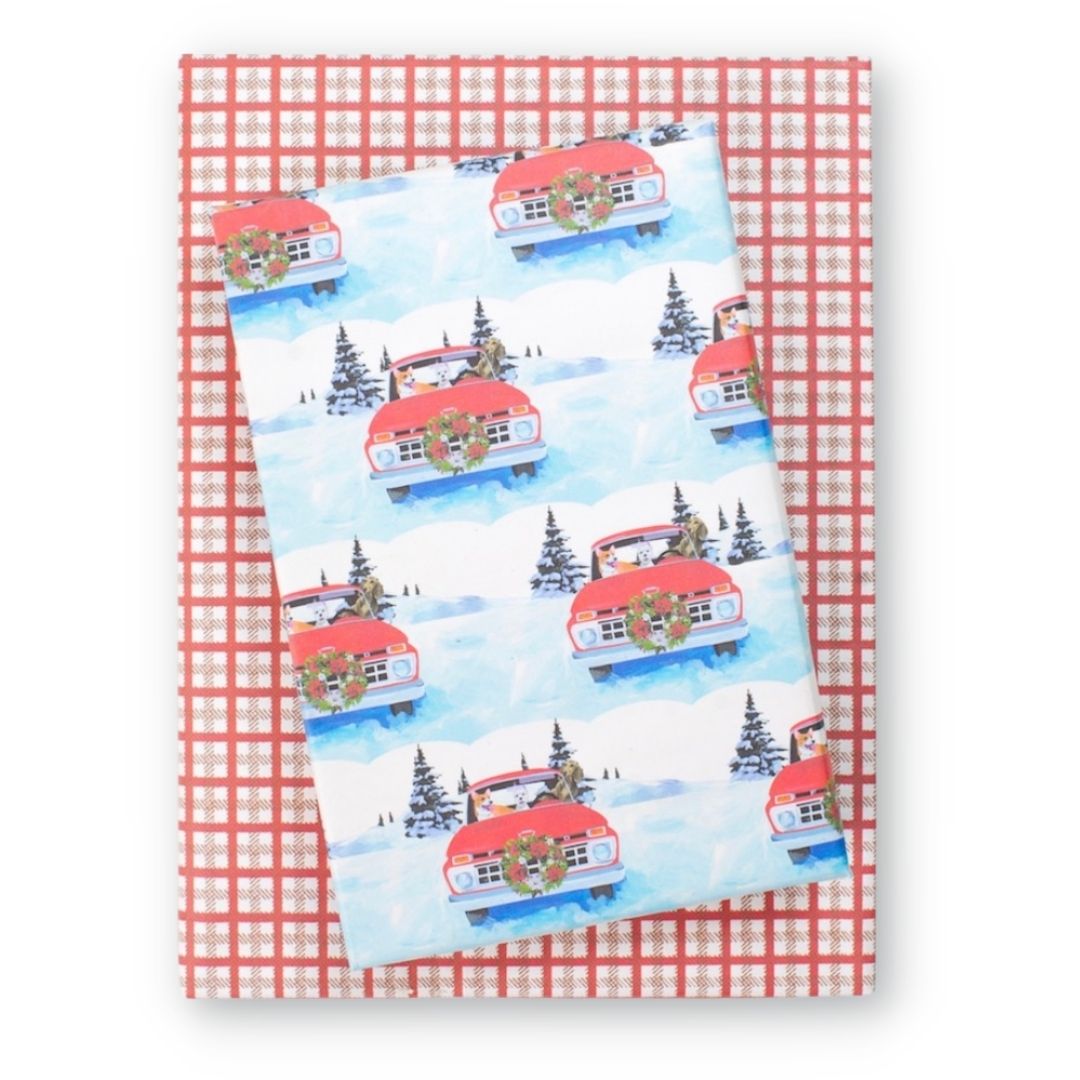


Red Truckin' Dogs by Allport Editions
$11.99
– Sold OutMix country charm with a touch of nostalgia and top with a dash of perfect holiday plaid. Artist Scott Church's collection of fun-loving animals are top-selling favorites at Portland-based stationers, Allport Editions. Rendered primarily in acrylics, his frolicking wildlife display an earnest joy that leaps off of the page. Package includes three sheets of wrapping paper with a coordinating textile pattern on the back for easy mix-n-match gift wrapping.
Package includes three double-sided wrapping paper sheets + adhesive gift tags
• Sheet size 21.5" x 34"
• Premium newsprint + soy-based inks = eco-friendly wrapping paper
• Plastic-free PLA packaging
• Flat, folded sheet for easy storage
• No unnecessary cardboard tube
• 100% recyclable and compostable
• Milled, printed and packaged in Washington State


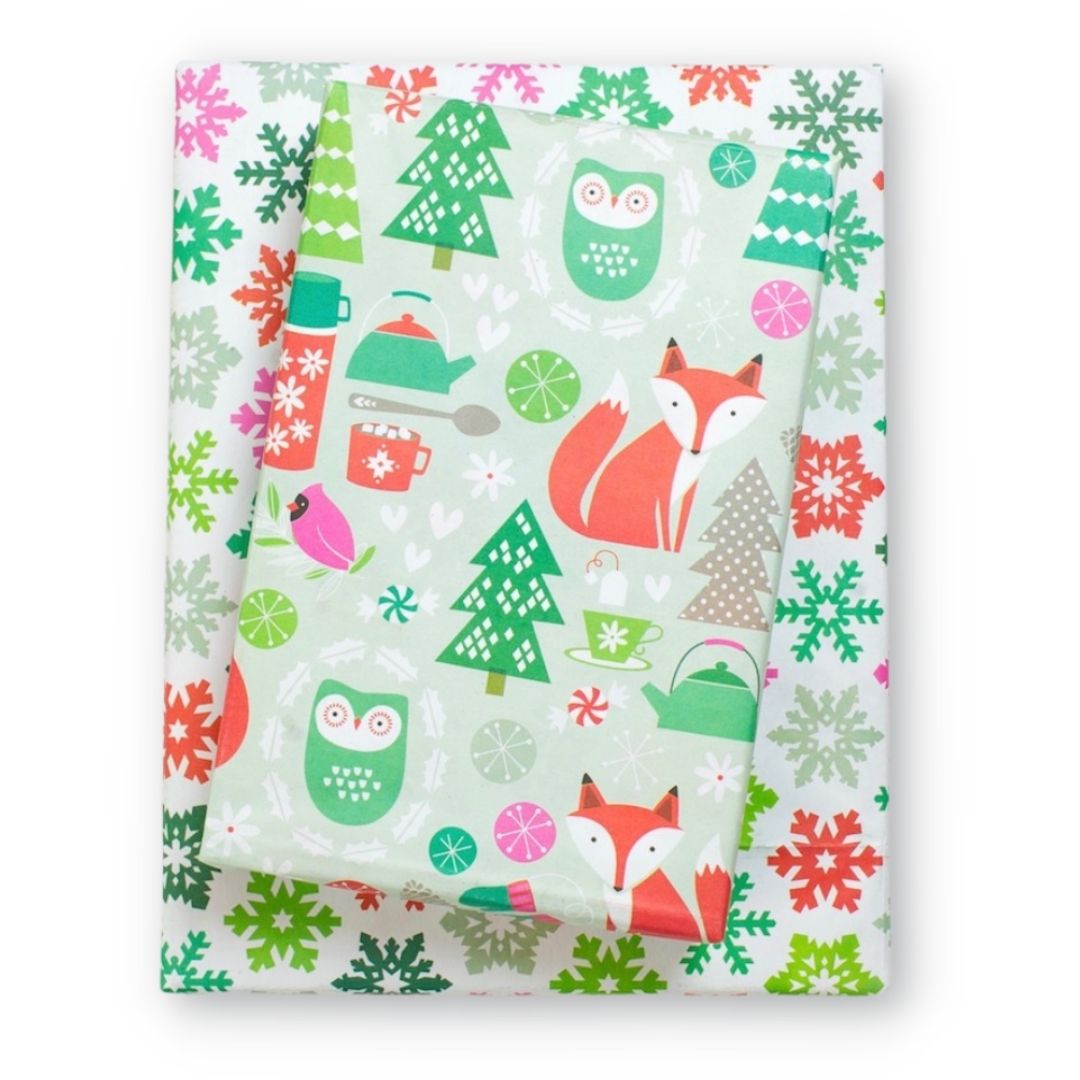
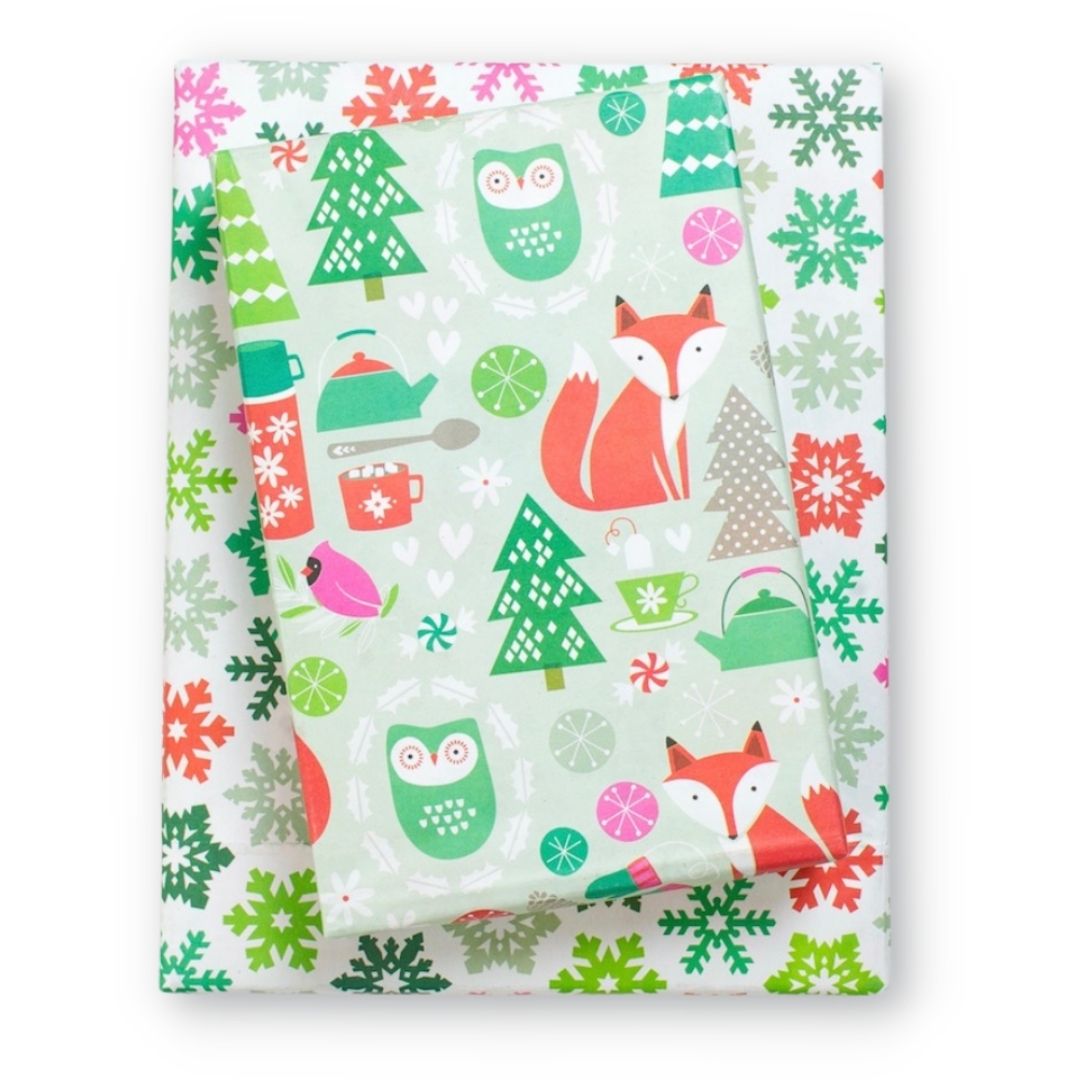


Festive Forest/ Snowflake Confetti
$10.80
-
What could be sweeter than a festive woodland forest scene including hot cocoa, wooly mittens, and the cutest foxes around? A confetti of cheery snowflakes sets off the party. (And yes, we do think pink is perfect for Christmas!) Professional surface designer Nadia Hassan created this collection, her whimsical patterns and warm, inviting colors ensure your gifts will look stunning stacked under the tree.
-
Reversible gift wrap sheets come flat and folded with complementary gift tag stickers. Full sheet size is 21.5" x 34". Printed in Washington State on recycled and recyclable newsprint.


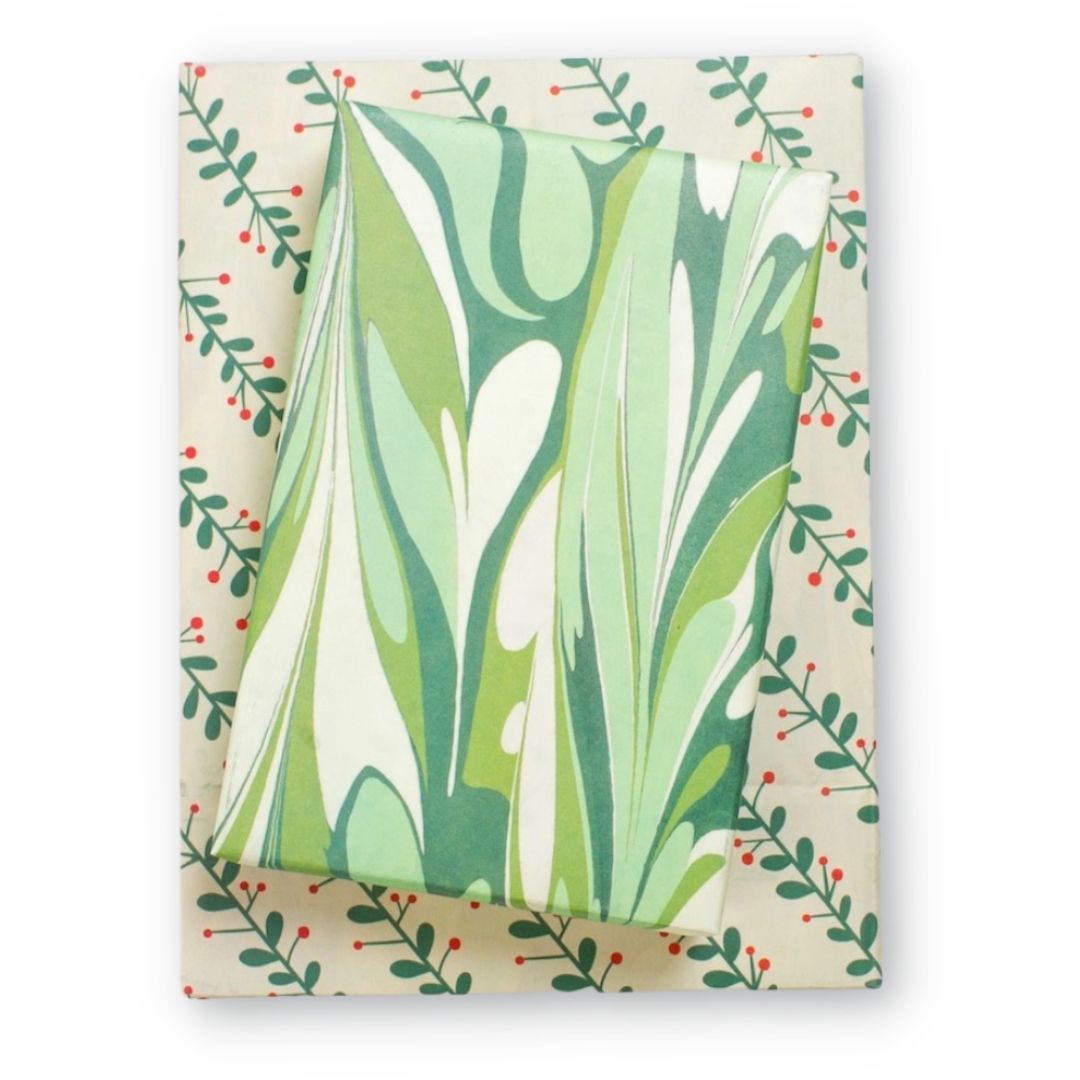
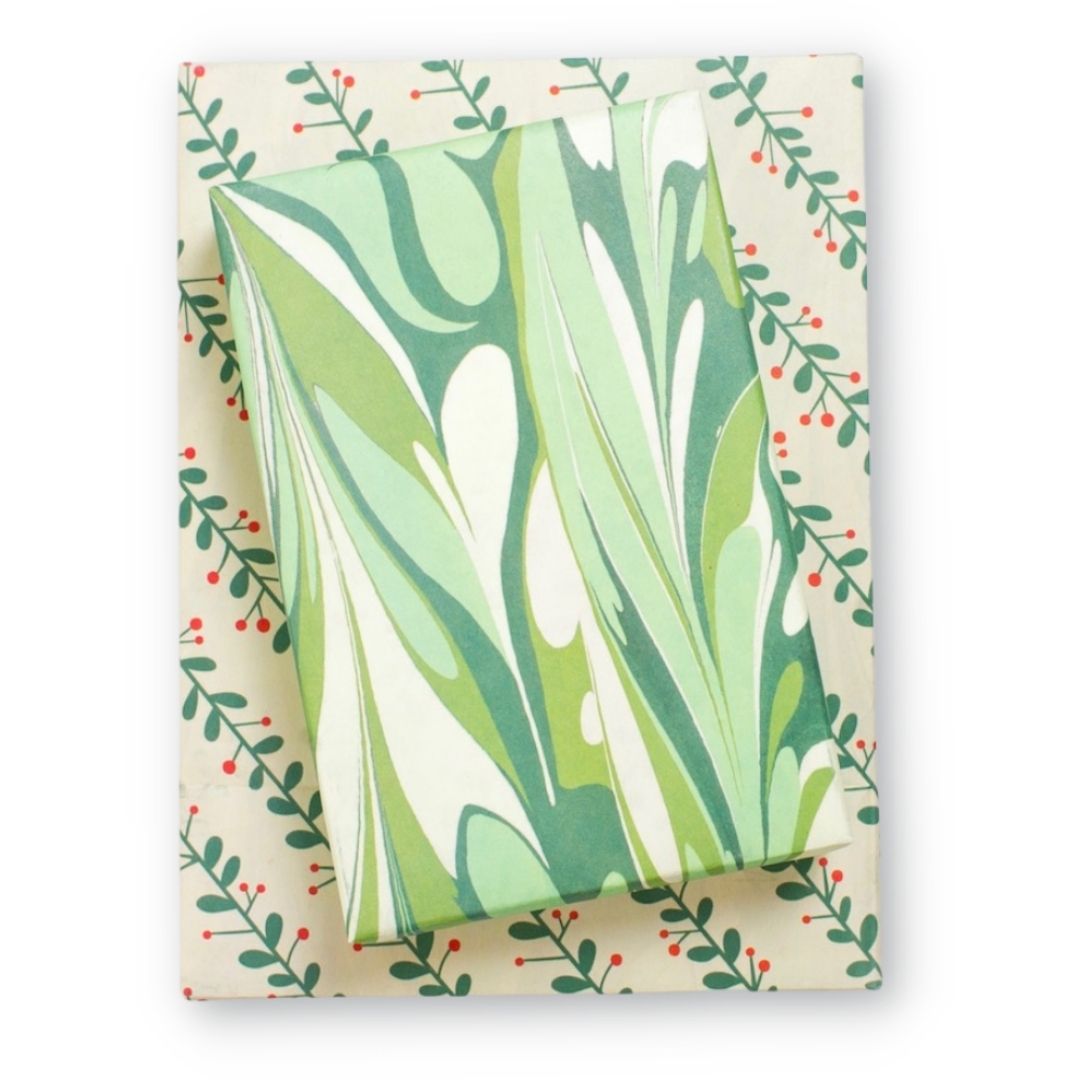


Marbled/ Mistletoe
$10.80
Swirls of festive green and a classic winter botanical – make your holiday gift wrapping a work of art with this fresh duo designed by Nadia Hassan (who else would hand marble paper then turn it into a repeating pattern?!) Paired with Poinsettias/ Painterly, we'd call this holiday collection artfully done.
Package includes three double-sided wrapping paper sheets + adhesive gift tags
• Sheet size 21.5" x 34"
• Premium newsprint + soy-based inks = eco-friendly wrapping paper
• Plastic-free PLA packaging
• Flat, folded sheet for easy storage
• No unnecessary cardboard tube
• 100% recyclable and compostable
• Milled, printed and packaged in Washington State


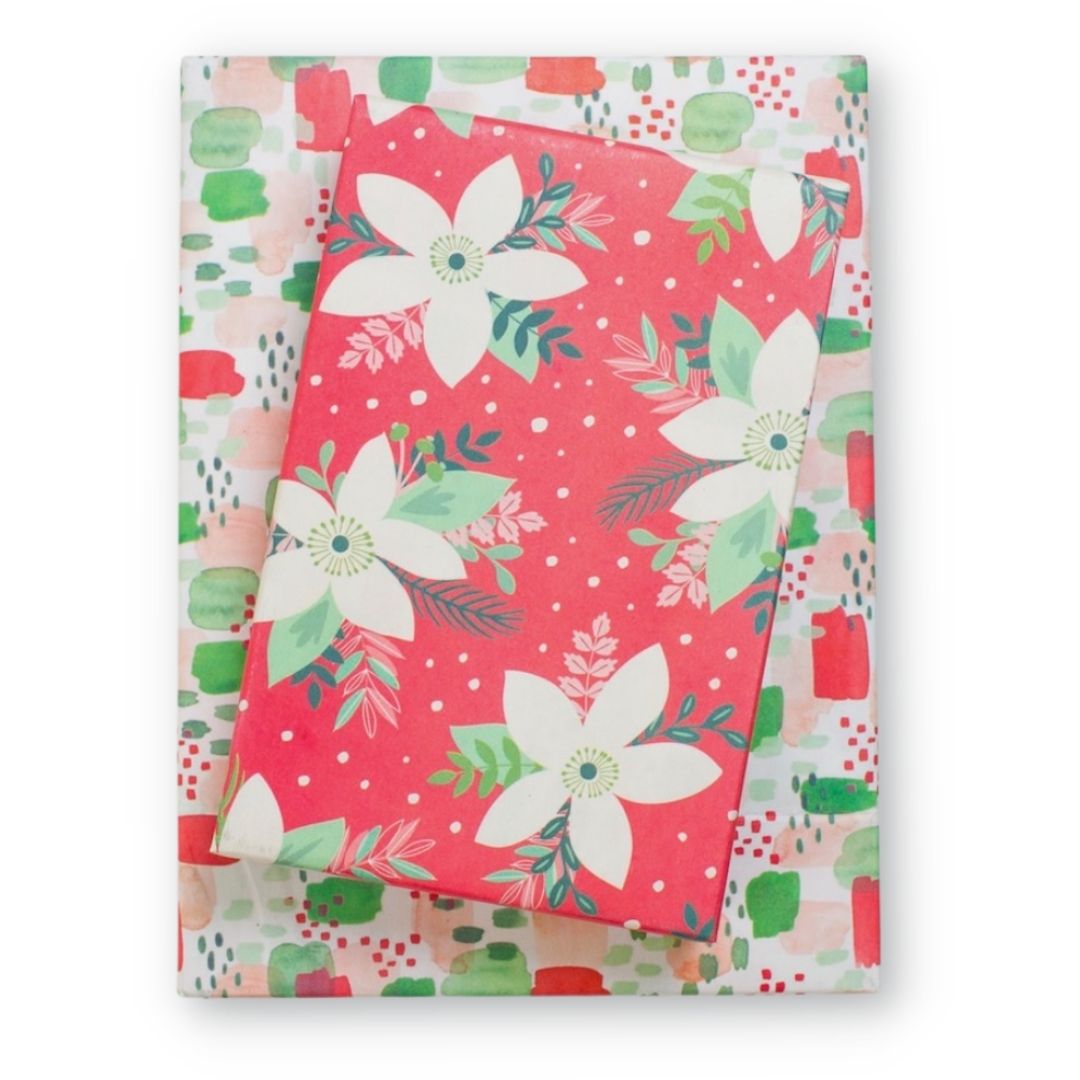
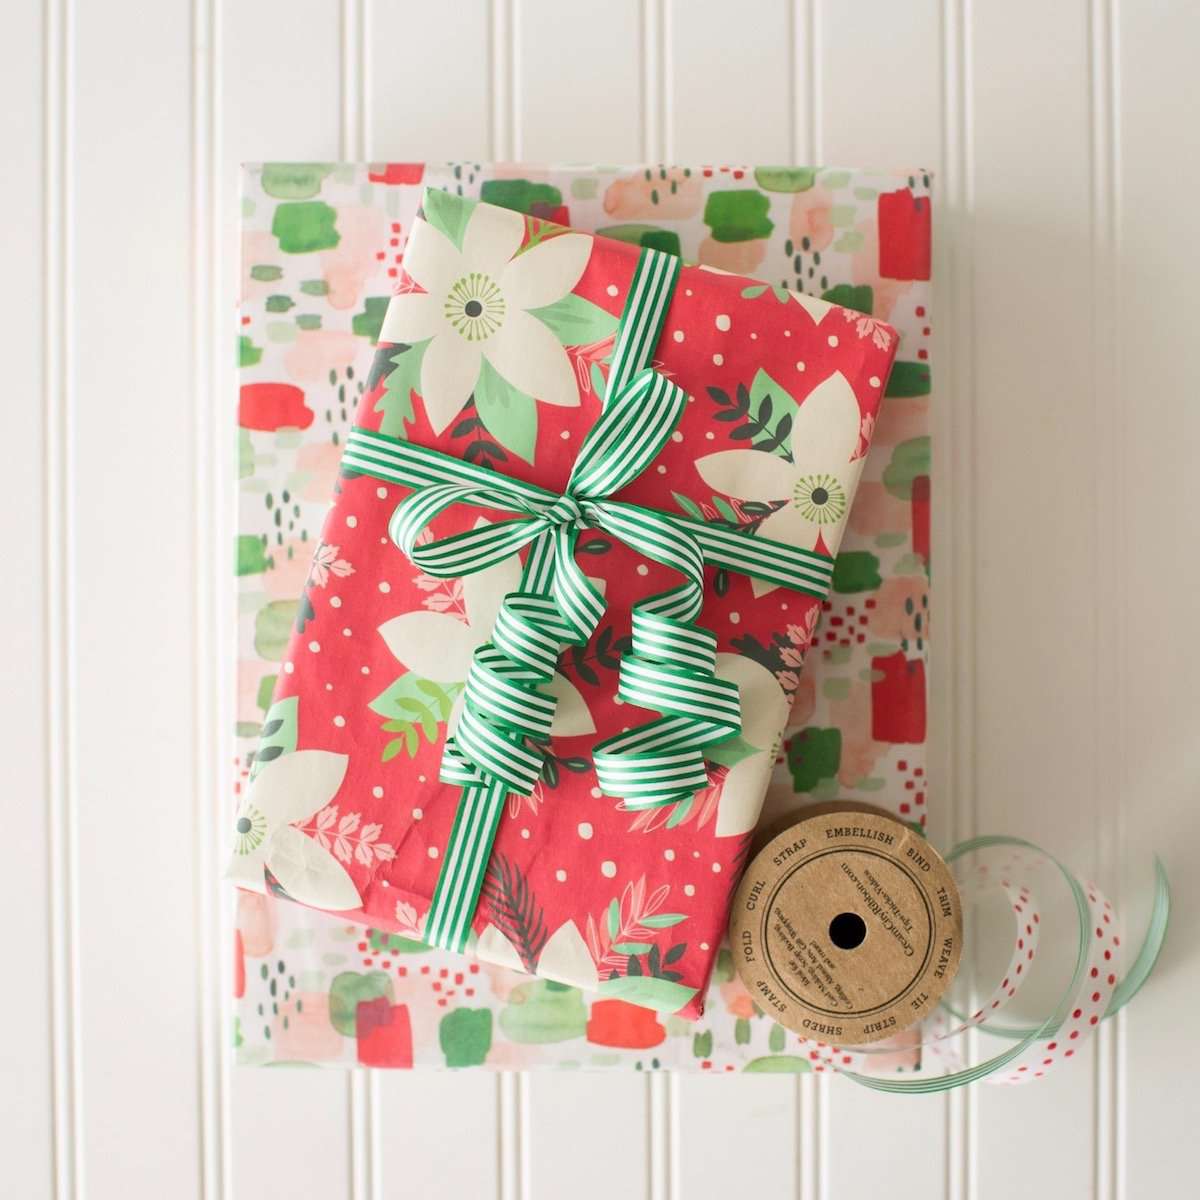


Poinsettia/ Painterly
$10.80
-
Va-va-va-bloom! Make your Christmas gift wrapping a work of art with this festive duo designed by Nadia Hassan. Poinsettias that really pop, and the hand-painted watercolor pattern? It's a sheer brushstroke of genius. Paired with Marbled/ Mistletoe, this holiday collection artfully done.
-
Wrappily's reversible gift wrap sheets come flat and folded with complementary gift tag stickers. Sheet size is 21.5" x 34". Printed in Washington State on recycled and recyclable newsprint.


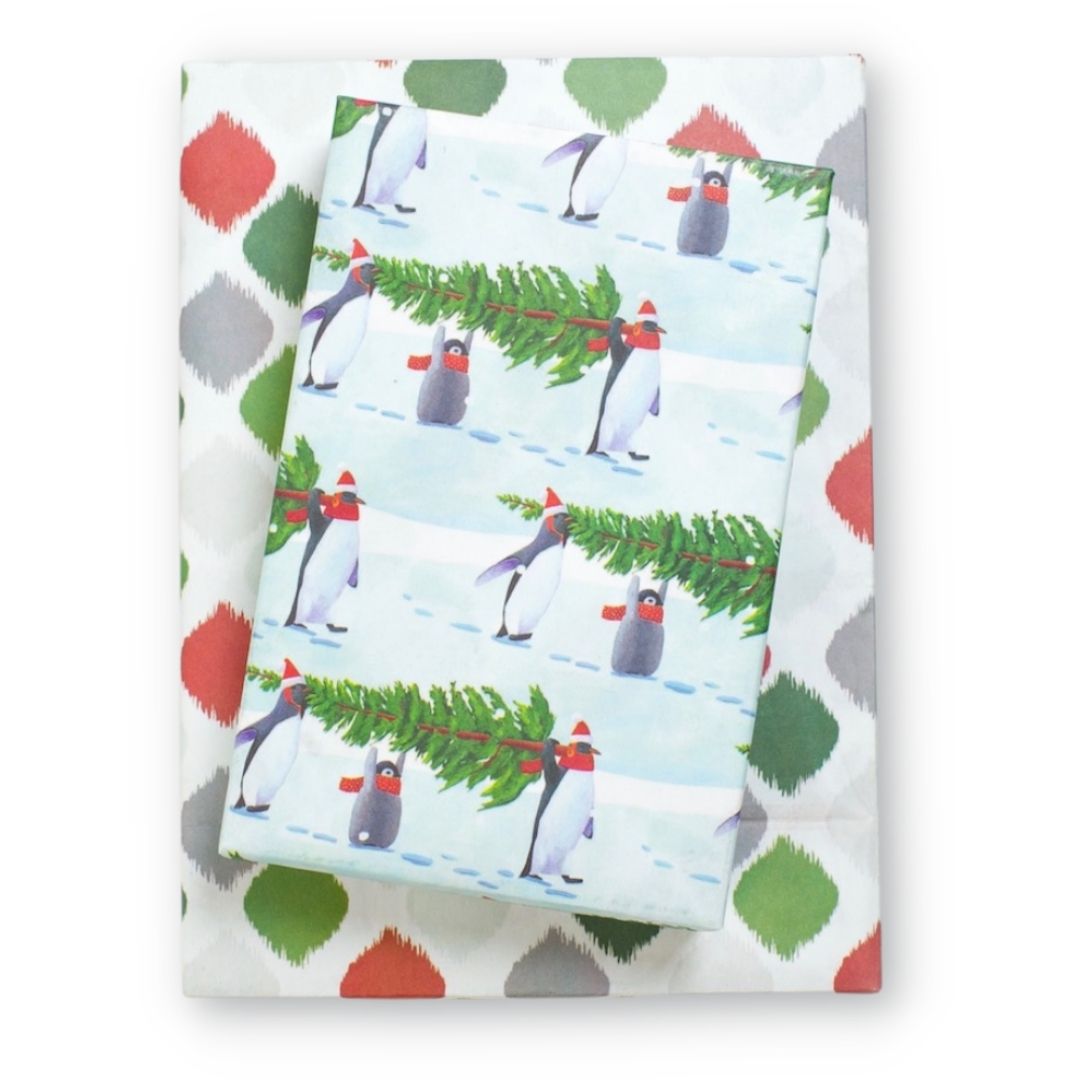
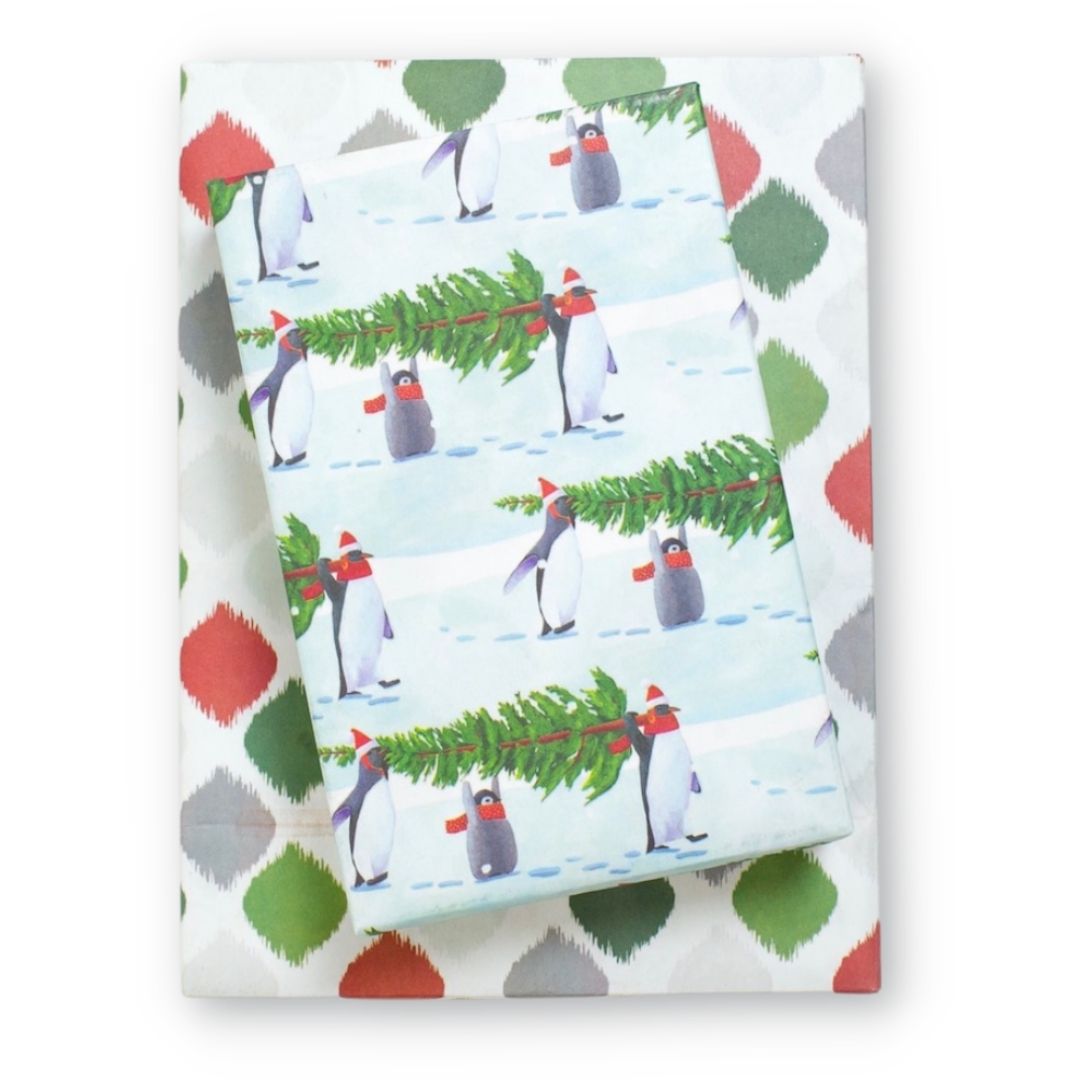


Penguin Trees By Allport Editions
$8.99
– Sold OutA march of the penguins decked in full holiday cheer! Artist Scott Church's collection of fun-loving animals are top-selling favorites at Portland-based stationers, Allport Editions. Rendered primarily in acrylics, his frolicking wildlife display an earnest joy that leaps off of the page.
Package includes three double-sided wrapping paper sheets + adhesive gift tags
• Sheet size 21.5" x 34"
• Premium newsprint + soy-based inks = eco-friendly wrapping paper
• Plastic-free PLA packaging
• Flat, folded sheet for easy storage
• No unnecessary cardboard tube
• 100% recyclable and compostable
• Milled, printed and packaged in Washington State


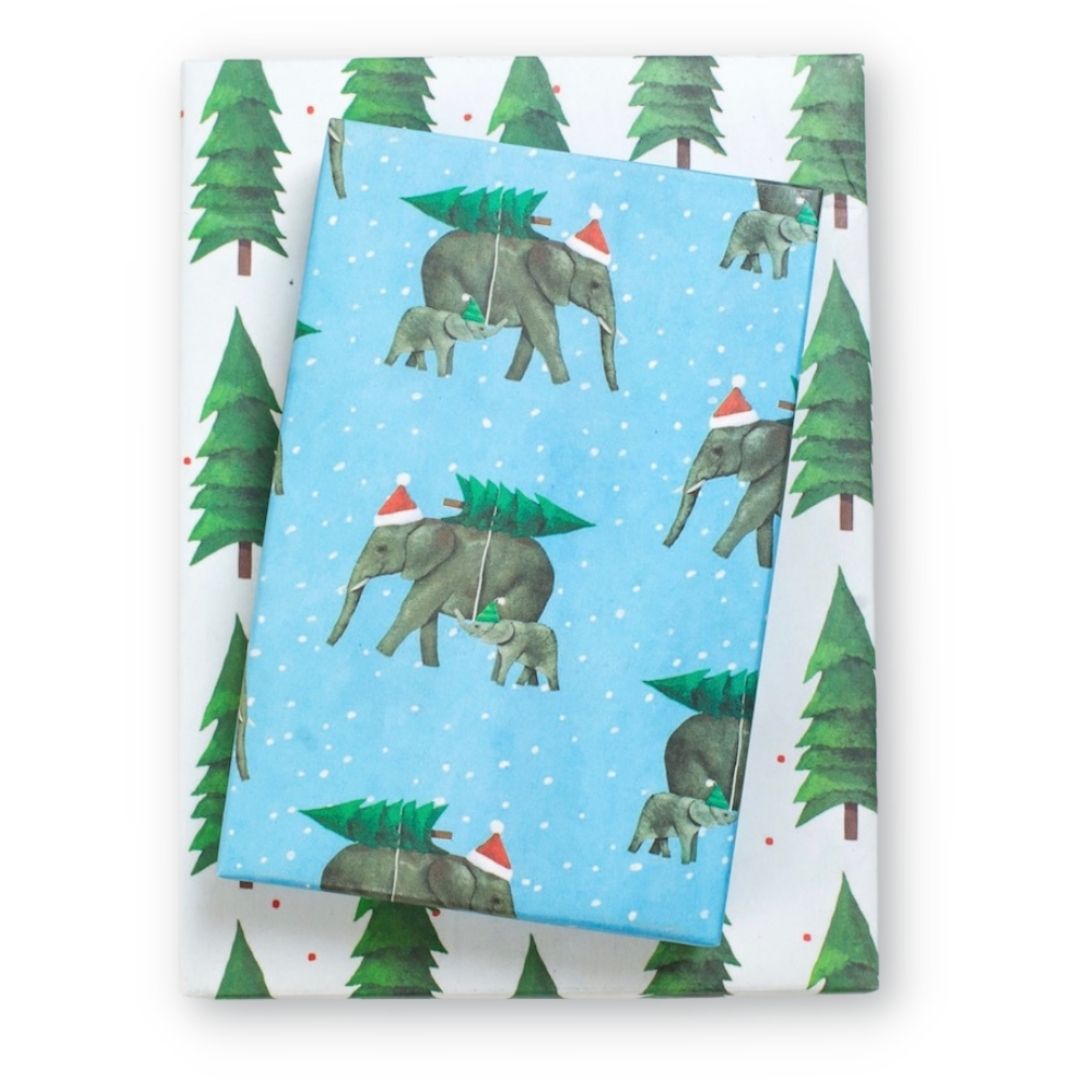
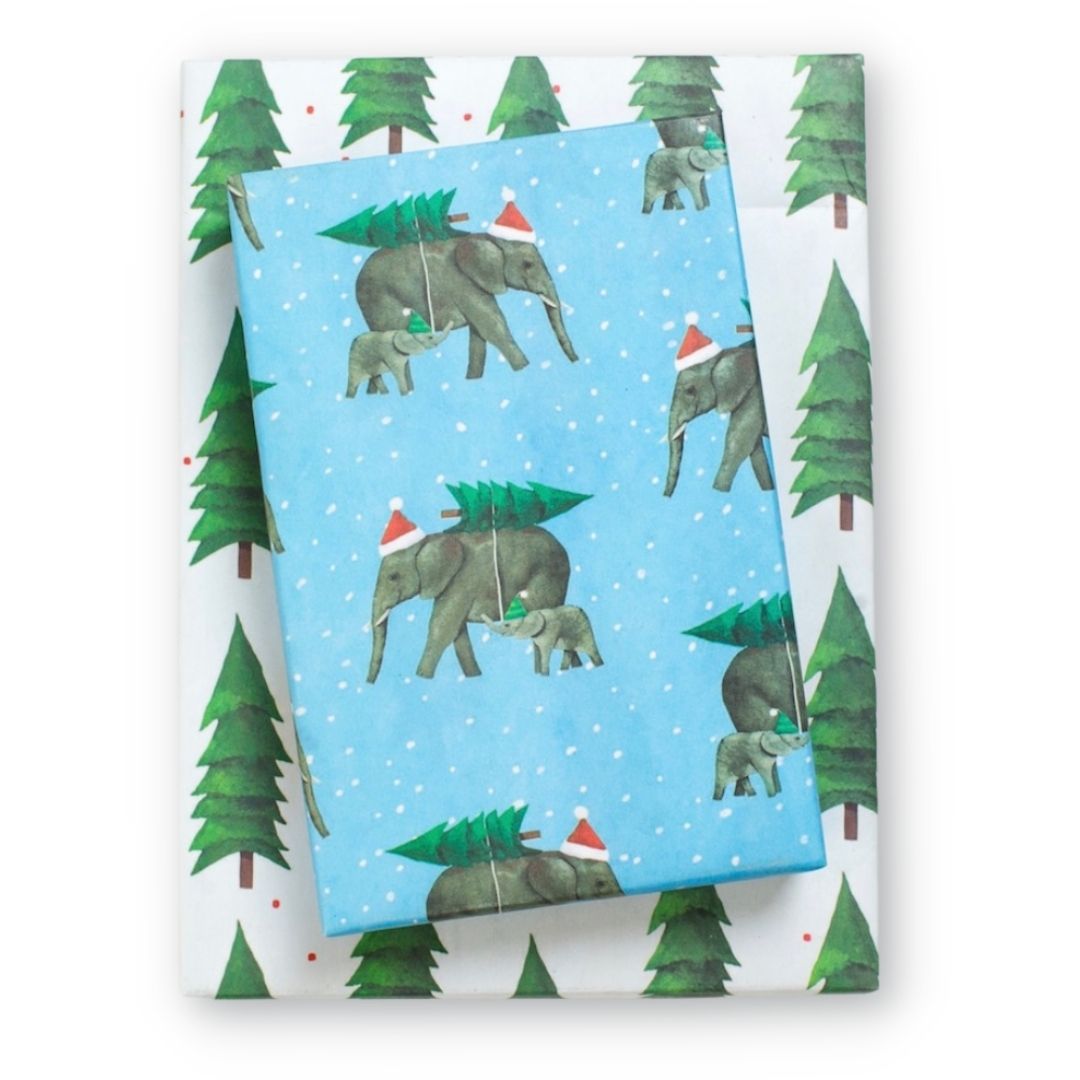


Elephants - Double-sided Eco Wrapping Paper for Christmas & Holidays
$10.80
Festive elephants portray a family-favorite holiday tradition, fetching the Christmas tree. Artist Scott Church's collection of fun-loving animals are top-selling favorites at Portland-based stationers, Allport Editions. Rendered primarily in acrylics, his frolicking wildlife display an earnest joy that leaps off of the page.
Package includes three double-sided wrapping paper sheets + adhesive gift tags
• Sheet size 21.5" x 34"
• Premium newsprint + soy-based inks = eco-friendly wrapping paper
• Plastic-free PLA packaging
• Flat, folded sheet for easy storage
• No unnecessary cardboard tube
• 100% recyclable and compostable
• Milled, printed and packaged in Washington State


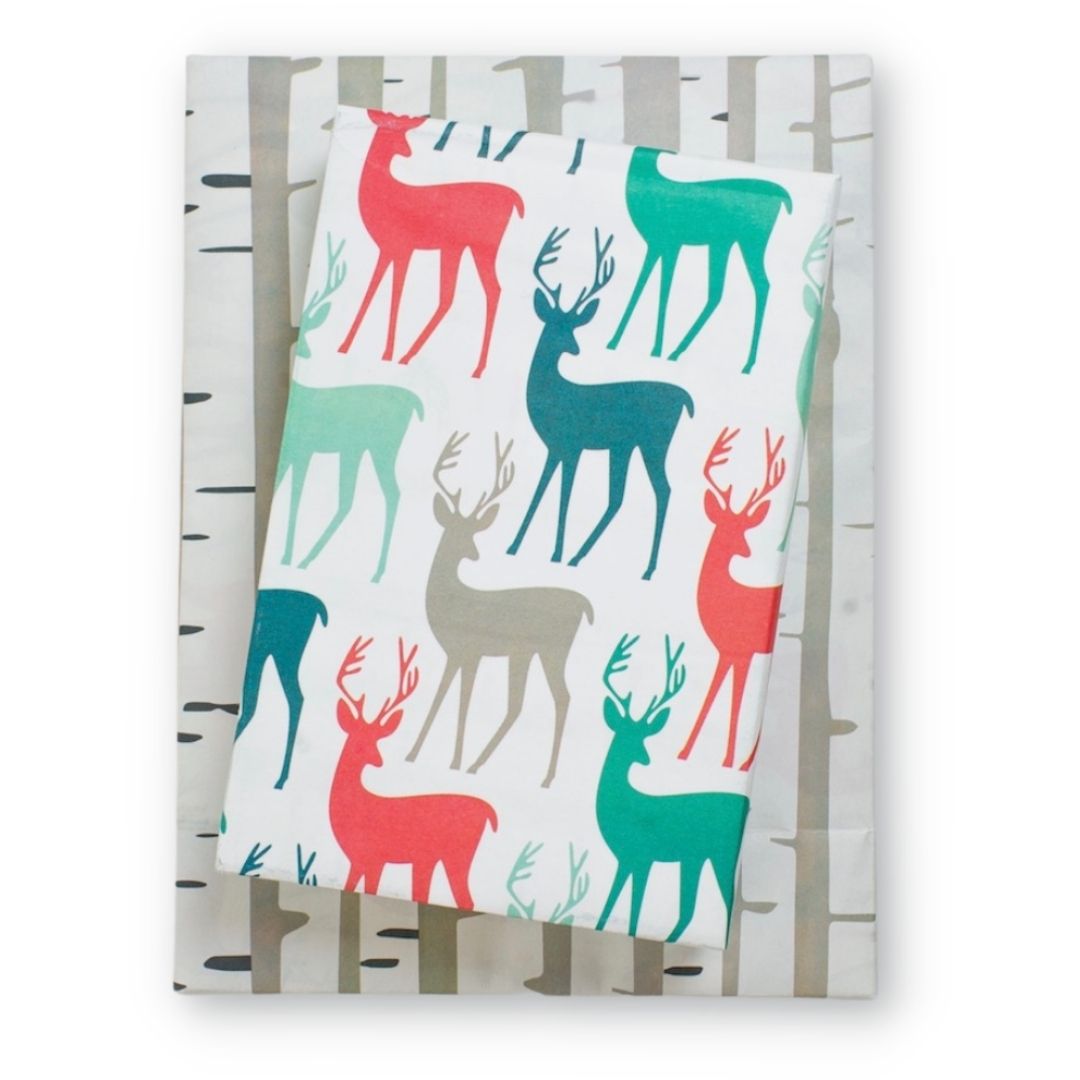
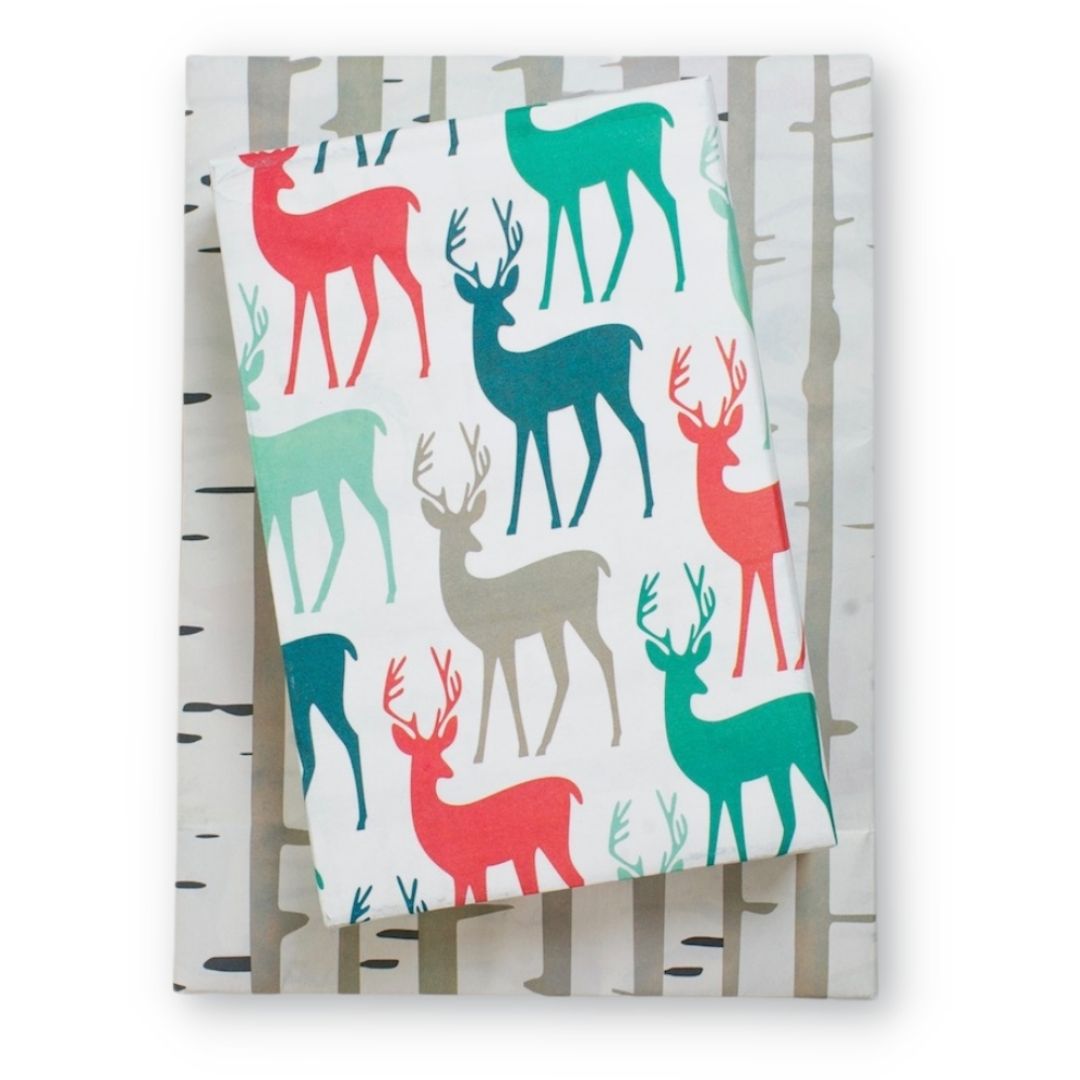

Stags/ Birch - 6-sheet value pack
$13.99
– Sold Out-
Handsome holiday gifts start here, with this elegant combo of birch trunks and colorful reindeer stags. Professional surface designer Nadia Hassan created this collection, her whimsical patterns and warm, inviting colors ensure your gifts will look stunning stacked under the tree.
-
Reversible gift wrap sheets come flat and folded with complementary gift tag stickers. Full sheet size is 21.5" x 34". Printed in Washington State on recycled and recyclable newsprint.


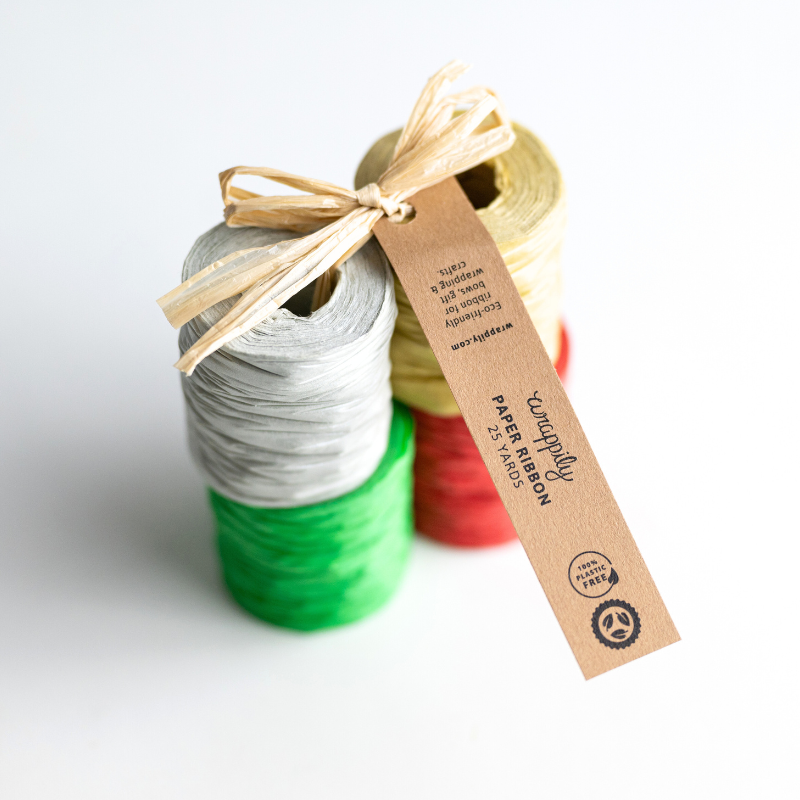
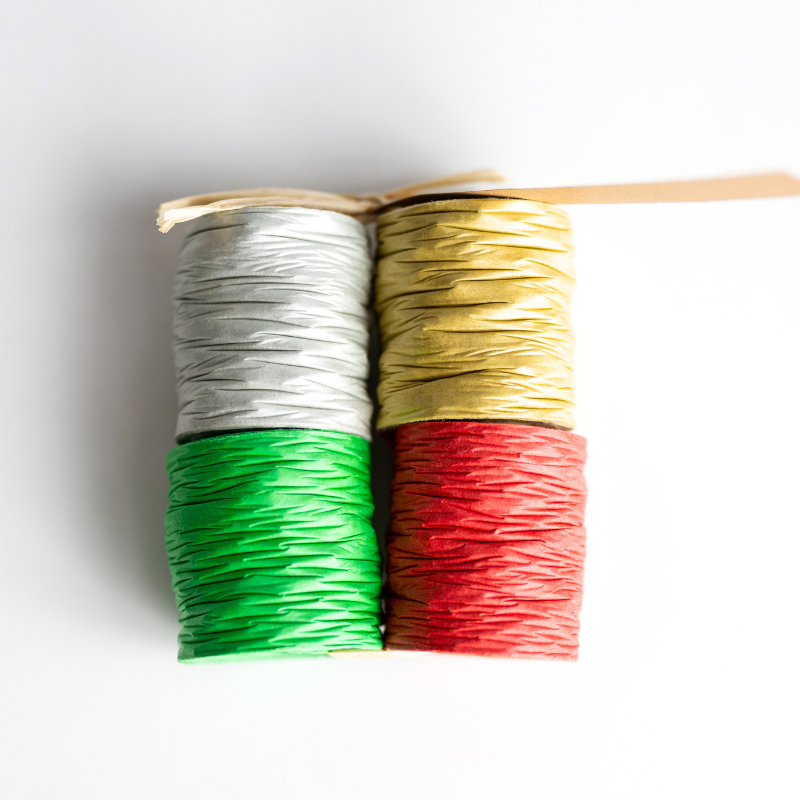


Multi-Spool Paper Ribbon Set - Christmas Mix
$24.99
– Sold OutA perfect accent to your holiday gift wrapping, our paper ribbon set includes four colors: red, green, gold, and silver. This eco-friendly ribbon adds a perfect pop of color and is recyclable, compostable and made with non-toxic, water soluble dyes. It's shapable, versatile, sturdy, and has a great crinkle texture allowing you to get creative tying-on that finishing touch to your gifts.
Each roll is approximately 1.5" wide and a generous 25 yards. Multi-spool set includes four ribbon colors for a total of 100 yards.


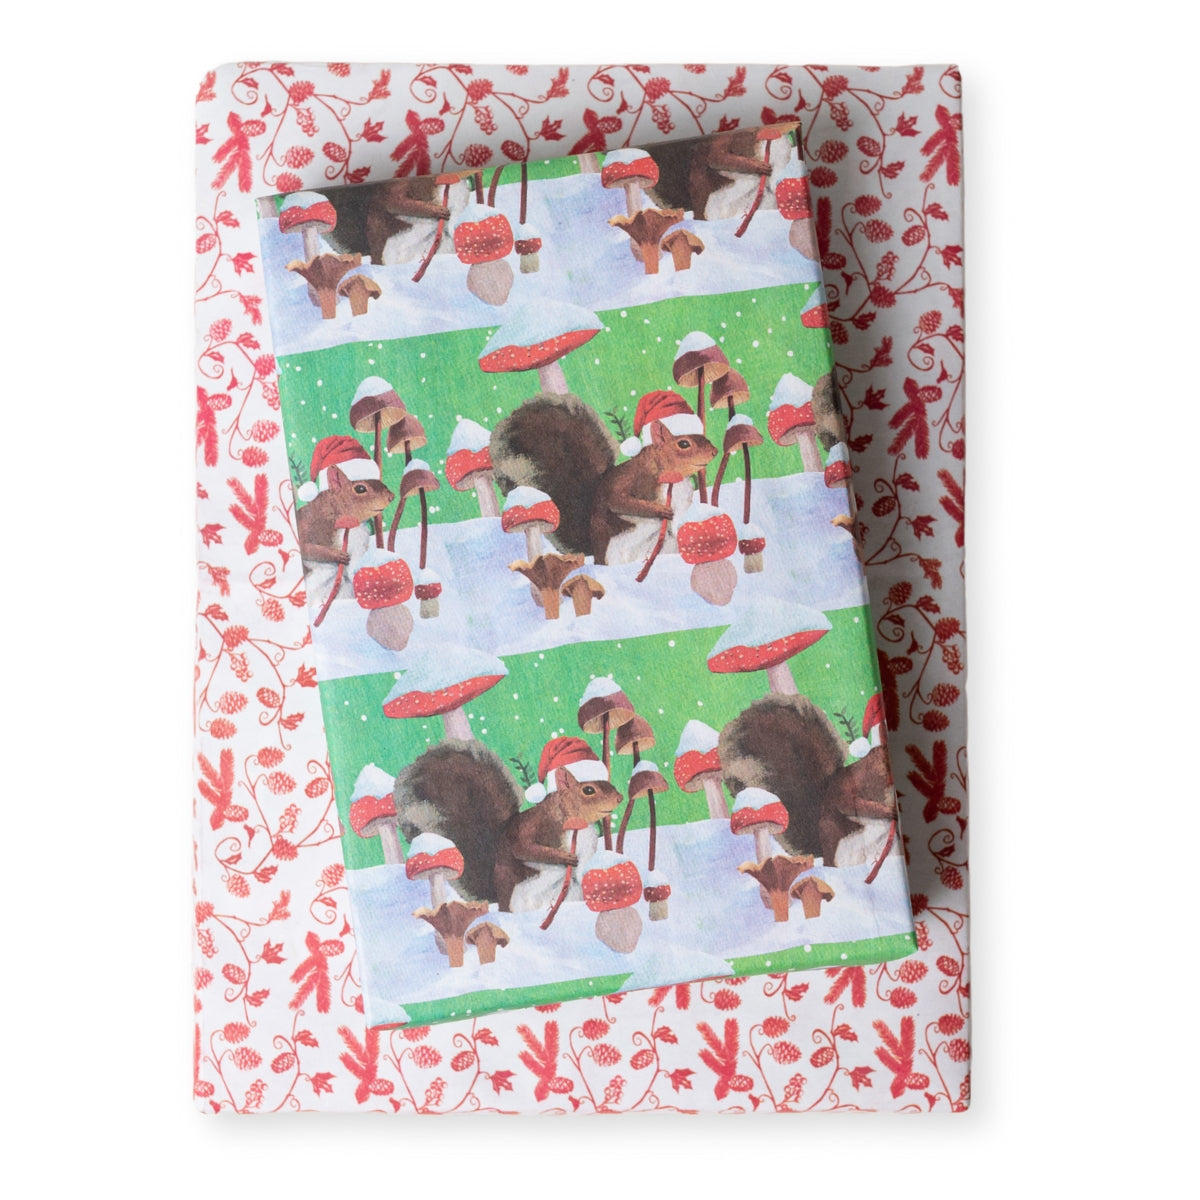
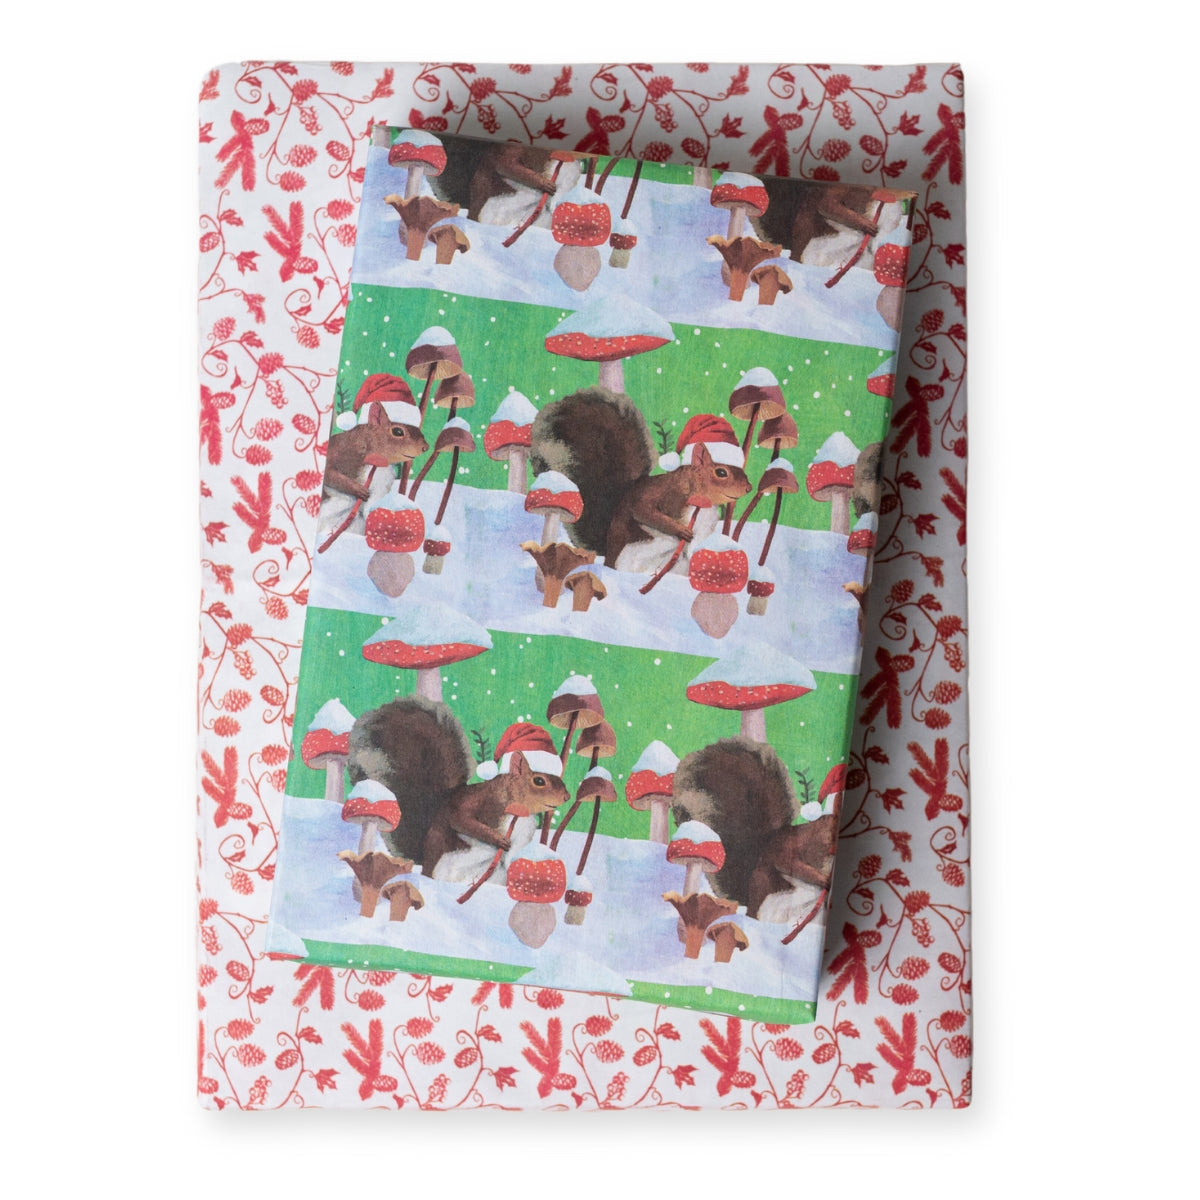


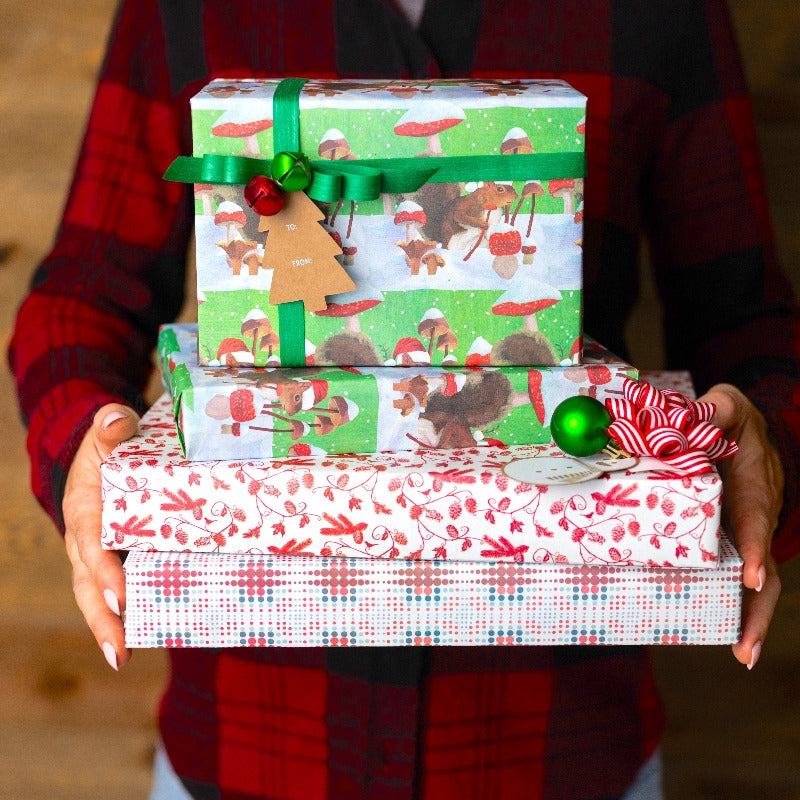
Holiday Squirrel & Mushrooms Double-sided Eco Wrapping Paper
$10.80
Wrap beautiful gifts this holiday season. Presenting the eco-friendly, double-sided wrapping paper of your dreams, this holiday squirrel snow scene with winter mushrooms is a new Wrappily exclusive by illustrator Scott Church for Allport Editions.
Celebrate sustainably with our recycled and recyclable wrapping paper. Reversible patterns make holiday gift wrapping fun! Paper works great for crafting, too.
Package includes three double-sided wrapping paper sheets + adhesive gift tags
• Sheet size 21.5" x 34"
• Premium newsprint + soy-based inks = eco-friendly wrapping paper
• Plastic-free PLA packaging
• Flat, folded sheet for easy storage
• No unnecessary cardboard tube
• 100% recyclable and compostable
• Milled, printed and packaged in Washington State
Join the mission to green-up gifting!
#wrapriprecycle #wraphappy #gifthappily


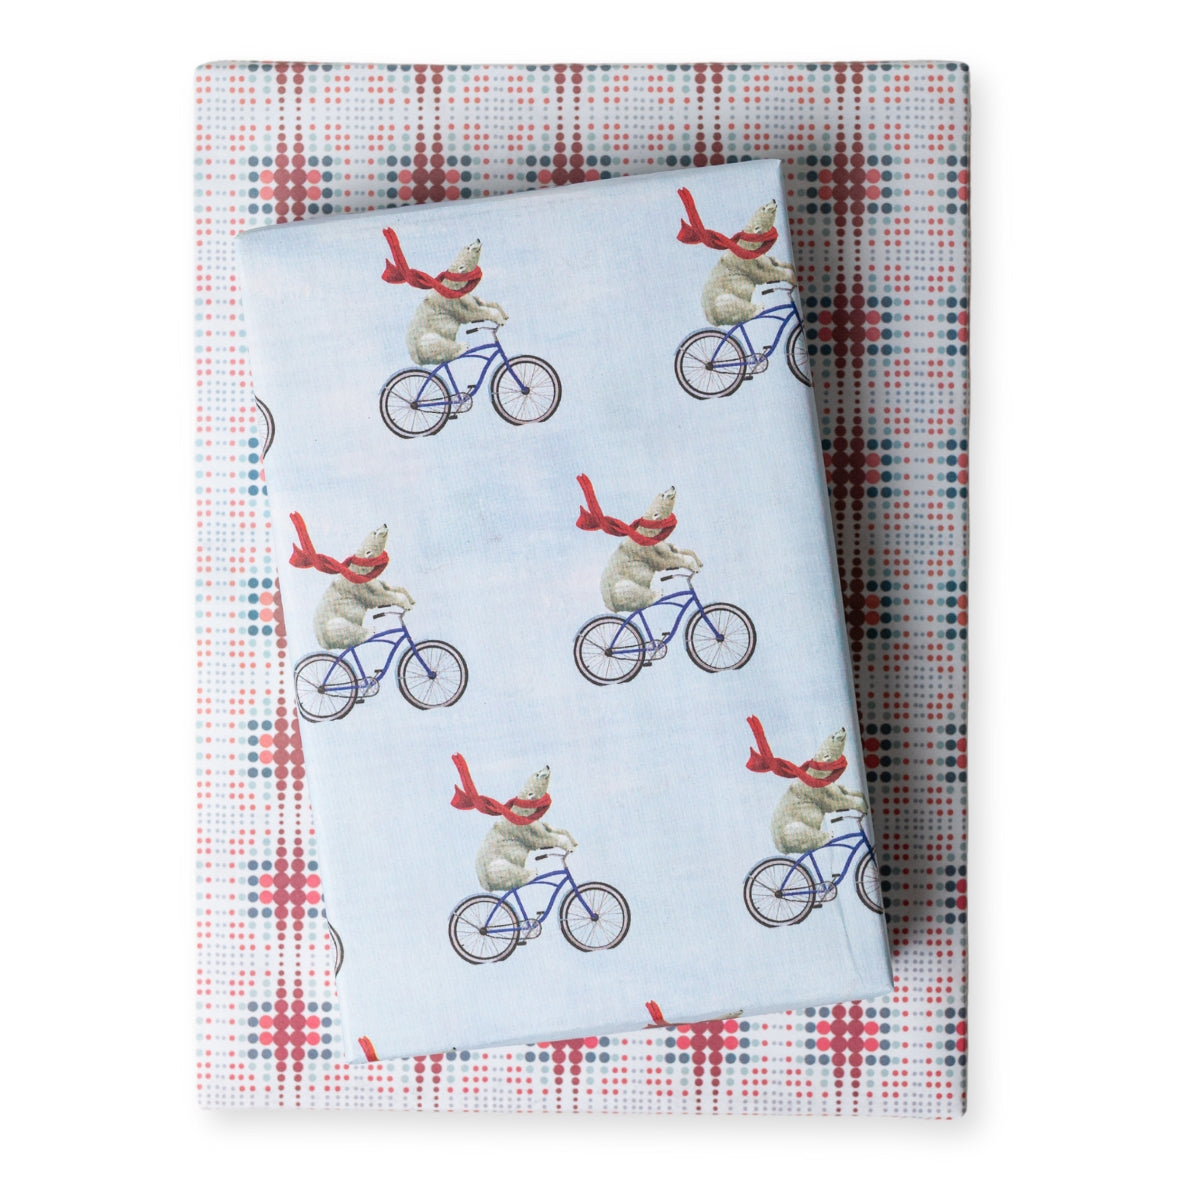
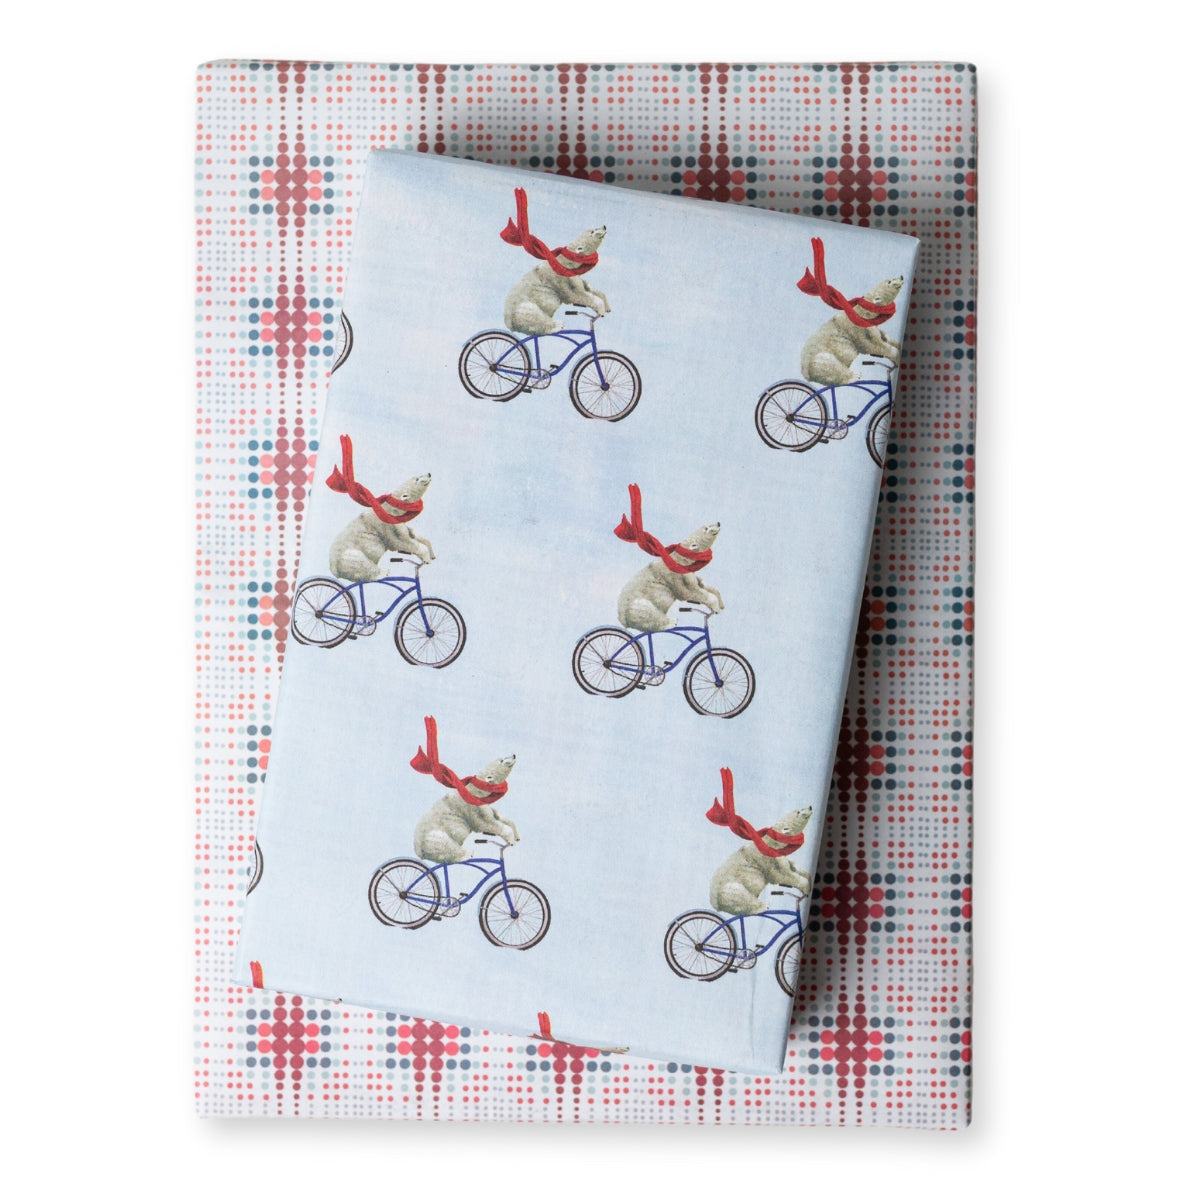


Polar Bear in Red Scarf Eco Holiday Gift Wrapping Paper - Reversible Patterns
$10.80
Wrap beautiful gifts this holiday season. Presenting the eco-friendly, double-sided wrapping paper of your dreams, this snowy scene bike riding Polar Bear with a red scarf is a new Wrappily exclusive by illustrator Scott Church for Allport Editions.
Celebrate sustainably with our recycled and recyclable wrapping paper. Reversible patterns make holiday gift wrapping fun. Reversible patterns work great for crafting, too.
Package includes three double-sided wrapping paper sheets + adhesive gift tags
• Sheet size 21.5" x 34"
• Premium newsprint + soy-based inks = eco-friendly wrapping paper
• Plastic-free PLA packaging
• Flat, folded sheet for easy storage
• No unnecessary cardboard tube
• 100% recyclable and compostable
• Milled, printed and packaged in Washington State
Join the mission to green-up gifting!
#wrapriprecycle #wraphappy #gifthappily